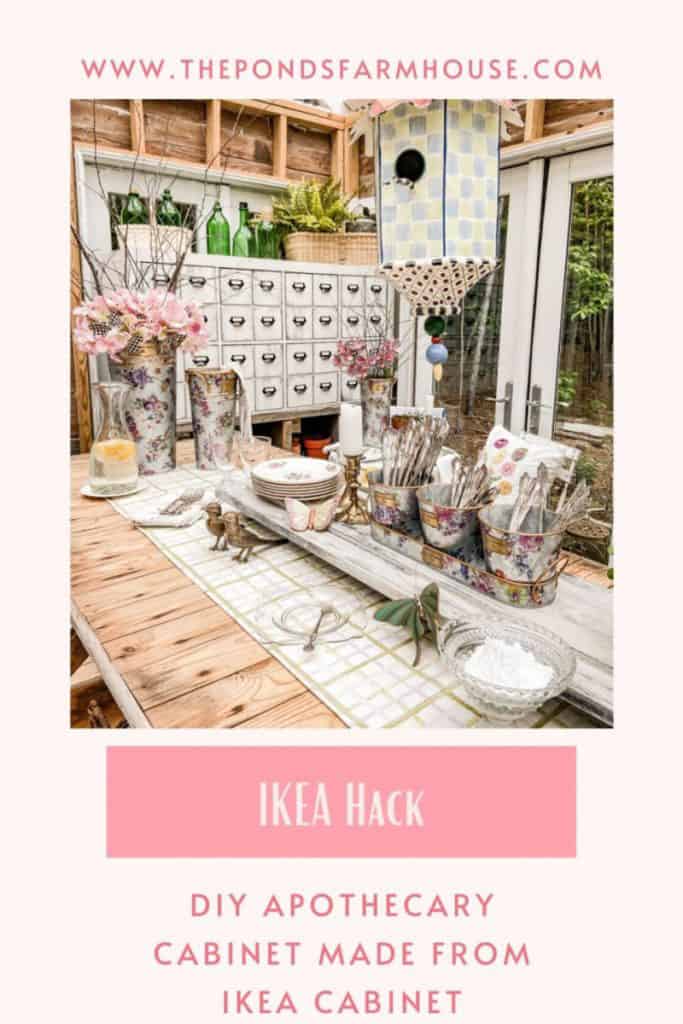
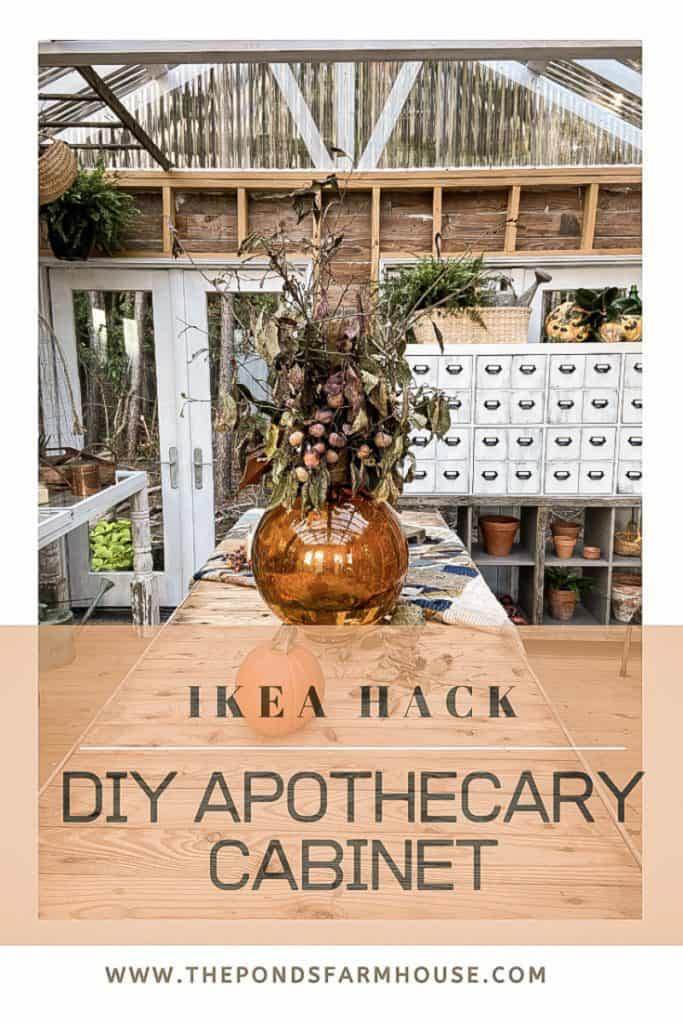
DIY Faux Apothecary Cabinet – (Card File Chest)
Are you a lover of Apothecary Cabinets, or do you call them Card File Chests? Anything with small drawers, even fake ones, will catch my attention.
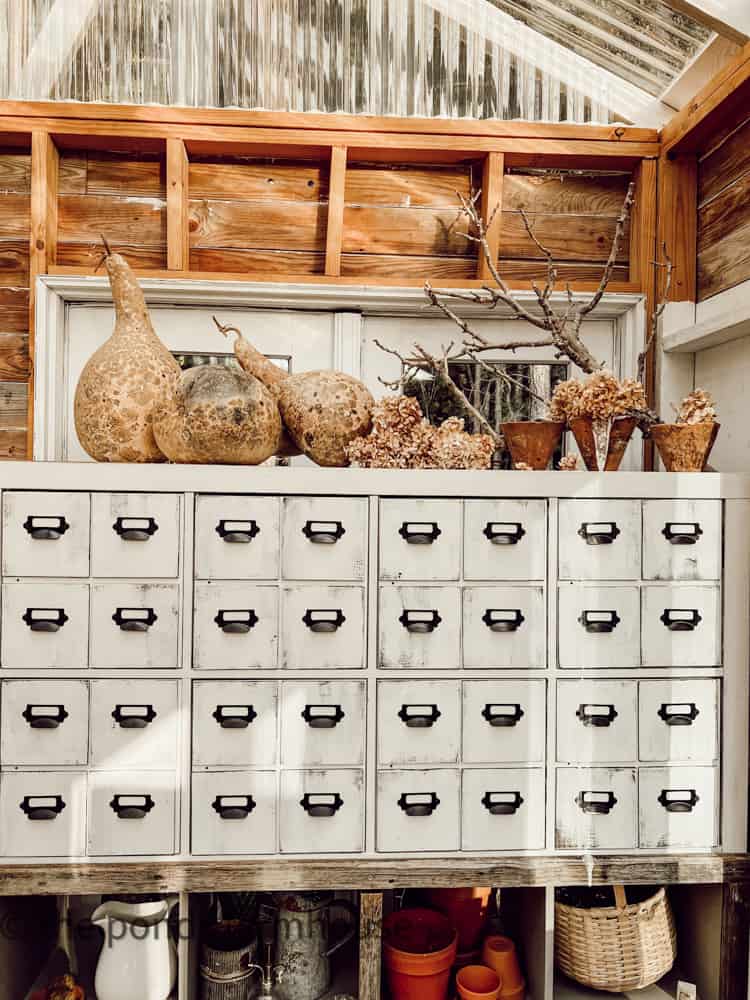
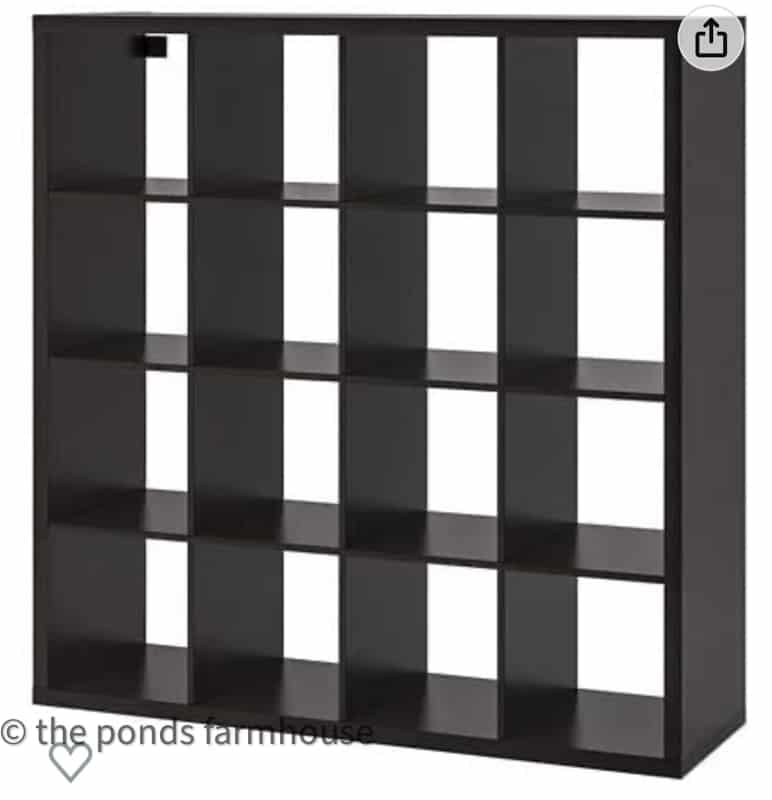
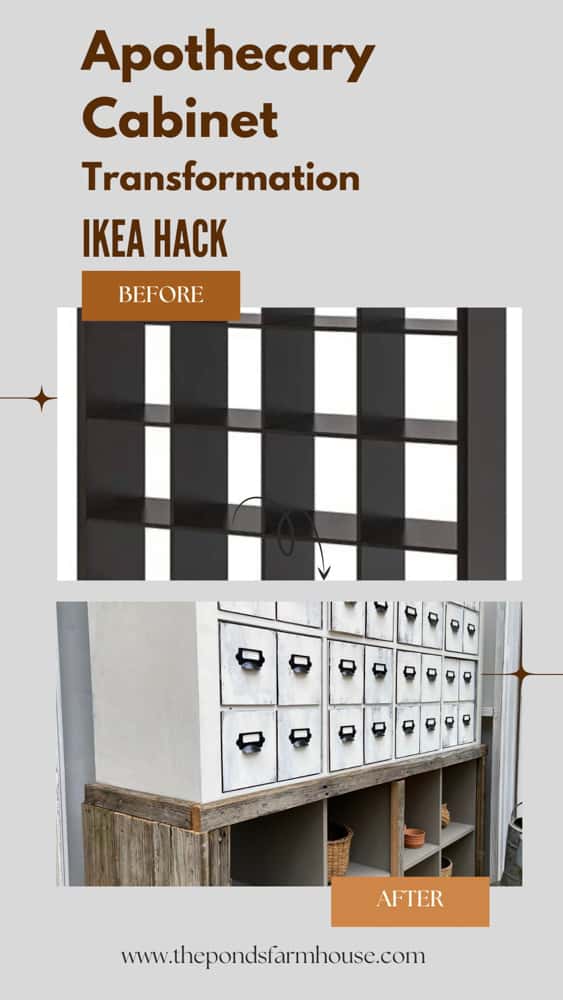
We decided to attempt an IKEA hack by building a DIY Faux Apothecary Cabinet – (Card file chest) out of this 16-cube storage unit. I knew it would be perfect for storing my gardening supplies in the greenhouse.
Let me show you how we made it.
What can you do with a 16-cube IKEA Storage Unit you no longer use? I will show you how to make a DIY faux apothecary cabinet or Card File Chest out of it.
What To Do With The IKEA Kallax Cabinet!
I had previously used the IKEA Kallax cabinet in my home office for storage. When we downsized, I no longer had a space for it. However, I held onto it, waiting for inspiration to hit. We were in the final stages of completing our DIY Greenhouse when an Idea began to form.
When we purchased the unit from IKEA, we bought 3 door and drawer inserts to hide the stored items. Since 8 door inserts were needed for this project, we needed to purchase an additional five.

(Posts on The Ponds Farmhouse may contain affiliate links. As an Amazon Associate, I earn from qualifying purchases. See the full disclosure details here.)
Supplies and Tools needed
- IKEA Kallax Cabinet
- 8 door inserts from IKEA (5 new ones purchased)
- Large Bun Feet
- Leg Mounting Plates
- Two Paint Colors of your choice – I used Old White Chalk Paint for the upper section and French Linen Chalk Paint for the bottom section.
- Clear Wax sealer
- 2 – 2×4 sheets of 1/4 smooth plywood are available at most hardware stores.
- 32 – Label Drawer Pulls
- 1′ long wood screws black
- Dark Stain – American Walnut
Tools
- Cordless Drill
- Belt Sander
- Table Saw
- Phillips Head Screw Driver
- Paint Brush
- Sharpie Pen
- One sheet of card stock or heavy paper to make a 6×6 template.
How to make a DIY Faux APOTHECARY CABINET or Card File Chest from an IKEA Hack
First, paint or stain the wooden bun feet to match the IKEA cabinet.
Adding the feet is optional. If you are happy with the cabinet’s dimensions, you can skip this step.
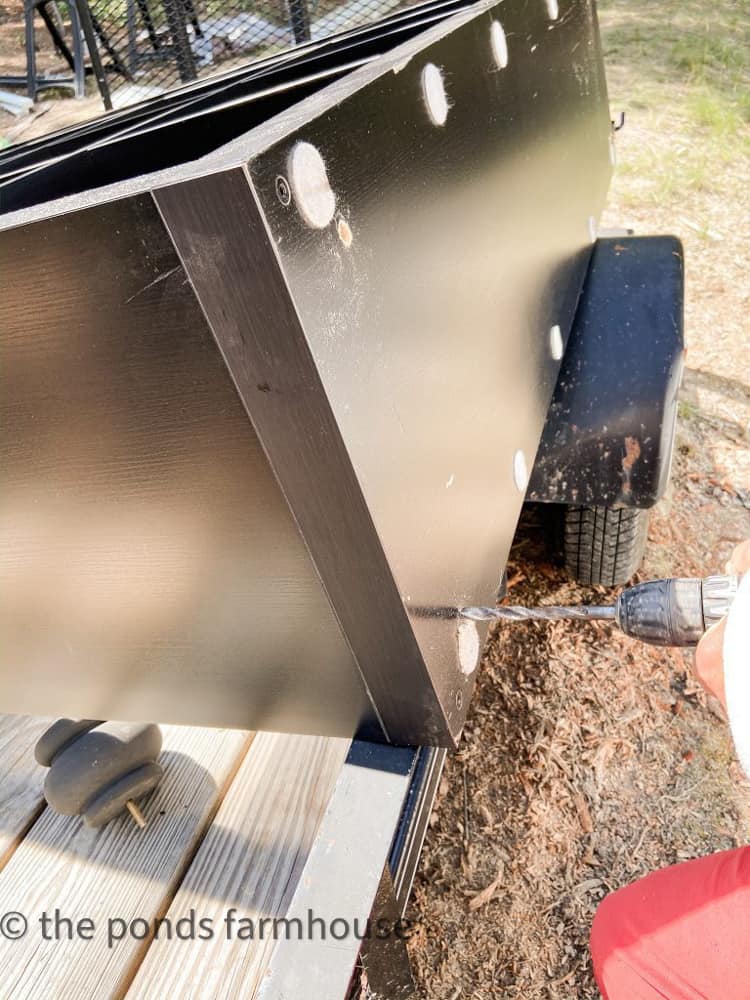
It is necessary to drill a hole the size of the screw attached to the wooden foot. You will also need leg mounting plates to attach the feet. Center the mounting plates over the drilled hole and secure them with the included screws. Then screw the wooden feet into place.
Paint the IKEA Cabinet your desired colors.
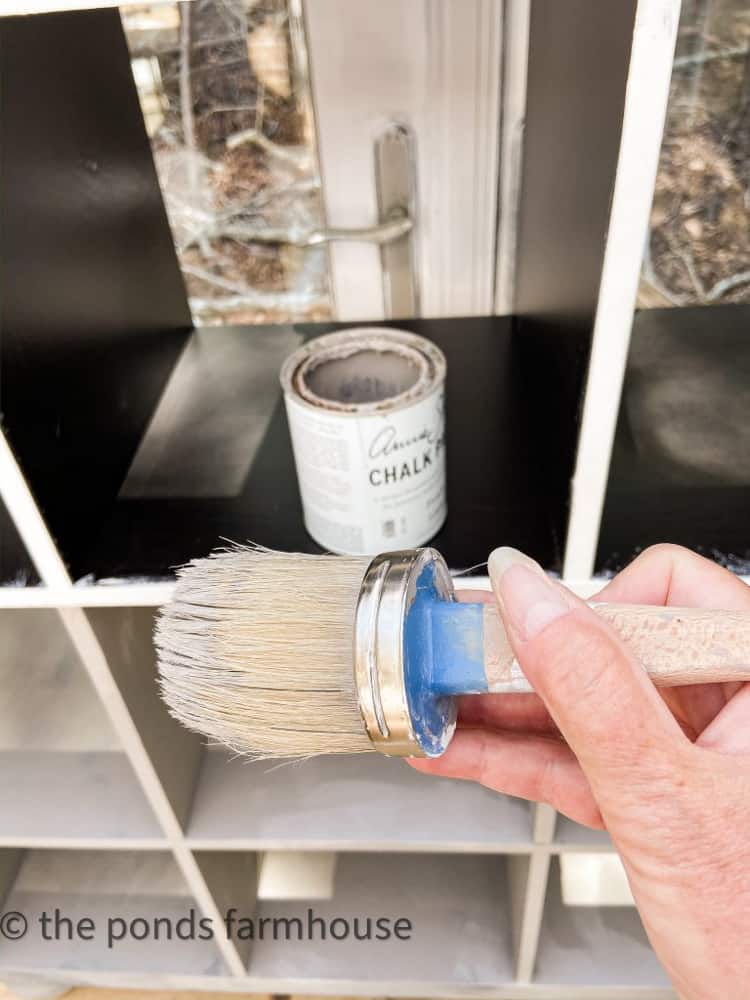
Next, it’s time to paint if you want to change your cabinet’s color.
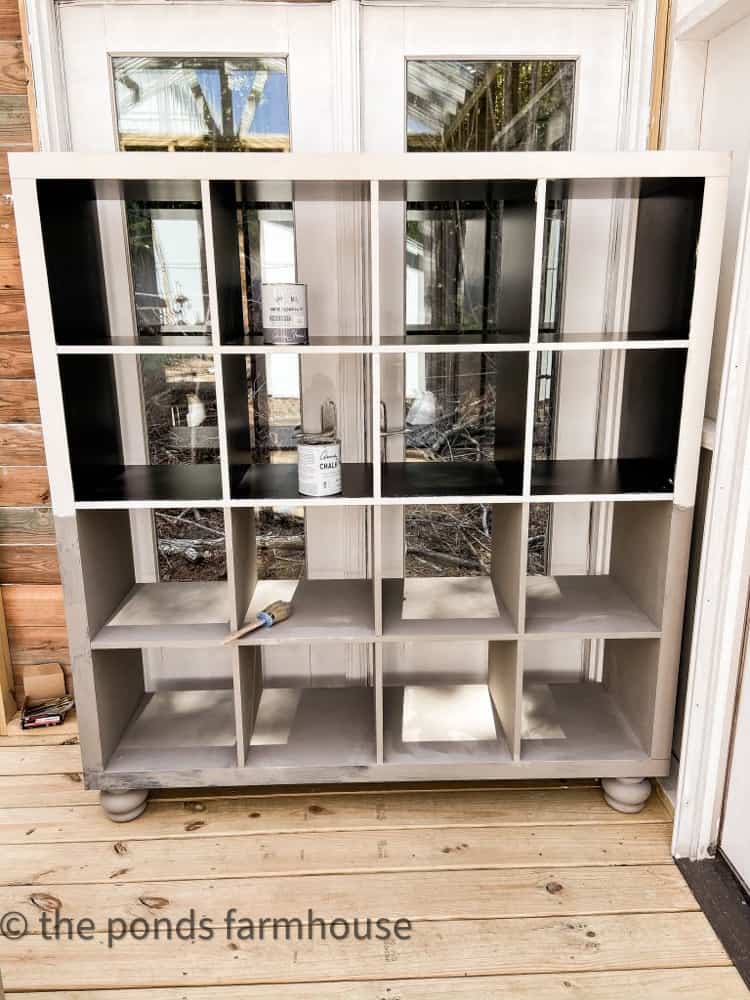
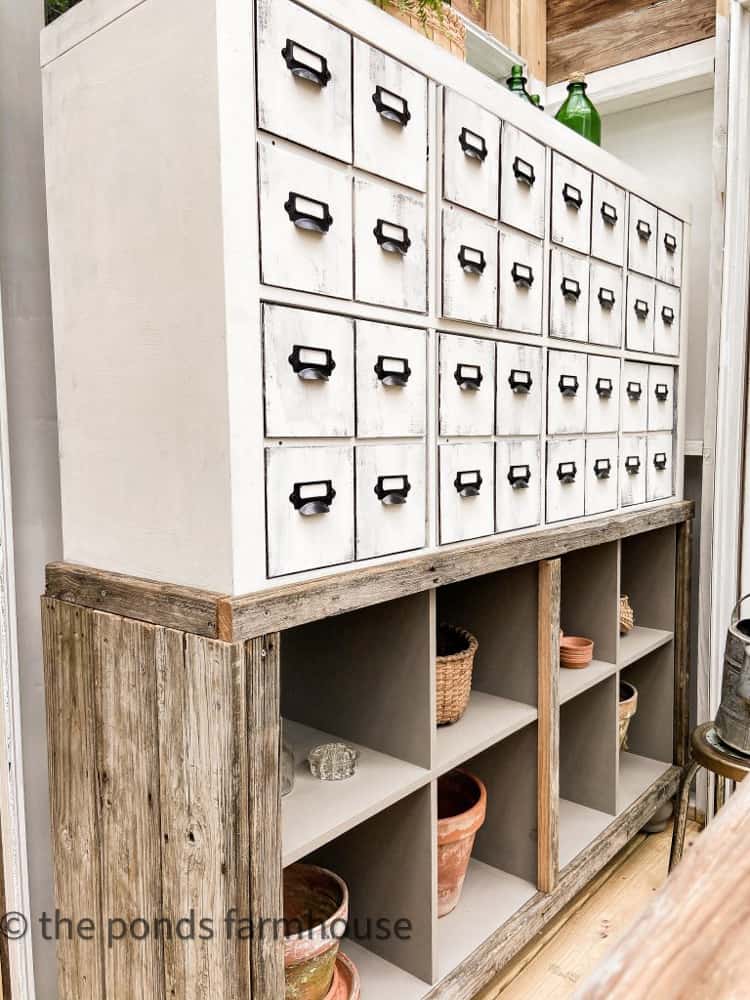
At this point, I have decided to make the existing cabinet look like two separate pieces—a larger piece at the bottom and the apothecary cabinet at the top.
I painted the bottom half one color and the top half a contrasting color.
I used French Linen for the bottom half and Old White for the top half. These Annie Sloan Chalk paints were some I had on hand, making the project more cost-effective. This tutorial teaches you how to use chalk paint.
The existing cabinet’s surface is slick, and chalk paint sticks well to it.
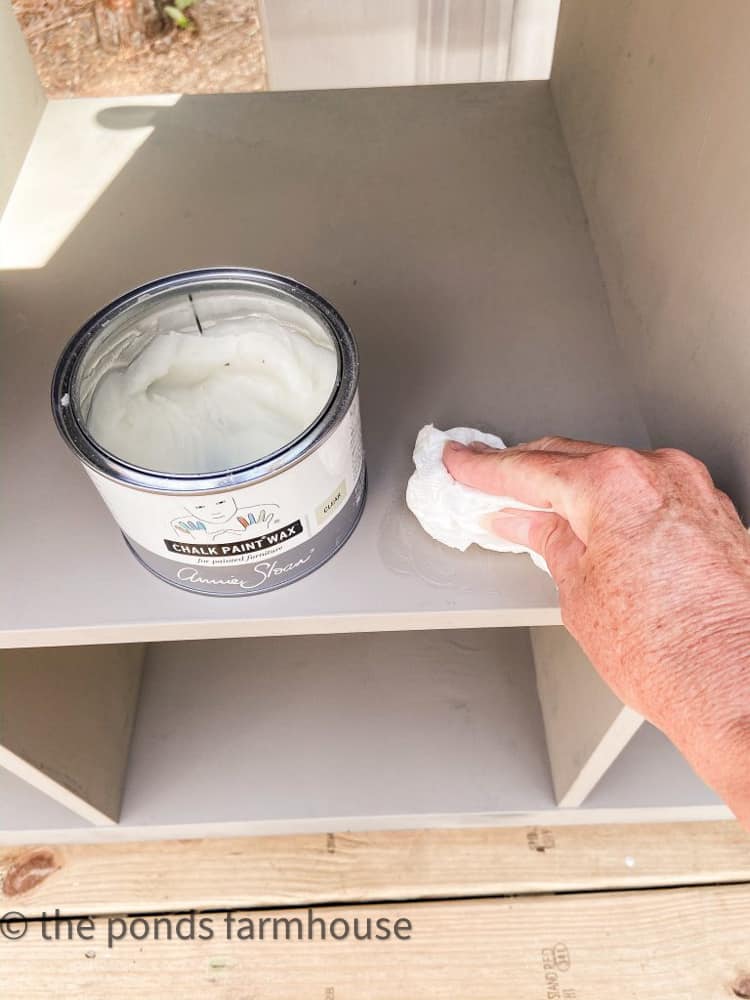
Next, apply wax to seal the paint. Here is what the cabinet looks like at this point.
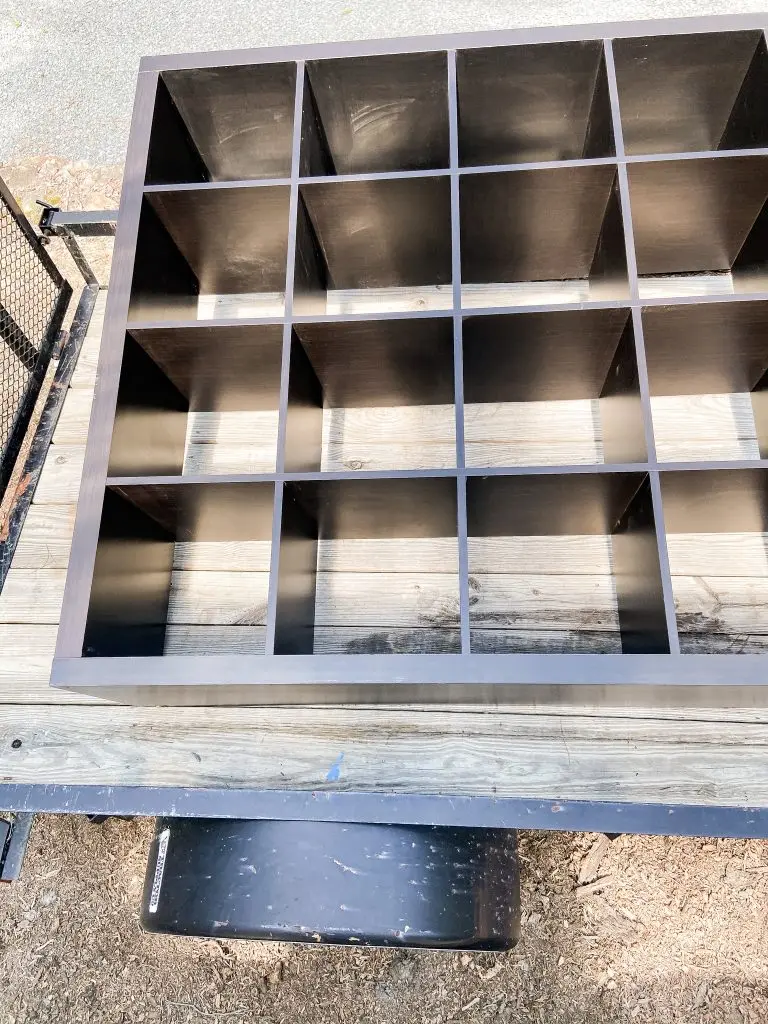
How To Add Reclaimed Wood To IKEA Storage Cube
To make the cabinet look like two separate pieces, you will want to add some additional wood and trim to the bottom half of the cabinet.
I used some weathered reclaimed wood that we had left over from another project. You can purchase new boards or trim work from the hardware store.

Now, add full-size boards to the side panels. We stripped the boards using a table saw to create the trim pieces. A single board was attached to the center of the cabinet to divide the piece.
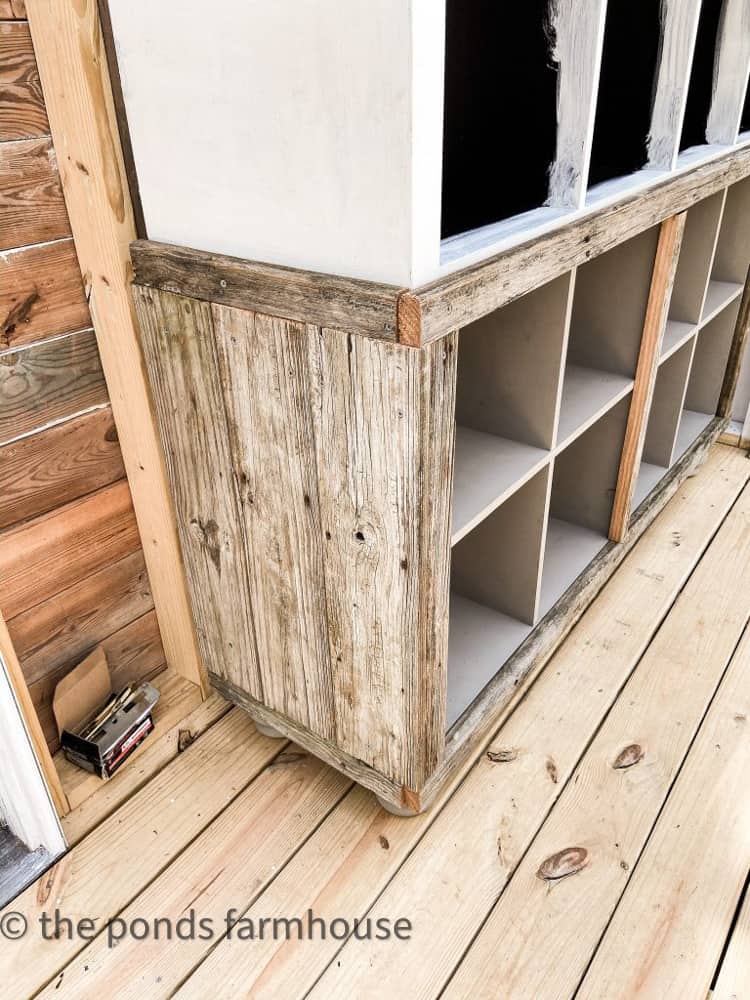
Now, the bottom appears to be larger than the top. The IKEA Hack is coming together. The reclaimed wood gives the bottom half a primitive, rustic feel.
How To Build Small Wood Drawers for the Cabinet
Now, it’s time to work on the top half of the cabinet. This is where the Apothecary Cabinet/Card File comes into play.
Because we already have some door inserts for this piece, we purchased more to create our drawers.
By purchasing two 2X4 sheets of 1/4″ plywood, you will have enough wood to create the illusion of small drawers. The 8 door fronts are 13×13, so begin by cutting 32 – 6×6 squares. We used a table saw to strip the plywood into the appropriate size.
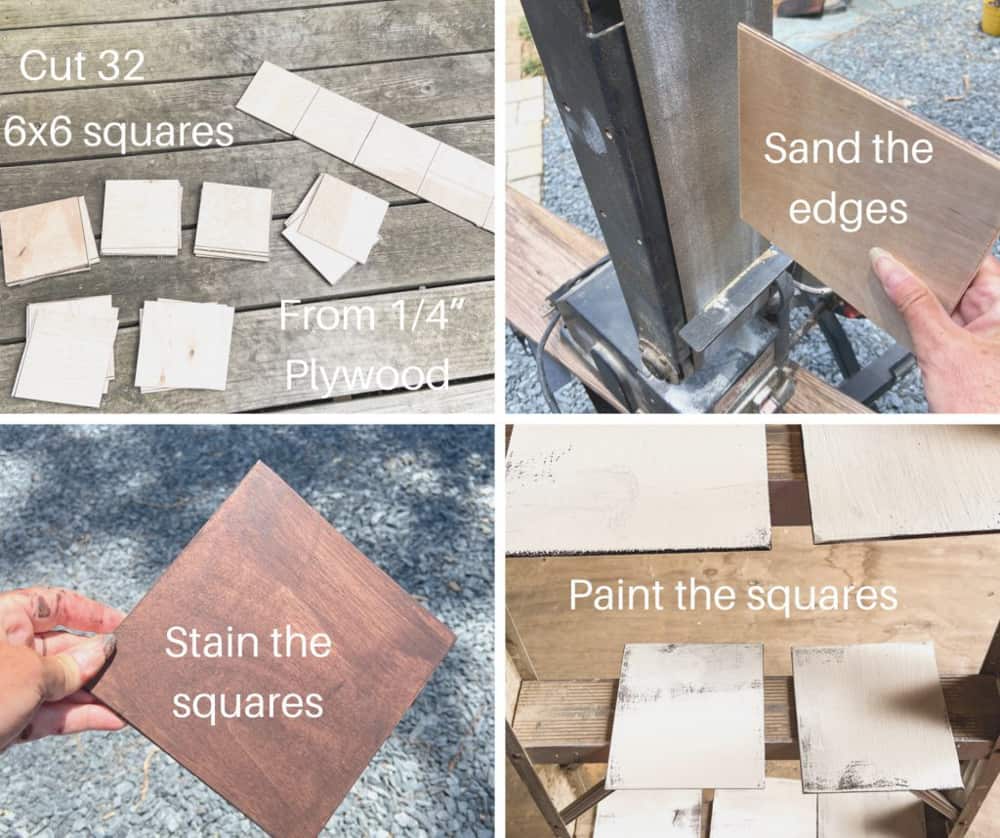
Then use a belt sander to smooth the edges. Although it is more time-consuming, you can use a sanding block or sandpaper if you don’t have a belt sander.
To achieve a distressed look for the Apothecary Cabinet Drawers, stain each square with a dark gel stain. These are stained with Old Masters American Walnut Stain.
Once the stain has dried, paint each square to match the top half of your cabinet. I used only one coat of paint to let the stain show through.
How To Create a Template for the Apothecary Drawers.
This is a crucial step that will save you time and heartache. It is tough to get the hardware installed evenly without a template.
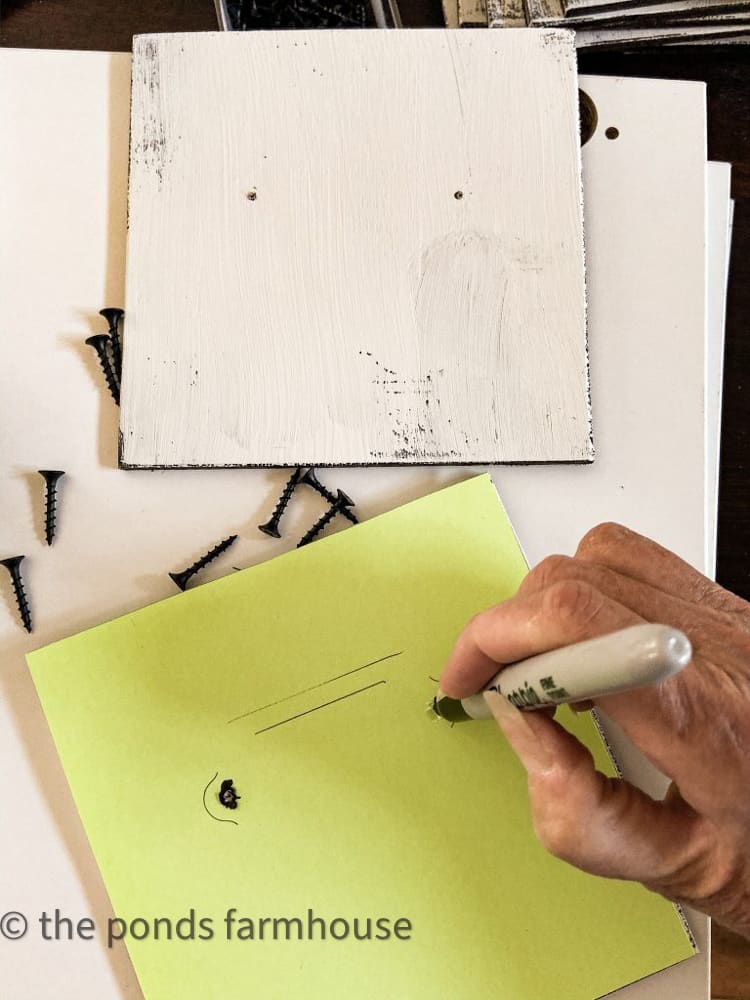
Next, create a template for your drawer fronts. Decide on the location of your hardware placement and punch a hole in the paper template to mark the pilot holes. This will ensure that your hardware is placed in the exact same spot on each board.
How To Attach Hardware and Drawer Fronts to Door Inserts.
Now, you will want to drill two pilot holes in each drawer front with a small drill bit.
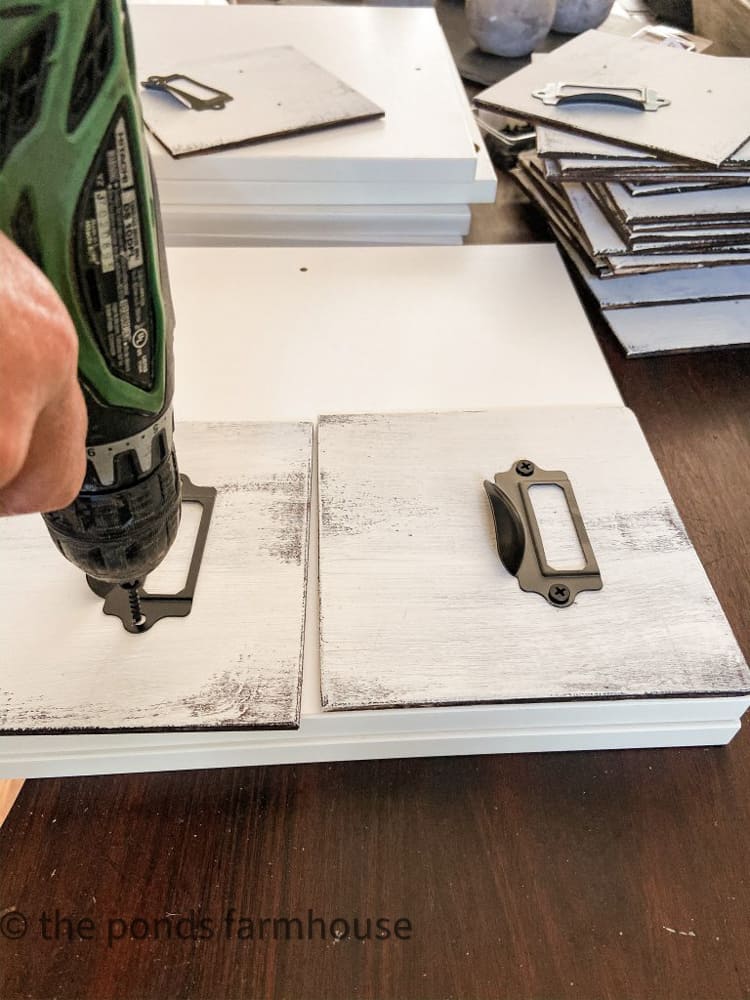
Please ensure you space the wooden drawer fronts evenly on the door insert. Use 1-inch wood screws to attach your hardware and wooden drawer fronts, securing them firmly to the door insert.
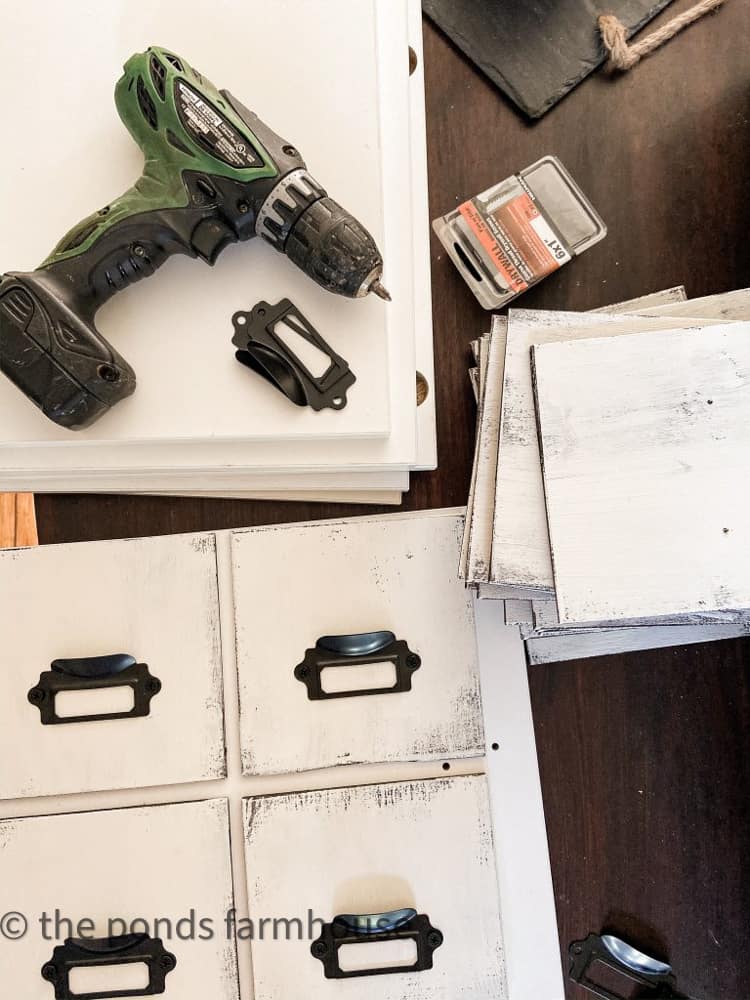
I used label holder pulls for my hardware. The screw goes in from the front on these label holders, making them perfect for this project. The same pulls are used on our DIY Farmhouse Kitchen Island and the Repurposed Silverware Box.
Install The Apothecary Doors
Finally, you are ready to install the door fronts according to the IKEA instructions, and your Apothecary Cabinet will be finished. I plan to label the drawer pulls once I add potting supplies to the cabinet.
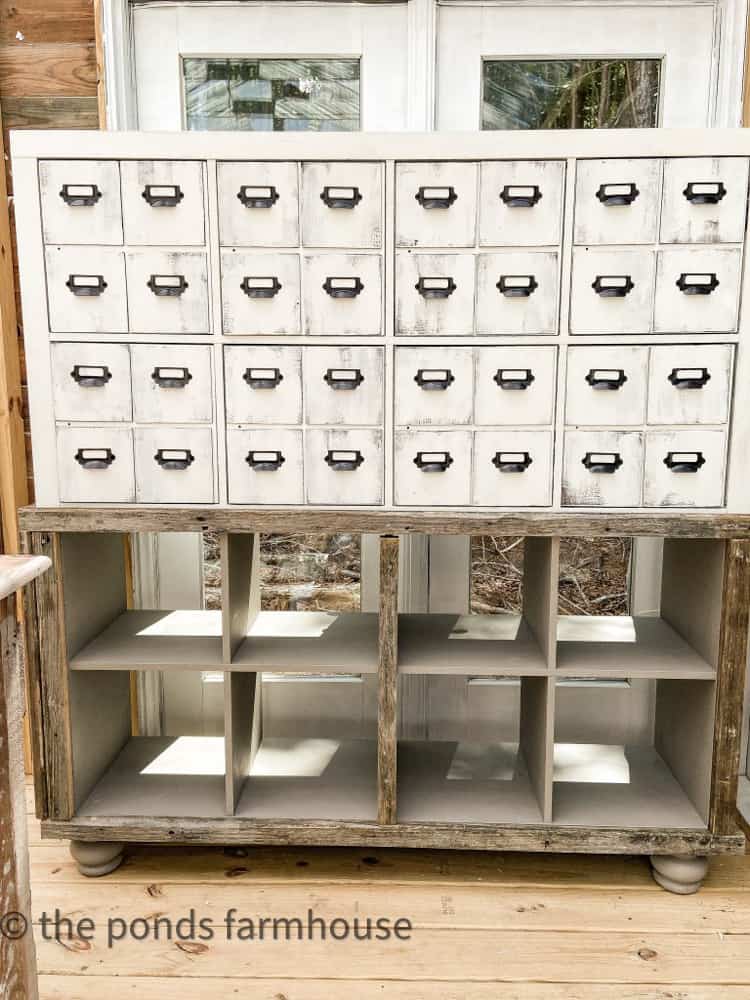
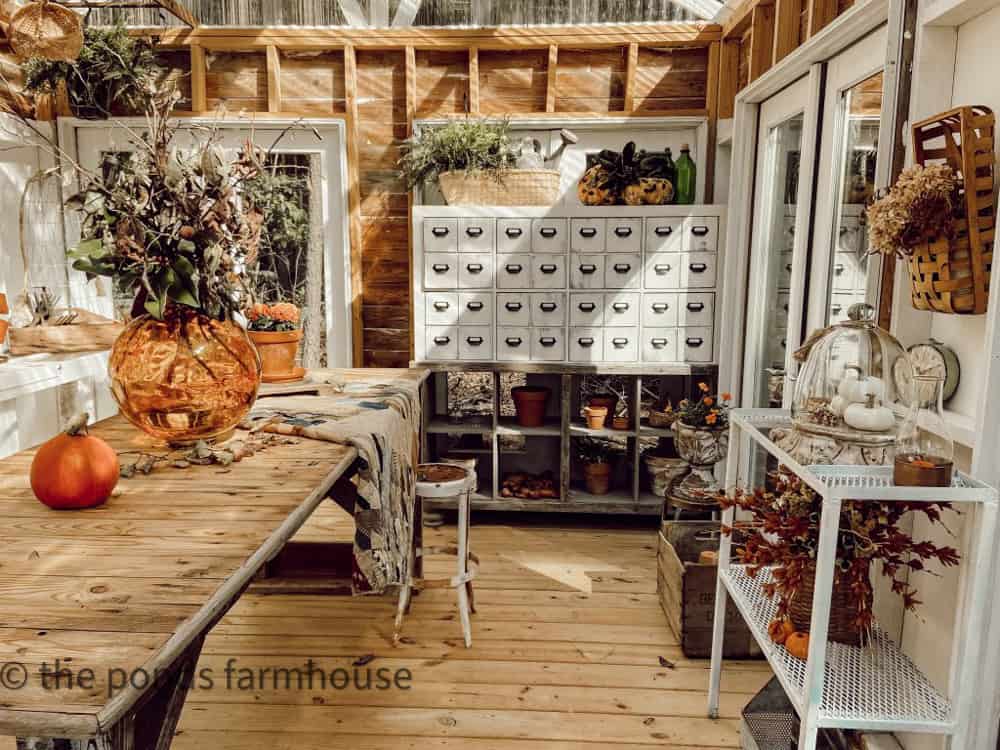
The upper Apothecary Cabinet Section appears to be resting on a more primitive vintage piece. See how I made a potting table and a solar chandelier for the Greenhouse.
I Love This IKEA Hack
I hope you like this IKEA Hack. It’s exactly how I envisioned the project, and I am thrilled with the results. This will provide much-needed storage for the greenhouse.
Check out this blog post, where I share all the photos and details about how we built this greenhouse.
More Favorite DIY Projects
- DIY Apothecary Cabinet IKEA HACK
- Over The Table Rod Stand Tutorial
- How to Make A DIY Potting Table from Old Windows
- Easy Rustic Ladder Tutorial
- Easy Thrifted Lamp DIY – Pottery Barn Hack

Thanks so much for stopping by. I look forward to sharing my next adventure with you.

Pin It To Remember It
Did you find some great ideas you’d like to save for future reference? To save, hover over the images and pin to your favorite Pinterest Boards when you see the PIN button in the upper left-hand corner.


Good Morning Rachel
Of course this is absolutely amazing. It sure does seem pretty tricky to come up with something so creative but you did it. I love it so much*
deezie
Deezie,
Thanks so much.
Oh my ever-lovin-soul! I cannot get over this fantastic transformation! I would never have believed it was an IKEA Kallax if you hadn’t shown us. It’s aaaahhhhhmazing! Pinned
Awww Thanks for making my day Cindy. I appreciate this so much.
Rachel
Again, you knock it out of the park! Thank you for inspiring and sharing!
Sondra,
I appreciate this so much. Thanks for these encouraging words.
Rachel
Unbelievable!! Your DIYs are the best! What a perfect piece for that dreamy green house. Hats off to you. I’m still in disbelief of the transformation. What a vision.
Cindy,
I am so glad you like it. Thanks for these encouraging words. I really appreciate your taking the time to comment.
rachel
That is an awesome transformation. You are so creative and talented.
Karen,
I am so glad you like it. Thanks for stopping by.
Rachel
This is such a fabulous idea! I love how you made the top and bottom halves look different, Adding the reclaimed wood was such a clever idea!
Katerina,
I really appreciate your comments. So glad you like the transformation.
Rachel
Wow! What a gorgeous faux cabinet–love it! Thanks for sharing at Vintage Charm–pinned!
So glad you like it Cecilia. Thanks for commenting.
Rachel
Hi Rachel, oh I LOVE this! I’m all about vintage garden goodies and anything for a greenhouse, so I’m totally smitten with this wonderful cabinet. You did such a great job! Thanks for coming by to link up at All About Home, I’m featuring this post this evening!
Debra,
I’m so excited to be featured. I’m so glad you liked this post.
Rachel
What a wonderfully creative project! Adding the doors with the faux drawer fronts is ingenious! And thank you so much for sharing the paint brand – in the past I struggled to get paint to stick to the slick Ikea pieces and went thru the tedious process of priming with oil based primer. I can’t wait to try the Rustoleum brand chalk paint! I popped over from Common Ground’s All About Home Link Party.
Carolyn
I’m so glad you popped over. Thank you for your comments. Yes, chalk paint is a game changer for those of us who had to sand and prime everything to get the paint to stick. Telling my age I think!!! Again, I appreciate you so much. I hope you have subscribed to my newsletter to not miss a post.
Rachel
This project is AMAZING! I’d love to feature it on Thistlekeeping! Let me know if I have permission to use one photo and I’ll link back to you!
Happy day friend!
karianne
KariAnne,
I’d be so honored. Thank you!
Rachel
This looks amazing! I would never guess it was all one piece!
Pamela, thanks so much for stopping by. I really appreciate your compliment! That was my intention to make it look like two pieces. Thanks so much.
That is one of the most amazing furniture flips I’ve ever seen. So creative of you to have envisioned this and executed it so beautifully. Love it!!!
June,
I appreciate these sweet comments so much. Thank you for stopping by.
Rachel
Does the top work as drawers or doors? And did you put a solid back on the upper to keep things from falling out? Thank you for this inspiration! I love it.
The top works as a door. There are 8 doors and the inserts from IKEA include a back and sides as well as the door. I originally thought I’d add a back to the bottom but decided not to. I appreciate your input.
Rachel
I love your ideas…I have been making solar chandelier hangers for years….yours is beautiful….I just made one for my friends memorial garden for her young daughter….apothecary is stunning…looking forward to see other ideas….🌸
Candie,
Thank you so much for commenting. I appreciate all your kind words and support. Have the best day.
Rachel
Incredible! I have always loved the look of the apothecary drawers but could not really think what I’d use all the small drawers for. This is a genius idea combining such a great look with much better (for my purposes) functionality. Thank you so much for posting this. Your other projects are great too so now I’ll have to look through all you’ve done and try some of your ideas. What a creative and talented person you are!
Diana
Diana,
Oh my gosh, what sweet compliments. You just made my day. I really appreciate you for taking the time to stop by and share your thoughts. It’s comments like these that make it all worthwhile. I hope you have the best weekend.
Just WOW!!! This is incredible, I would have never guessed it was an Ikea cabinet. Amazing job!
Sarah,
I’m so glad you like it. Thanks so much for stopping by.
Rahel
Wow! This is amazing!! I love how you added the weathered wood. It looks like it was supposed to be this way all along!
Hey Jennifer,
I’m so glad you like it. I wanted it to appear to be two pieces. I appreciate your comments.
Rachel
Rachel this piece turned out amazing! I LOVE it. You are so talented and creative!
Kelly,
OOh my gosh! I’m so glad you like it.
Thanks,
Rachel
Rachel — I just tried to sign up to your web site and got an Error Message saying you aren’t there anymore. Please let me know how I can subscribe to you — Thanks! [email protected]
Jan,
I am so sorry. Can you tell me where you tried to subscribe? If there is a break in the link, I’d like to get it corrected. In the meantime, I will try to get you added to the subscription.
Thank you for reaching out.
Rachel
Such a unique looking interpretation. What I don’t like about Ikea furniture is that it is lacking in personality, has no distinctive visual appeal, and absolutely must be personalize, which you have done amazingly. No one could guess what the ‘innards’ of this piece are. Lovely idea to adapt for indoor use too.
Johanne,
I really appreciate these encouraging comments. Yes, this piece served it’s purpose when I needed office storage. Now it has new life. Thanks for taking the time to comment.
Rachel
Rachel thank you for giving us such detailed instruction on building this cabinet! It turned out fantastic. And your greenhouse is the bomb, oh what I’d do to have something so nice! God bless you and I’ll be looking into the rest of your great ideas! Thanks again!
Susan,
Thank you for these sweet compliments. Looking forward to sharing more adventures with you.
Rachel
What?, that beauty used to be an IKEA storage unit! I noticed this stunning apothecary cabinet in your amazing DIY greenhouse post and figured you must’ve got it from an antique shop. Wow, Rachel, you guys did an amazing job with this transformation! Pinned 🙂
Marie,
Thank you for saying this. It was such a fun project. I appreciate you for pinning it. Have a great day.
Rachel
That is a very cool “IKEA flip”!
Jeanne,
Thank you so much. Have a great week.
Wonderful job Rachel!! How come there is NO dirt in your greenhouse, mine is a mess on the floor,, yours looks like another room of your home. Just beautiful, keep up the good work.
Ellen,
We used treated lumber for the floor and I can sweep the dirt through the cracks. LOL. Thanks so much for stopping by. I appreciate this.
This idea is brilliant Rachel! You completely transformed the look of those Ikea pieces – this is a project I want to try! Pinned 🙂
Cindy,
I really appreciate this. It’s a favorite transformation.
Rachel, I have had this blog post saved for some item! It is absolutely one of my favorites of all time. One of these days, I will get around to making one. Maybe for my new craft room.
Wendy,
You are so kind. That would be a perfect place for yours. Thanks for stopping by.
This turned out amazing Rachel! What an incredible and creative makeover!
Michele,
I really appreciate this.
This is a stunning makeover Rachel and I would love to try this on a smaller scale. Thank you for providing such a good detailed tutorial! Pinning!
Michelle,
It’s not the hard and I know you can do this.
Rachel, I would never have guessed that you made the apothecary cabinet. It’s amazing! I love your entire greenhouse!
Niky,
I really appreciate this. Thanks for joining us this time.
Oh my goodness! I love this idea so much. I want to do this in my greenhouse. I would love it if you would share this on the Fabulous Friday Link Party. You can find the link on my website. Hugs to you, my friend.
Renae,
Thanks so much.
KariAnne,
Thanks so much for sharing.
Thanks so much for sharing.
WOW JUST WOW! I can’t believe I am seeing this for the first time. I’ve seen this on your blog many times and thought it was an antique! What a beautiful way to fake your way through this! LOL I truly love this so much! I don’t have the room for one this big but I have got room for a smaller one. Love the way you created the front panels and I happen to have a small wood block about 2 ft. X 2 ft. thats divided already and this would be perfect for the space I have. Thanks so much for the inspiration!
Never stop crafting…
Shirley, thanks so much for the hind comments. I’m glad you enjoyed it. Keep coming back, we have many more projects!
Hi Rachel! This is absolutely amazing! I am so glad i found you because you give me so much inspiration. This was genious!
Cheryl,
Thank you so much for these kind words of encouragement.
LOVE!!!! How do the Top doors/drawers open? Thank you!!
Karen,
So glad. Thanks so much.
I really love this and have been looking for something just like this to try. If you don’t mind a bit of feedback (please note: I am really still learning how to do these things) as a newbie I would personally really benefit from a few additional details such as the size of the reclaimed wood you used (I understand I can measure the shelving however, as the expert, your advice here can certainly make the difference in these steps, and perhaps an example of what (material etc) you used to make the template etc. I understand these are basics especially to you as you clearly knocked this out of the park but for myself, believe me when I tell you, these can be the little steps where the wheels fall off 🙂
Thank you for sharing it is so seriously gorgeous! You have a gift for this stuff!
Best,
Kristin
Kristin,
Sure each door is 13 inches square and the small panels are created using 1/4 inch smooth plywood. Each square is 6 x 6 inches. As for the template, I used a piece of card stock paper. I hope this is helpful.
I LOVE LOVE this IKEA hack! Wow what a transformation! You’ve got my wheels turning! I have two smaller sized IKEA cabinets in my craft room that I could do this to. Great tutorial!
Karin,
I’m so glad you like it. Thanks for stopping by.
i love this one! I want to do it
Stacy,
Let me know if you make one.
This is amazing and your instructions are so helpful. I am attempting it, thank you for the inspiration.
One question I have is how did you determine where to place the faux drawers on the actual drawers and doors? Was it flush with the sides of the actual drawers/doors?
Robin,
The faux drawers are flush around the edges but I left a slight gap between each of the four faux drawers. If you zoom in on the finished cabinet you can see that they aren’t perfect. The most important aspect is to place the hardware evenly and I used the template to ensure their placement. If you have any other questions, please let me know. Merry Christmas!
@Rachel, I have another question. I am finding that dust and dirt in getting stuck in the wax even a week out from sealing it. Can I seal over the wax with something else like Poly? Any recommendations would be appreciated!
Robin,
What type of wax did you use? You should be able to buff the wax to a hard shine. It shouldn’t be sticky. If the wax is sticky, and you can’t get it to buff out I’d paint over it with another coat of chalk paint and then seal with polyurethane. If you seal the wax, it may peel off. But first, get a course cloth and really try to buff the original wax. It may take some elbow grease to get it smooth but will be less trouble than repainting.
@Rachel
Hi Rachel,
I have another question for you. When I go to put the doors with the faux doors on them I’m unable to open the real doors fully because they hit the side. What am I doing wrong?
Thank you so much!
Robin,
I’m not sure. My doors are not flush with the cabinet; they stick out slightly. The doors in my IKEA cabinet slide in and are not attached to the cube itself. I can slide them in and out to adjust their position. I can’t tell from the photo if your doors are attached similarly. If the doors opened properly without the wood attached to the front, you may need to move the accent wood over, away from the edge, to allow more space.
I’m sorry you are having issues. I hope this helps.
@Rachel,
This makes sense. Do you recall if you put the sliding inserts at the depth ikea recommended or further forward?
Thanks, Rachel
Robin,
They are slightly forward. The added drawer fronts extend beyond the edges of the cubes. I hope this helps. Have a wonderful week.
This looks amazing! I recently had my kitchen cabinets painted have been trying to figure out what to add to an empty wall and I think this is exactly what I need to do. I am definitely going to try this with an old cube shelving unit I have. Thanks so much for sharing!
Alex,
Oh I’m so glad you found this helpful and inspiring. Please let me know how it turns out. I appreciate you for following along.
That looks nice Rachel and looks like the real deal , Unfortunately I don’t have a place to put one .
Teresa,
I understand, however this tutorial can be used for smaller pieces if you were to run across one.