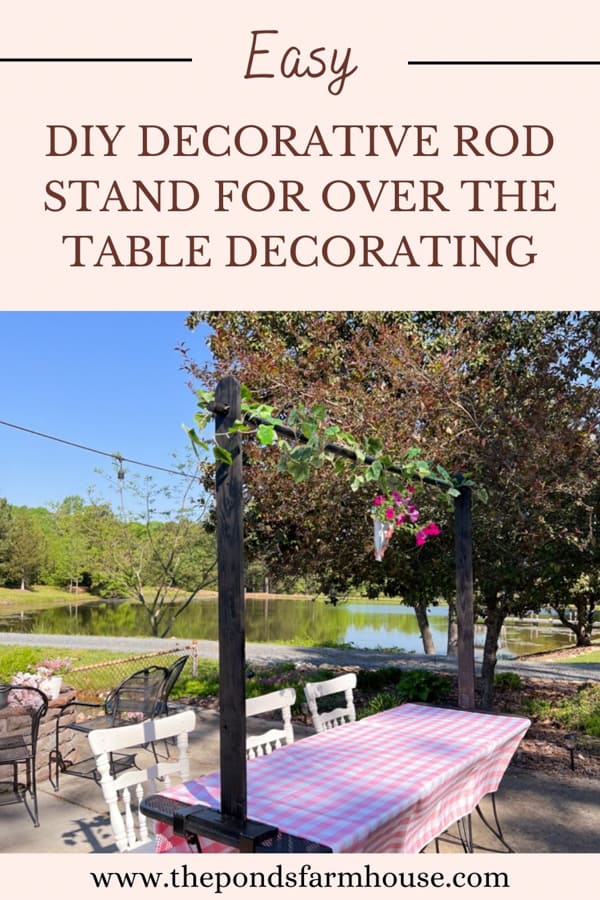
Easy DIY Decorative Stand For Over The Table
Have you seen those cute over-the-table rod stands? Today, you will learn how to make an inexpensive decorative stand to attach over the table for beautiful tablescaping. We were able to use leftover materials and recycled them for a budget-friendly and very sturdy table rod stand. So, let’s take a look at how we did it.

Recycle Materials For Budget-Friendly Table Rod Stand
I have been wanting a stand for my outdoor table, and finally got Brad on board to help me build one. When we remodeled our beach cottage, we removed large dowel curtain rods. Y’all know I had to save them because I knew I’d find a way to use them eventually. So I had the rod; now I just needed the stand.
All the lumber was recycled or left over from previous projects. It was necessary to purchase hardware to make the rod sturdy and attach it firmly to the table.
(Posts on The Ponds Farmhouse may contain affiliate links. As an Amazon Associate, I earn from qualifying purchases. See the full disclosure details here.)
How To Make An Over The Table Rod Stand
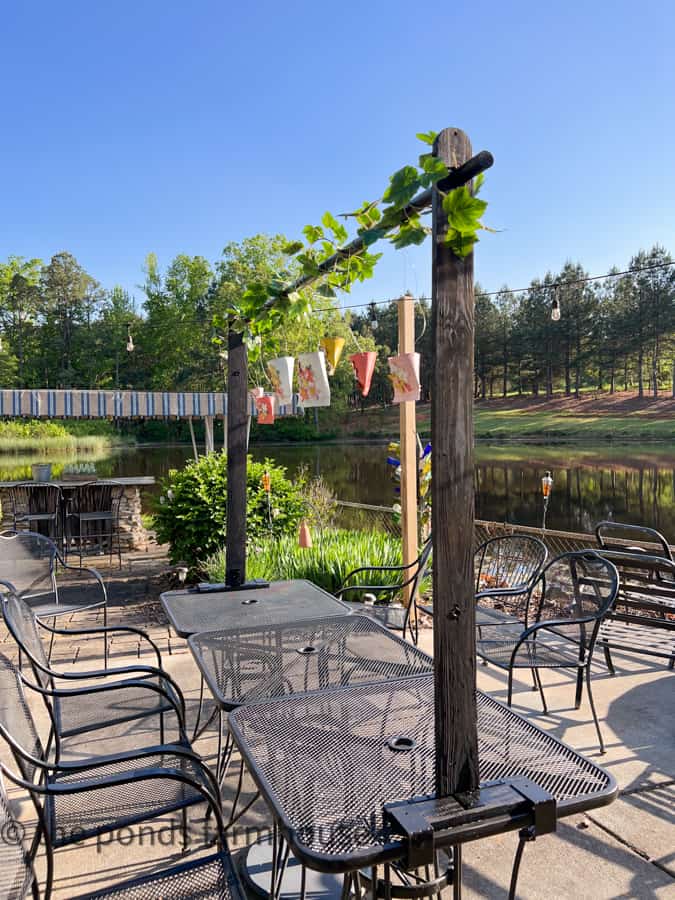
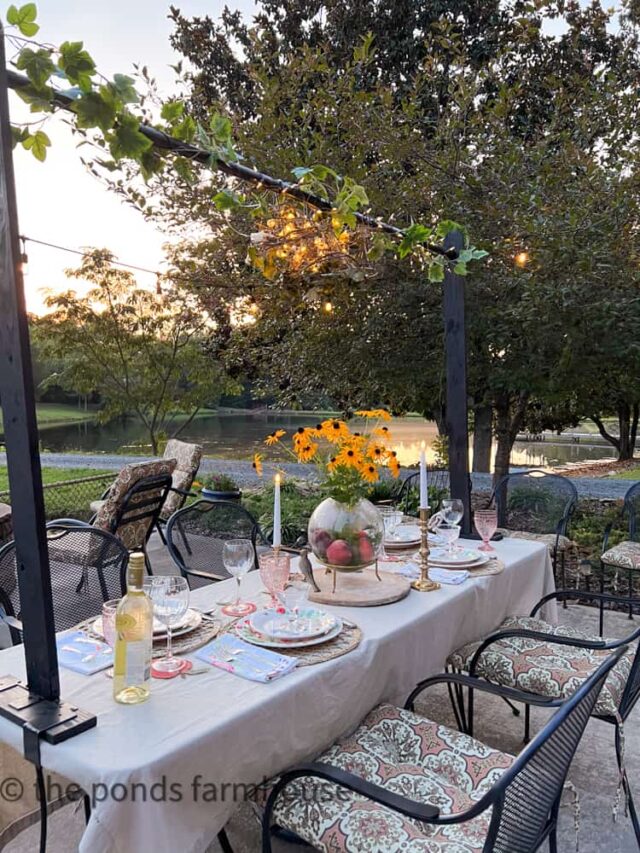
We have a set of 3 square bistro-style tables that are used together in our outdoor kitchen dining area. Fortunately, the dowel curtain rod was almost the exact length of the three tables together. Therefore, we only needed a method to hold that rod above the table.
We had some brackets that we used to attach the boards and I found great clamps that were perfect for securing the rod stand to the table. They are easy to remove and make storing the stand simple.
What Is A Table Rod Stand?
I have seen the rod stands used over tables to decorate for many occasions, such as weddings, showers, luncheons, and dinner parties.
Really, any occasion that you want to take your table decorations to the next level.They work great when adding lighting over outdoor tables with no overhead light fixture. There are so many options for decorating the table, and I’m excited to finally have one for entertaining.
I’ve already started playing around with some ideas. I can’t wait for you to see them, but first, let’s talk about how to make one.
Materials For Decorative Stand
First, you need to determine the length and height of your rod stand. I recommend adding a few inches to the dowel rod so that it extends beyond the length of your table.
In addition, you want the height of the stand to be a few inches taller than the rod placement.
We wanted the rod height to be 42 inches, so the board we used was 45 inches long. Here’s what you need.
- 2 – 4 x 1-inch boards cut 45 inches long
- 2 – 4 x 1-inch boards cut 14 inches long
- 2 wide L brackets
- 4 narrow L brackets
- wood screws
- 1 – 1 inch dowel rod, the approximate length of your table
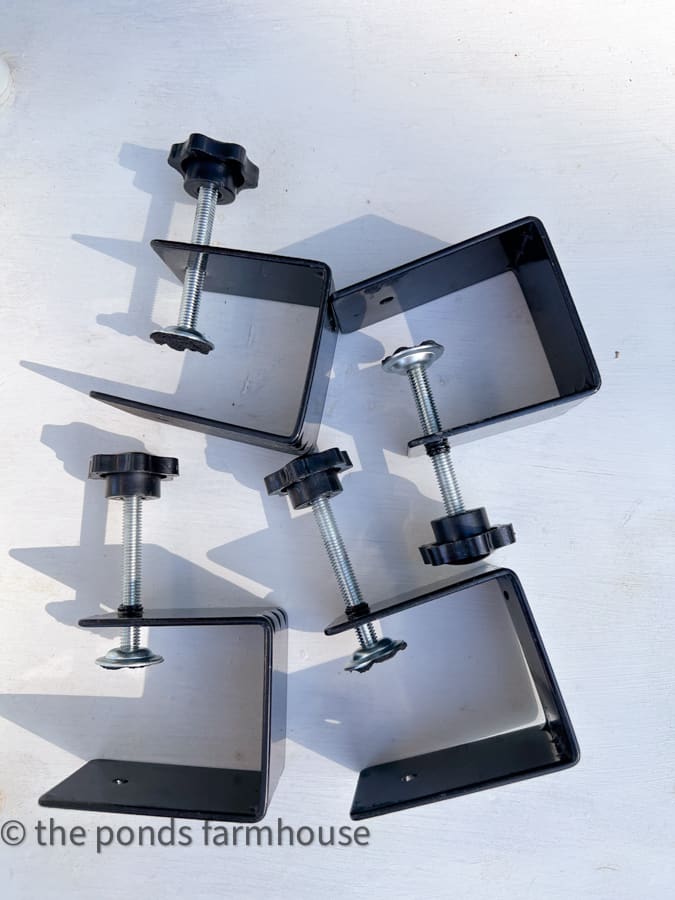
- 4 Heavy-Duty Clamps – Note: Pay close attention to your table edge to determine what clamp style will work on your table. You should consider the table depth plus the depth of your base board to ensure that the clamp is wide enough to wrap around both.
- Black Spray Paint
You will also need…
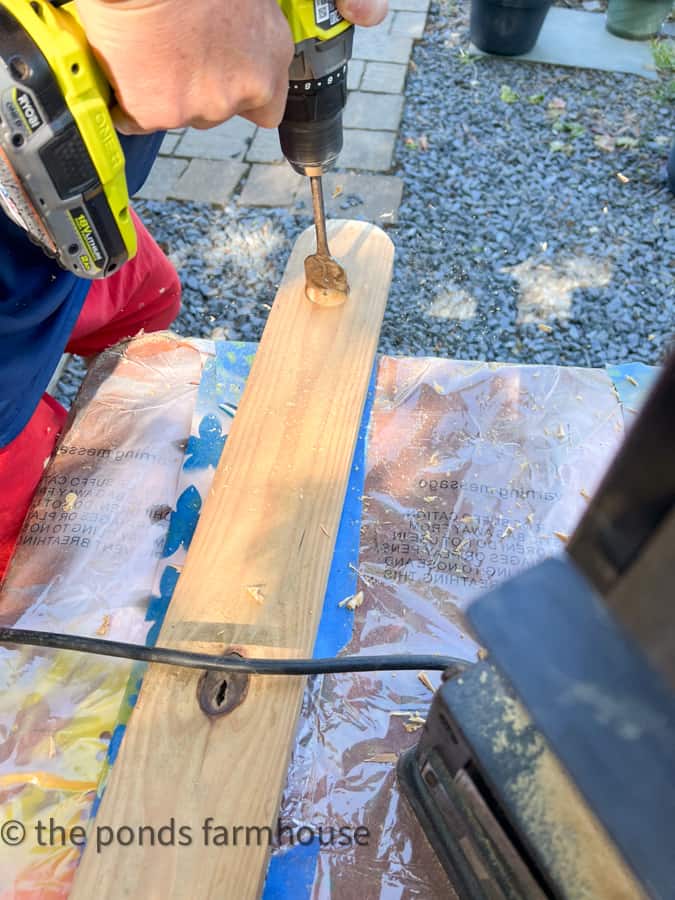
- Cordless Drill
- Large drill bit the diameter of your dowel rod or larger
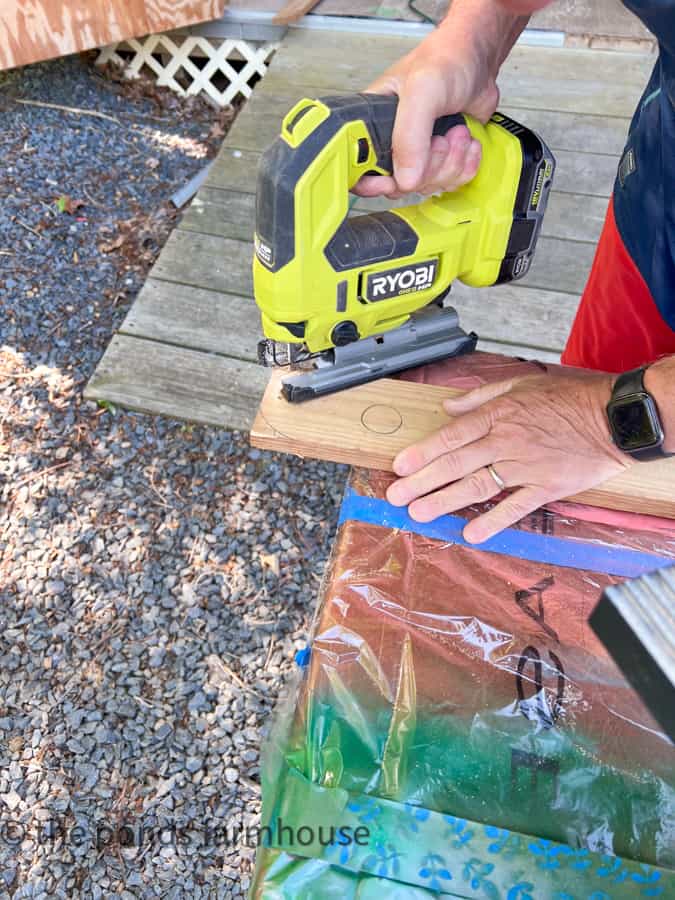
- Jig Saw
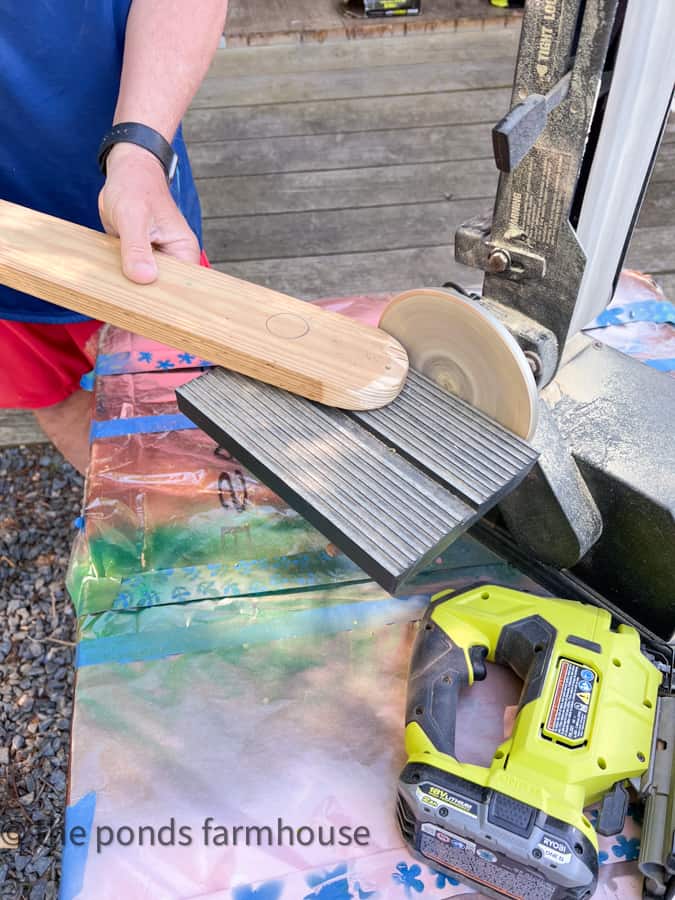
- Belt/Disk Sander
- Miter Saw

DIY Rod Stand Tutorial
Begin by cutting all the boards to the specified size using a miter saw.
Draw any decorative details to be cut on the board. I kept mine very simple with a small rounded top.
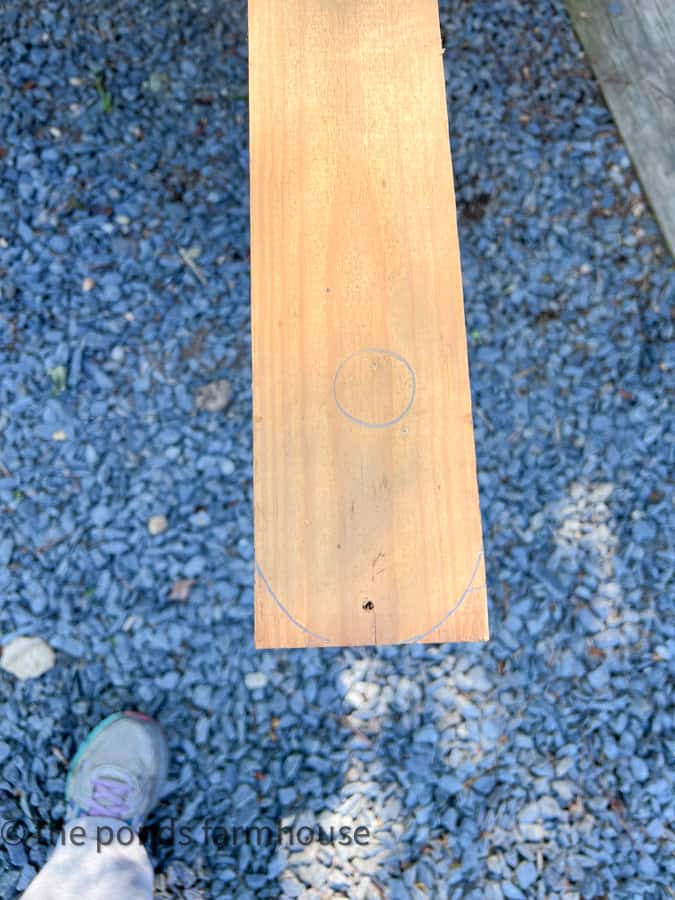
First, cut the decorative curve at the top of the boards and sand it with a belt or disk sander to smooth the edges.
Next, drill the hole at the top of the board for the dowel rod. I wanted my rod to be easily removed for storage, so the hole was slightly larger than the rod.
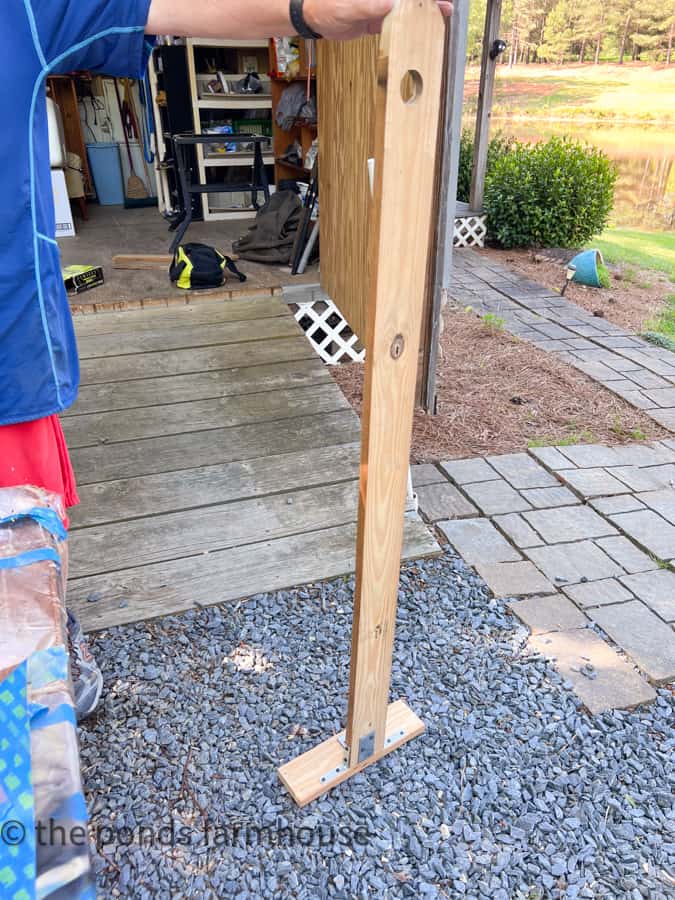
Attach The Rod Stand Together
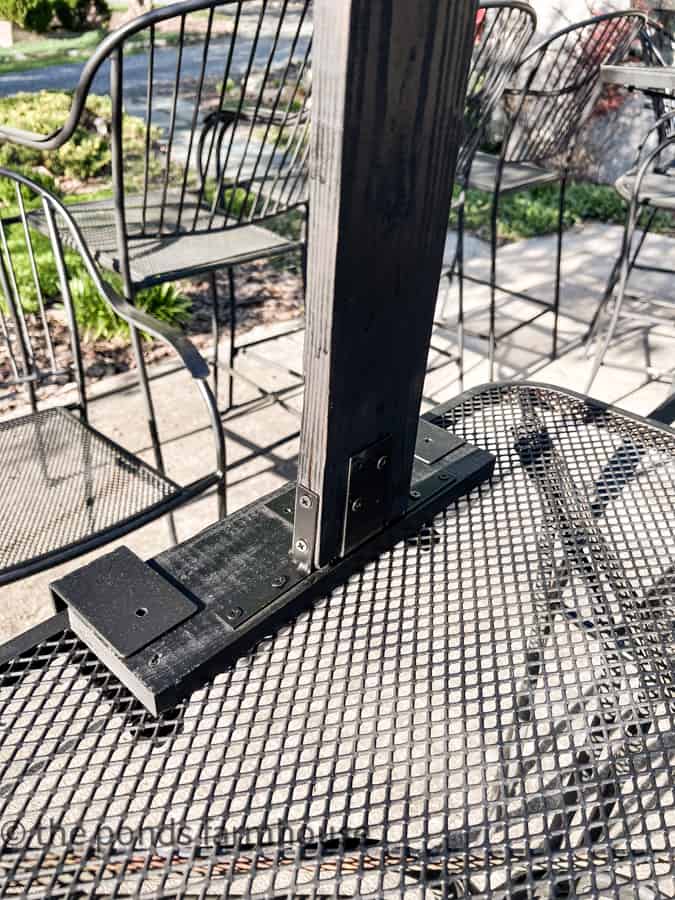
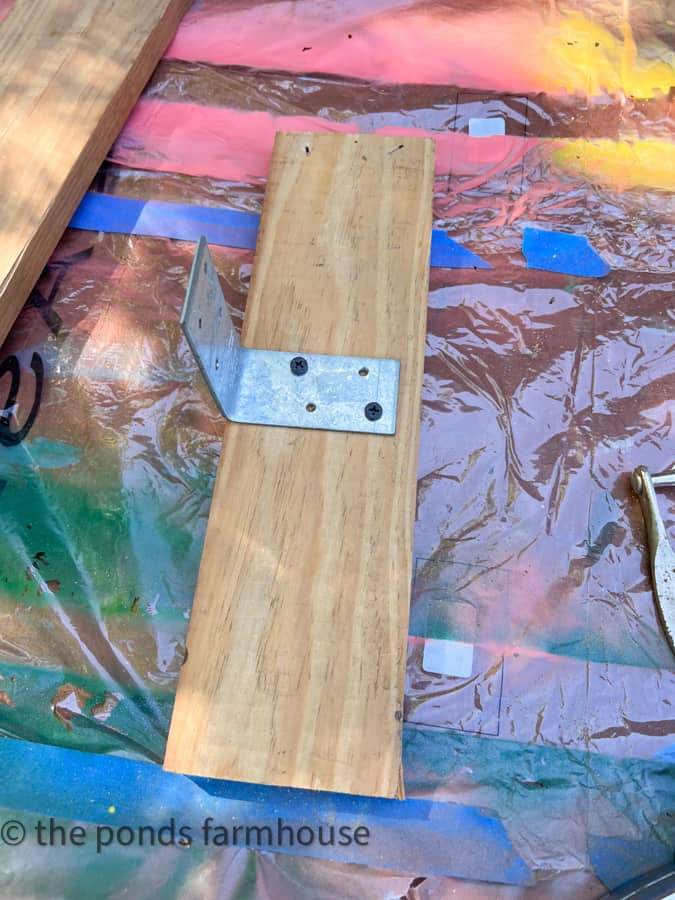
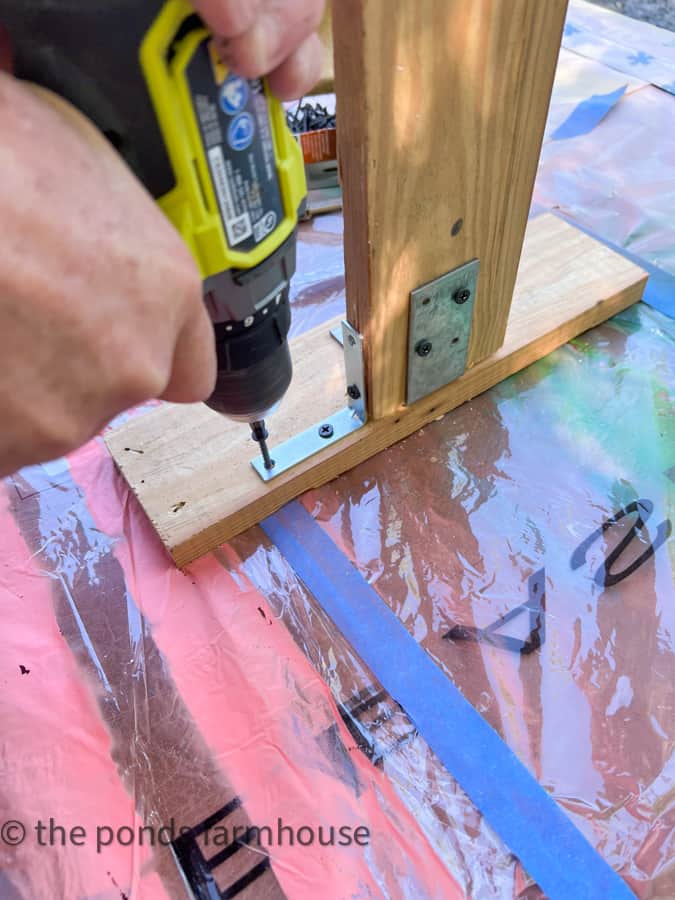
Attach the base and stand together using wood screws to secure the larger L bracket.
If the screws extend beyond the wood, you can cut the tips off with a hack saw.

For added security, we used smaller L brackets on the sides of the boards to prevent any wobble.
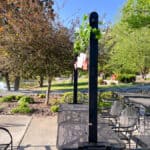
Before attaching it to the table, here is what the over-the-table rod stand looks like.
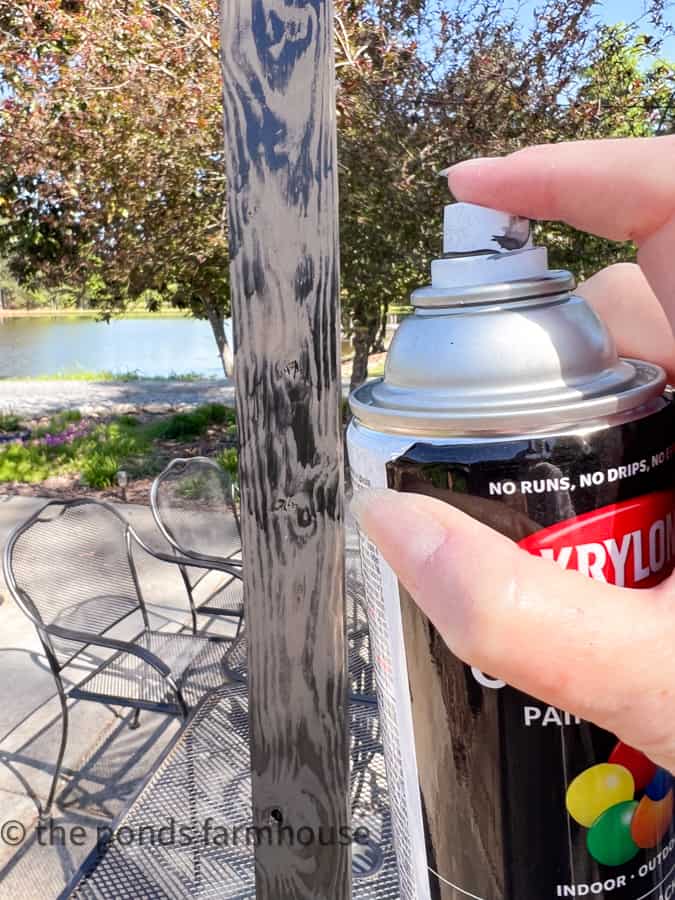
Paint Or Stain Your Decorative Stand
Depending on the desired finish, you can now either paint or stain your rod stand.
Since our outdoor tables are black, I decided to paint mine black.
I used the same paint as we used to touch up the tables each Spring, so I could paint the stand while attached to the table. This made the job so much easier.
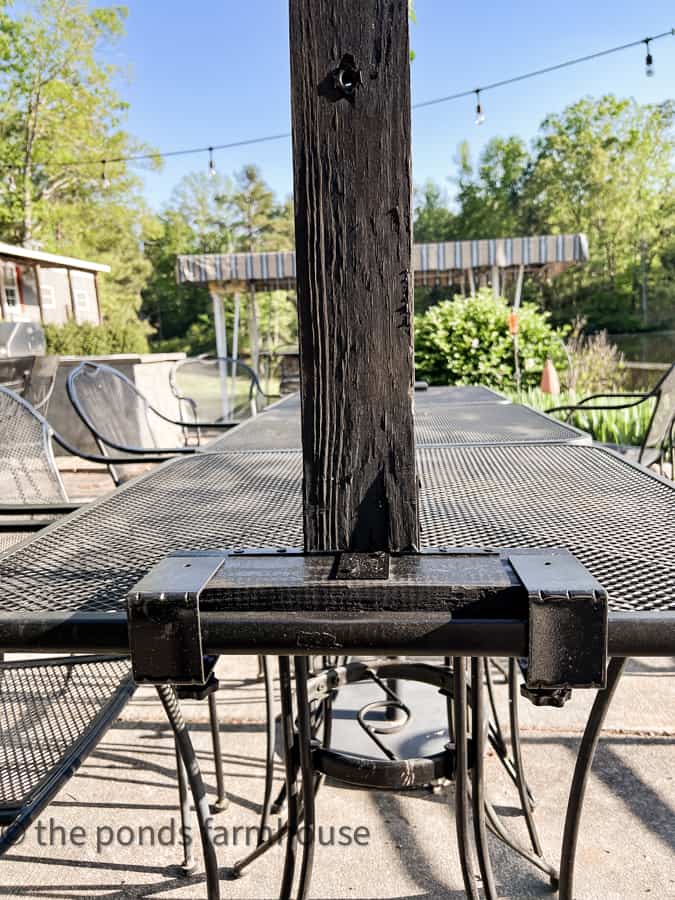
Secure The Rod Stand To The Table
Once everything is painted and dry, you can attach your rod stand over the table.
We used these black clamps and the stand feels very secure.
Please note that you need to consider the edge of your table to determine what type of clamp will work.
DIY Over The Table Rod Stand
Equipment
- Jig Saw
- Miter Saw
- Drill
- Drill Bit
Materials
- 2 – 1 x 4 board cut 45 inches long
- 2 – 1 x 4 board cut 14 inches long
- 2 – large L brackets
- 4 – small L brackets
- Black Paint
- 1 inch dowel rod slightly longer than your table.
- 4 heavy duty clamps
Instructions
- Cut boards to length with a miter saw
- Draw any decorative design on top of the boards
- Cut the decorative design with jigsaw
- Drill holes in boards for the dowel rod
- cut the dowel rod to the length is needed
- Attach the base board to the rod stand with a large L bracket
- Secure with two small L brackets on each side of the rod stand for added stability.
- Paint or stain your rod stand and a dowel rod. Allow drying
- Attach the over the table rod stands to each end of your table with clamps
- add dowel rod to the drilled holes.
- Decorate with garlands, flowers, string lights , etc.
Over The Table Rod Stand
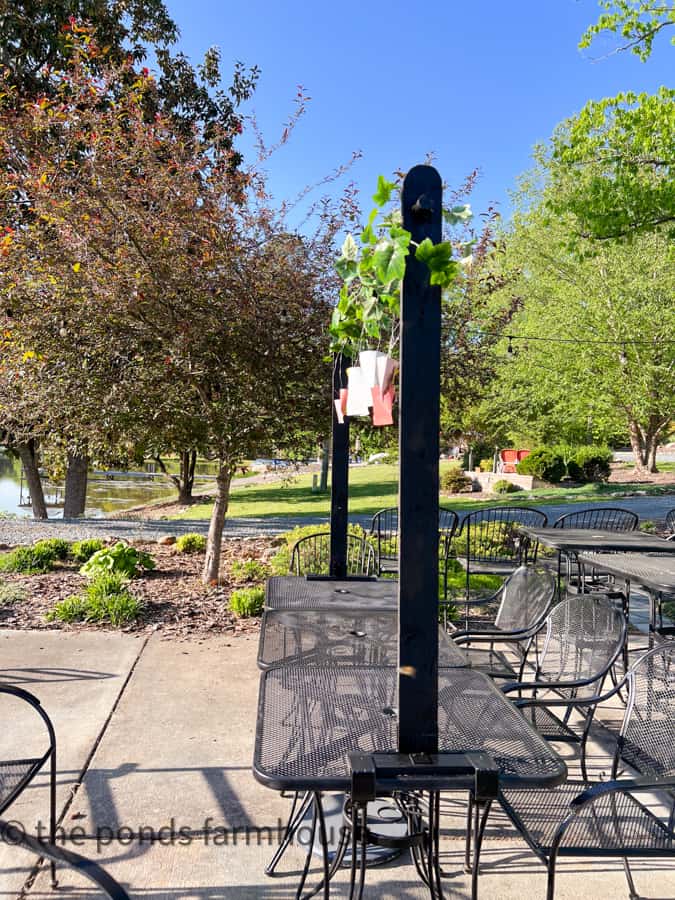
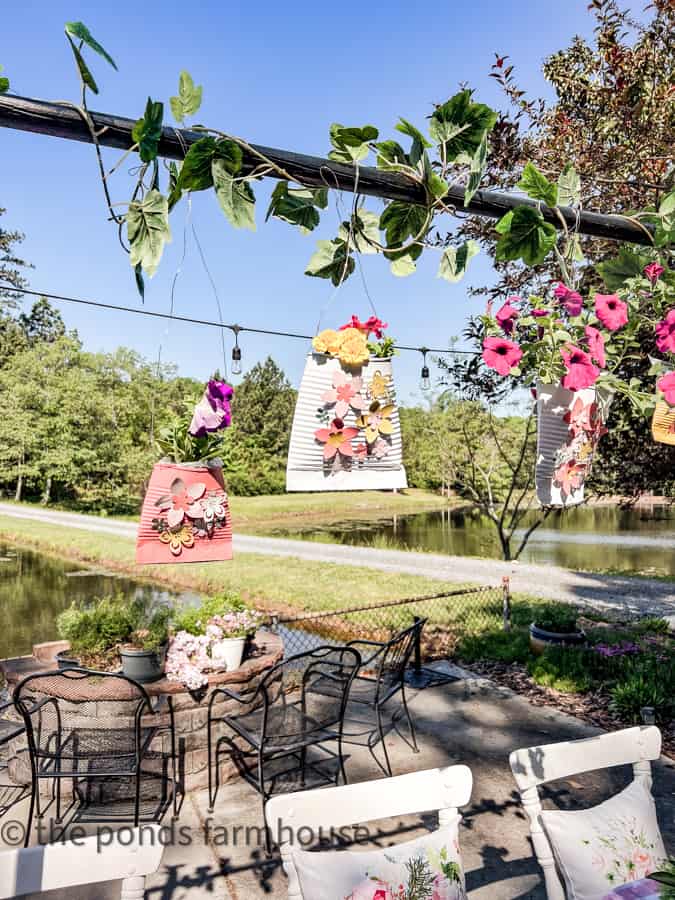
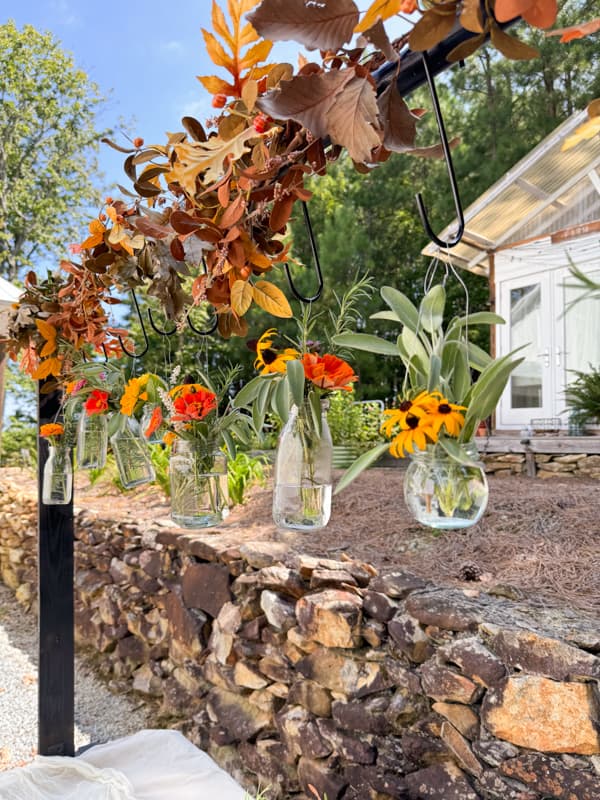
Now you can decorate over your tables with garlands of greenery or flowers. Add string lights and more to create a beautiful tablescape.
Now I’m setting up for a Mother’s Day Luncheon. I can’t wait for you to see the table and how the rod stand is decorated.
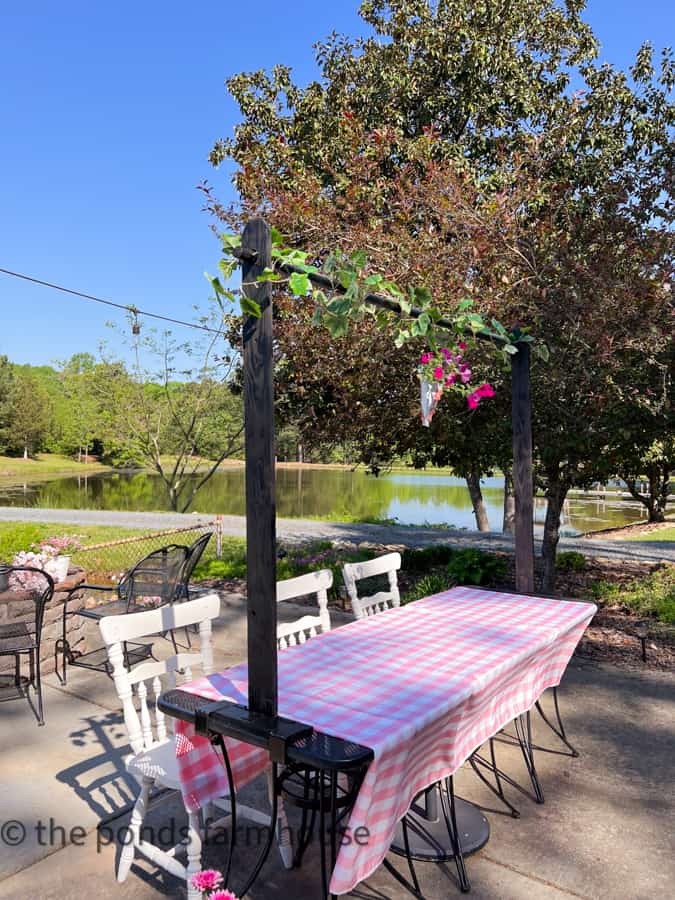
The over-the-table rod is decorated with DIY recycled tin can plant pockets. If you’d like to see the Mother’s Day Luncheon details, check out Creative Mother’s Day Luncheon Table Ideas.
Also, check out these additional posts that used the decorative over-the-table stand. Last summer, we hosted a Peachy Keen Dinner Party with deconstructed lampshades over the table. This fall, I added these DIY recycled jar-hanging flower pots to the table stand.

Pin It To Remember It
Did you find some great ideas you’d like to save for future reference? Hover over the images you’d like to save and pin to your favorite Pinterest Boards when you see the PIN button.

I had not seen this before, but what another great way to decorate a table area. I’m looking forward to seeing what you do for your mother’s day reveal.
Kudos to Bra
Bonnie,
Thank you! I’m excited to finally have one.
Should be kudos to Brad. He seems to always be on board to help with your projects.
Bonnie,
After I work on him for about 2 months.
I’ve never heard of these, but I love it!
Susan,
They look so cute decorated. Thanks for stopping by.
Love this idea, I had never seen one made so easily. Adding to my list of to do’s as soon as all the rain stops pelting our area!
Pinned
Shirley,
I can’t wait to see how yours turn out.
That is a fabulous idea! Would add to many different occasions. Saving this idea.Thank you for sharing.
Blessings
Oh I’m so glad you like this. Thanks for stopping by.
I’ve wanted to make one of these too since I saw Michele’s. Thank you for these easy to follow directions and thanks to Brad for making it happen. Now I have my next project to make! 🙂
AnnMarie,
It was so easy. I’m glad you like it.
So clever. I look forward to seeing different ways you decorate using your over the table rod.
Angie,
Thank you! I’m excited to finally have one.
Such a great idea!
WEndy,
Thanks so much.
This looks so good! I’ve wanted one of these for a long time. Now that you’ve given us instructions, I’ll have to get Big Al on the project!
KIm,
I kept it really simple. I’m glad to help.