How To Use A Wall Stencil To Create Budget Faux Wallpaper
Want to save money on expensive wallpaper? Here is a way to use a wall stencil to create budget-friendly faux wallpaper. Take a look at how easy it is to paint the design with a wall stencil.
We’ve been remodeling our tiny beach cottage for the past year, and this past weekend, we decided to tackle the bathroom.
I can’t wait for you to see the results.
(Posts on The Ponds Farmhouse may contain affiliate links. As an Amazon Associate, I earn from qualifying purchases. See the full disclosure details here.)
Wallpaper Inspiration
Since we began the project, I’ve been drooling over some of the wallpaper choices I’ve seen. I started saving images of the wallpaper patterns that would work in the space.
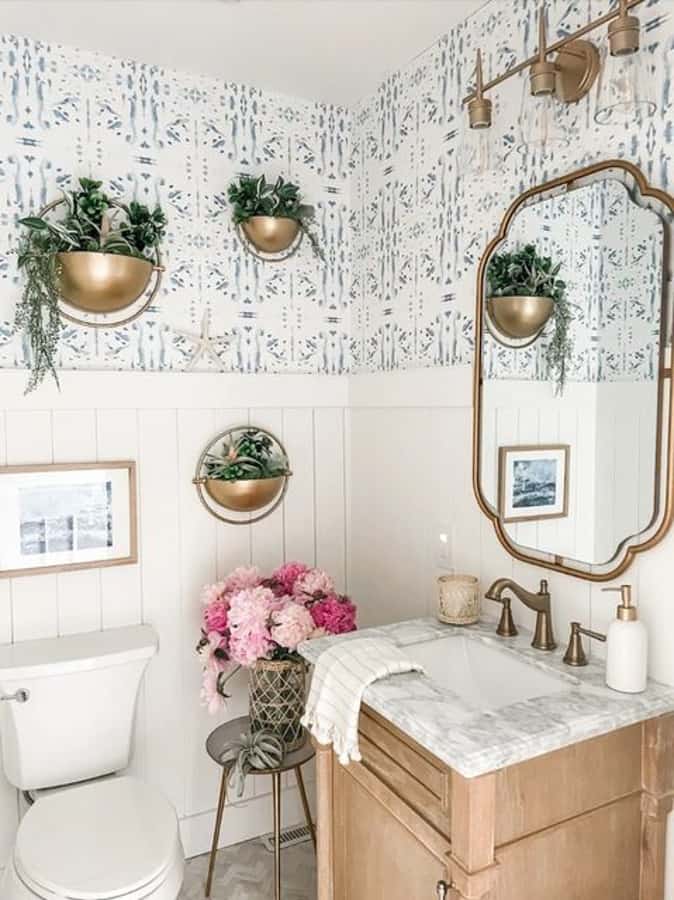
One of my favorites was the wallpaper Heather Krout used when she remodeled her bathroom.
I saved the link and continued to come back to this one repeatedly. Isn’t it stunning?
The Challenge
The biggest challenge was the faux textured wall in the bathroom.
This was a project from 17 years ago when I was faux-finishing everything in sight.
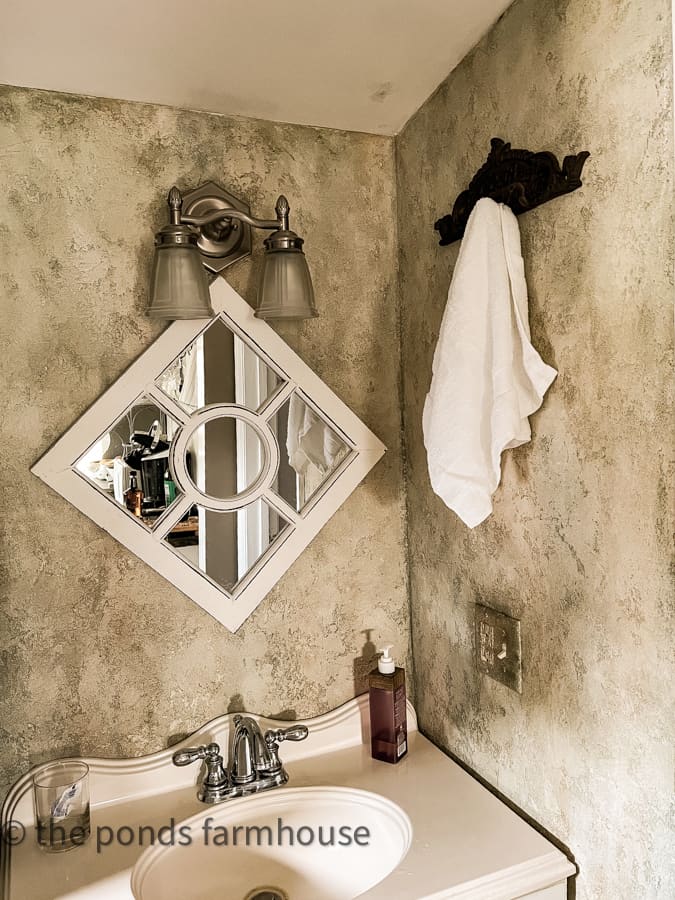
The textured wall would need to be sanded for the wallpaper to adhere. What a mess that would be!
The second challenge was the cost of the wallpaper. Although I only needed a small amount, the price, $126.00 per roll, was outside my budget.
So far, we have worked on this remodel with a shoestring budget, and although the amount of wallpaper needed was minimal, it wasn’t budget-friendly.
Can You Use a Wall Stencil To Create Faux Wallpaper?
The answer is yes and maybe!
It will undoubtedly depend on the wallpaper design you plan to duplicate.
The more complicated the design, the harder it will be to create a wall stencil for painting.
I liked the simple design, and I felt confident I could stencil my walls and save money.
How To Create a Wall Stencil for Painting?
First, I had this bright idea to make my stencil by drawing a pattern similar to the wallpaper on stencil material.
I used a Sharpie pen to draw my design and was somewhat happy with the results.
Then reality set in. It was time to cut the stencil.
The stencil could have been cut with my silhouette cameo, but I’m not good at creating my designs and didn’t want to take the time to learn a new skill.
I thought I could do it by hand. However, I would be wrong.
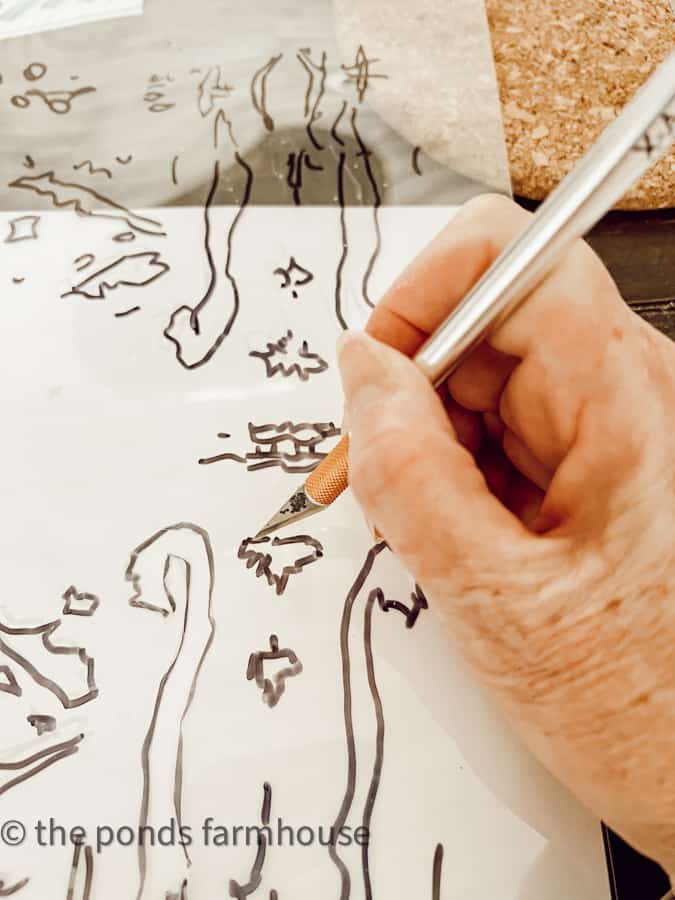
Oh, don’t get me wrong, I was able to cut the stencil with an exacto knife, but it wasn’t pretty.
The Solution
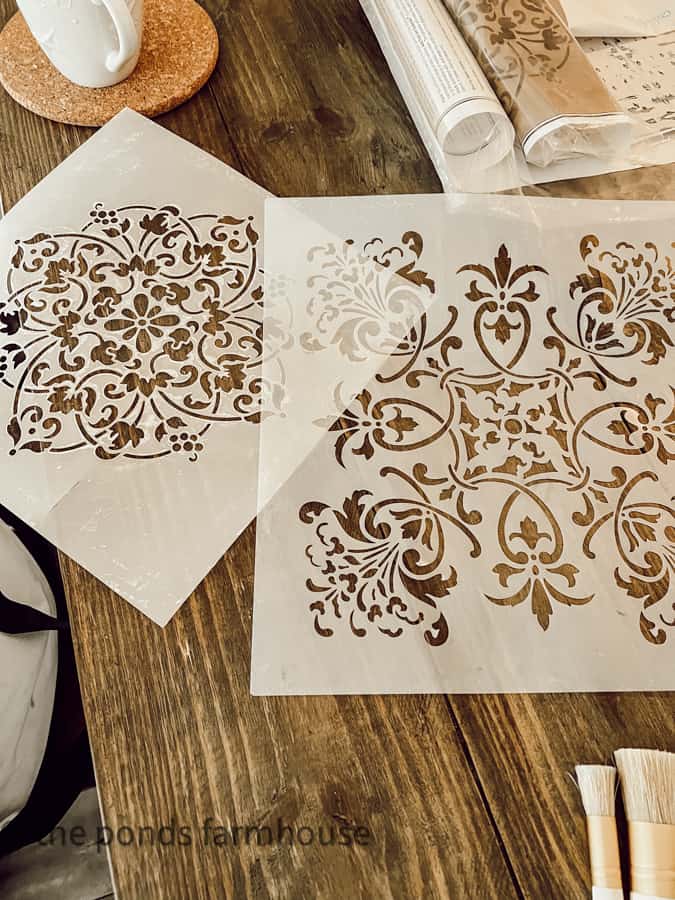
I was beginning to feel discouraged but then remembered that you can buy pre-cut stencils, and I had several packed away from my interior design faux finishing days.
After looking through all my old stencils, I found two that I thought might work.
They were not exactly like this gorgeous wallpaper, but I felt I could get a similar result.
Supplies For Wall Stencil Project
For this project, I began by painting the wall with Benjamin Moore Balboa Mist. This is the color of the living area in the beach cottage.
Then I chose three colors of blue for the wall stencil painting.
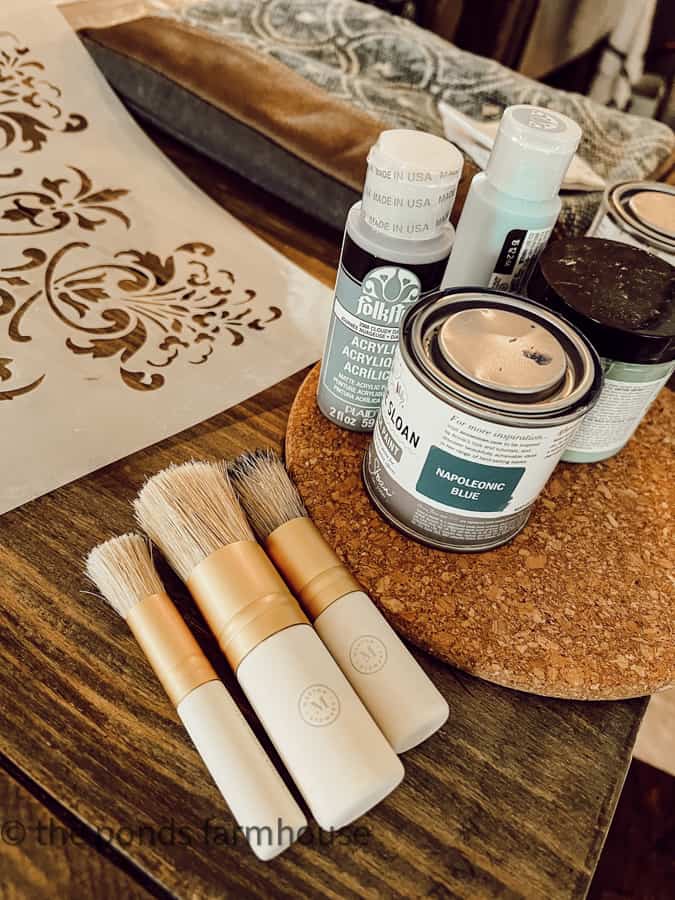
- Base Paint Color – Balboa Mist
- Stencil Brushes
- Stencil – great pattern. This pattern would also work.
- 3 Shades of Blue Craft Paint – Folk Art Dolphin Dauphin & Cloudy Day Plus, Napoleonic Blue by Annie Sloan.
- Painters Tape
- Laser Level
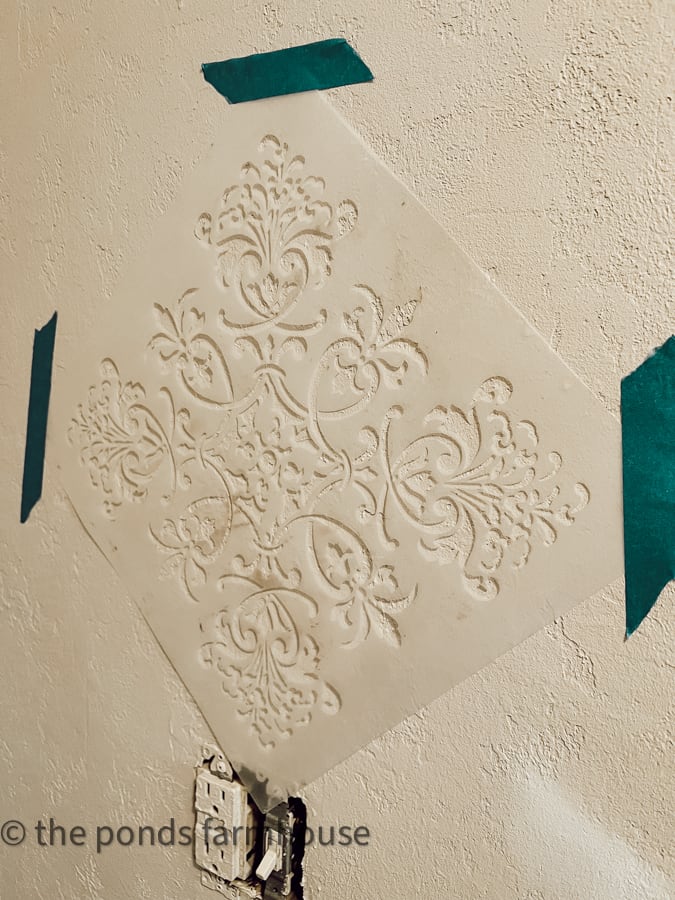
How Do You Stencil A Textured Wall?
The good news is that adding a wall stencil for painting to a textured wall is easy. The wall texture will add to the authentic wallpaper appearance.
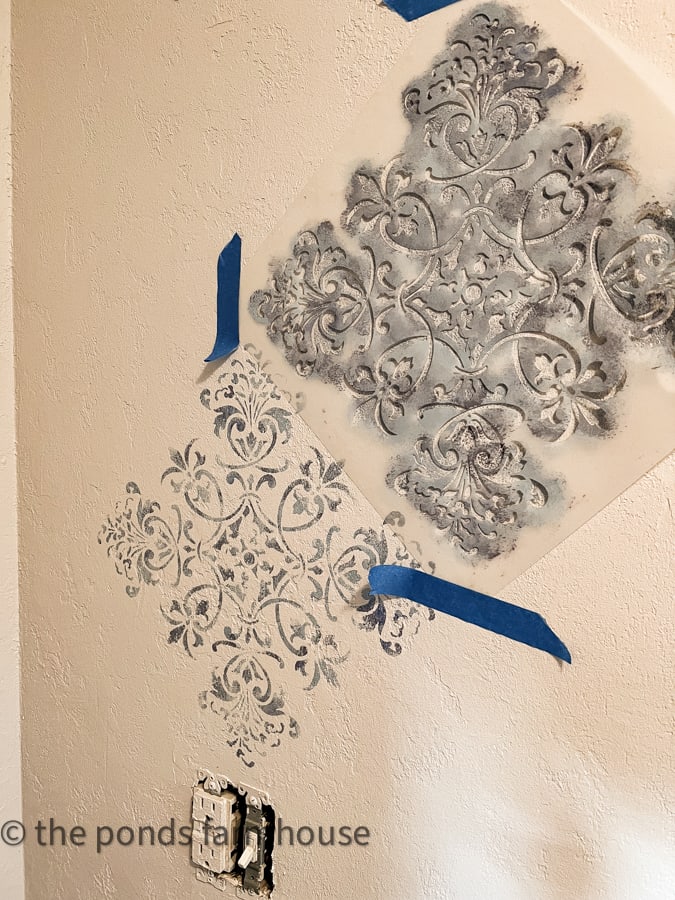
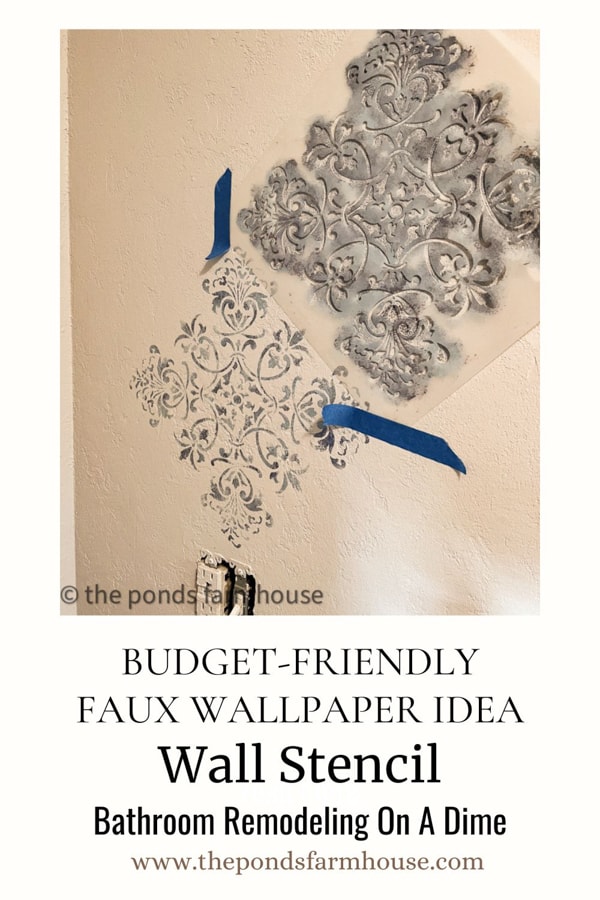
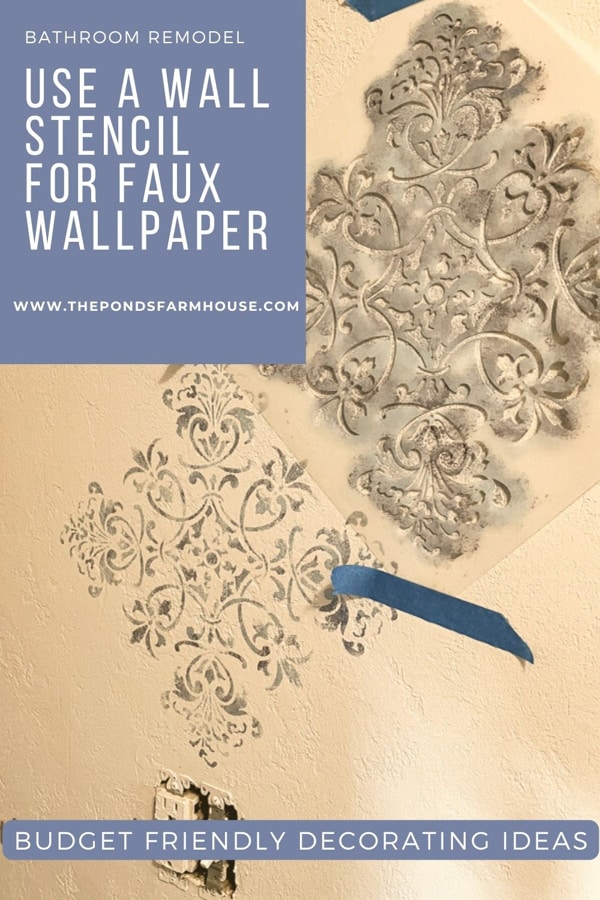
Begin by taping the stencil to the wall at a starting point. Be sure the stencil is level by using a laser level to align.
Because my space was limited, I began on the most visible spot of the wall.
How Do You Paint A Wall Like Wallpaper?
You can begin by adding the paint colors to a paper plate or pallet.
Here are the three paint colors I used.

Once the stencil is secured to the wall, begin painting it to resemble the inspiration wallpaper.
Add the lightest paint color to a stencil brush and remove any excess paint by blotting on a paper towel.
Dab the flat end of the brush over the open cuts in the stencil, pressing straight onto the wall. Do not brush the paint side to side.
The coverage should be random for this design. You want to avoid solid coverage.
The brush can be partially dry for the application. If you need heavier coverage, you can always add more paint.
Remember to build the coverage slowly to avoid adding more paint than needed.
Next, randomly dab the medium Cloudy Day paint color onto the wall. Add less coverage than you did with the lighter color.
Finally, add just a tiny amount of the Napoleonic Blue chalk paint to a smaller brush and lightly apply it to the stencil. Do not completely cover any of the openings with a darker color.
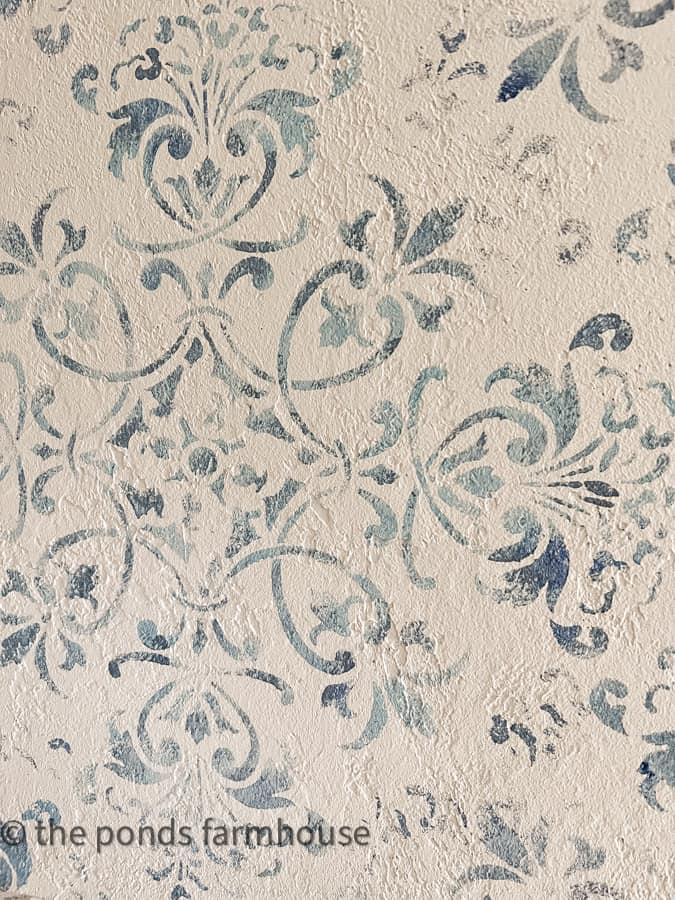
You can see how the three colors are applied randomly to achieve the desired effect below. Some areas barely show any paint, and other areas appear darker.
Continue By Moving The Stencil
The paint is applied with an almost dry brush technique so you can quickly move the stencil to the next spot.
Align the stencil next to the first application and continue with the same application technique as above until the wall is covered.
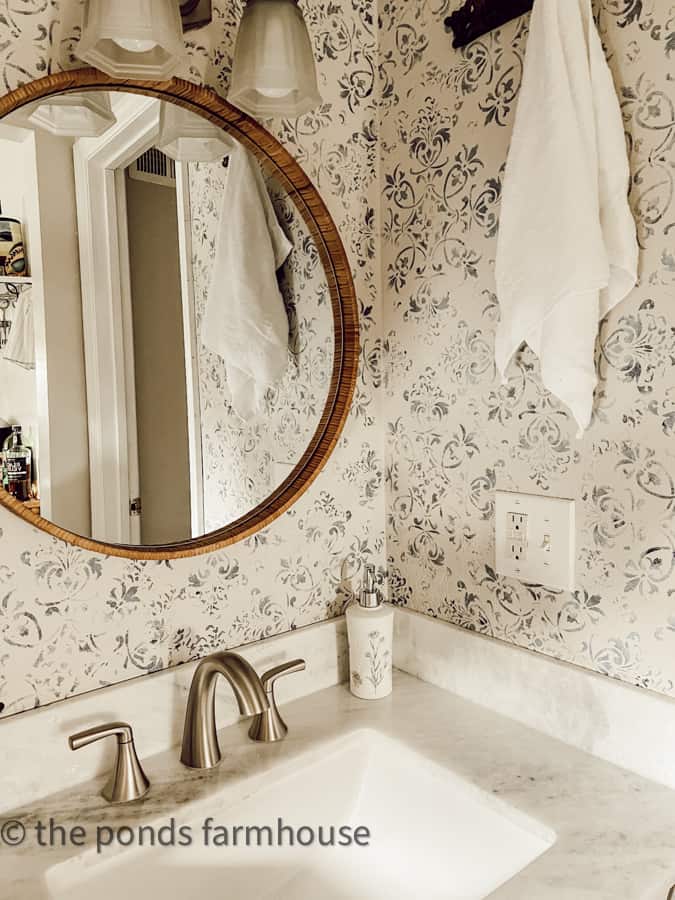
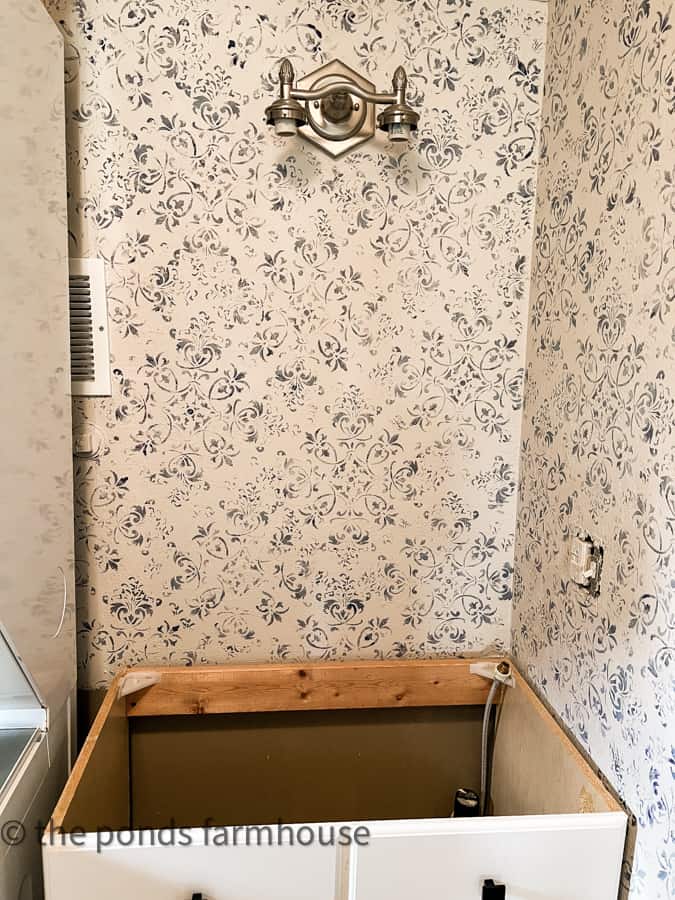
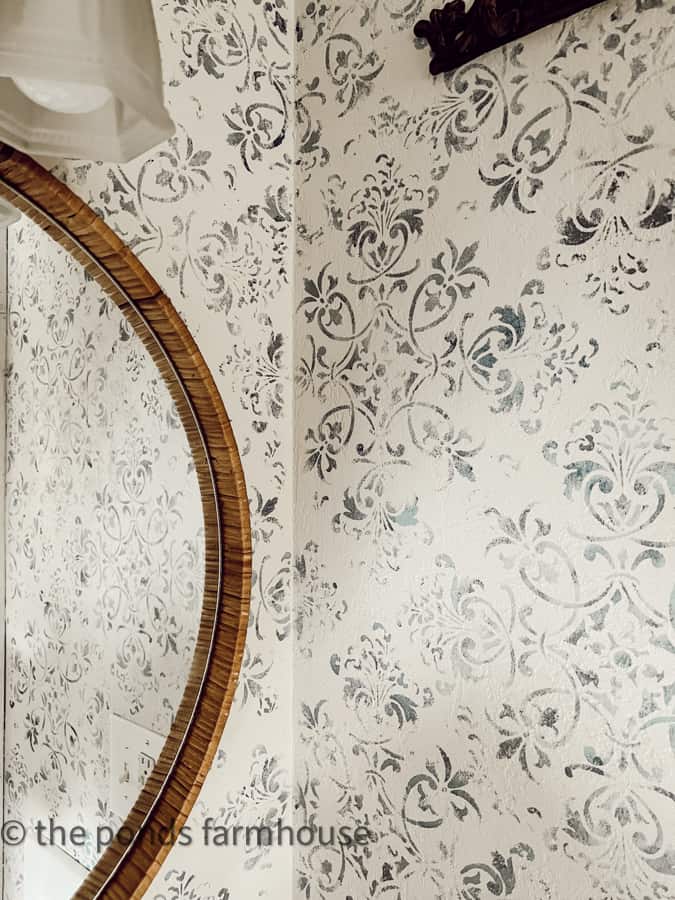
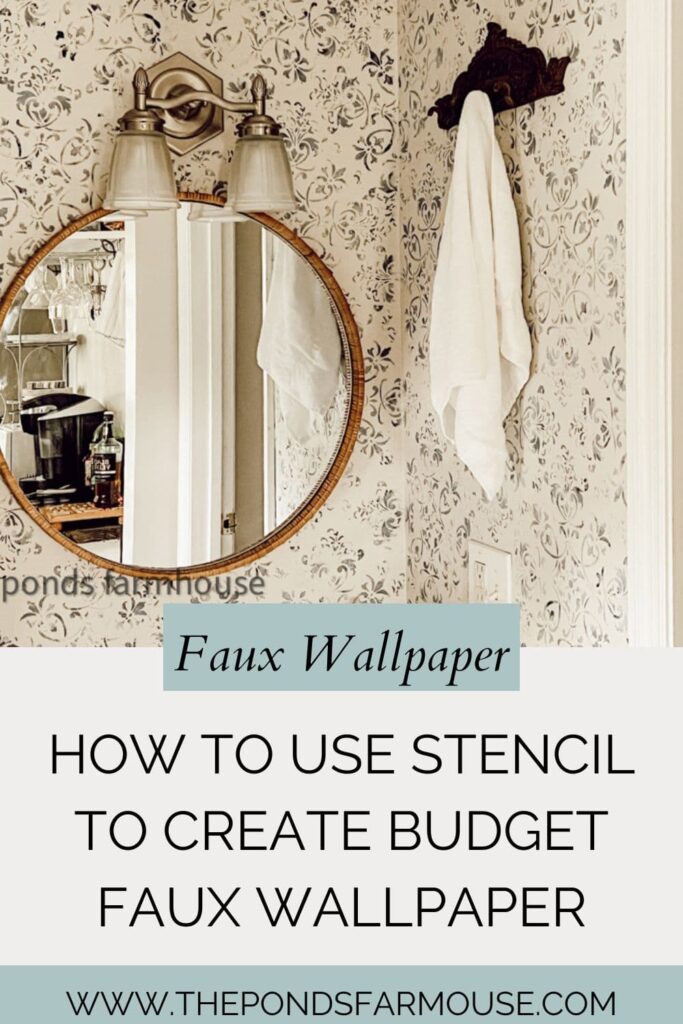
The Finished Faux Wallpaper
Finally, the wall is covered with the wall stencil paint technique, and here is a close-up of the wall.
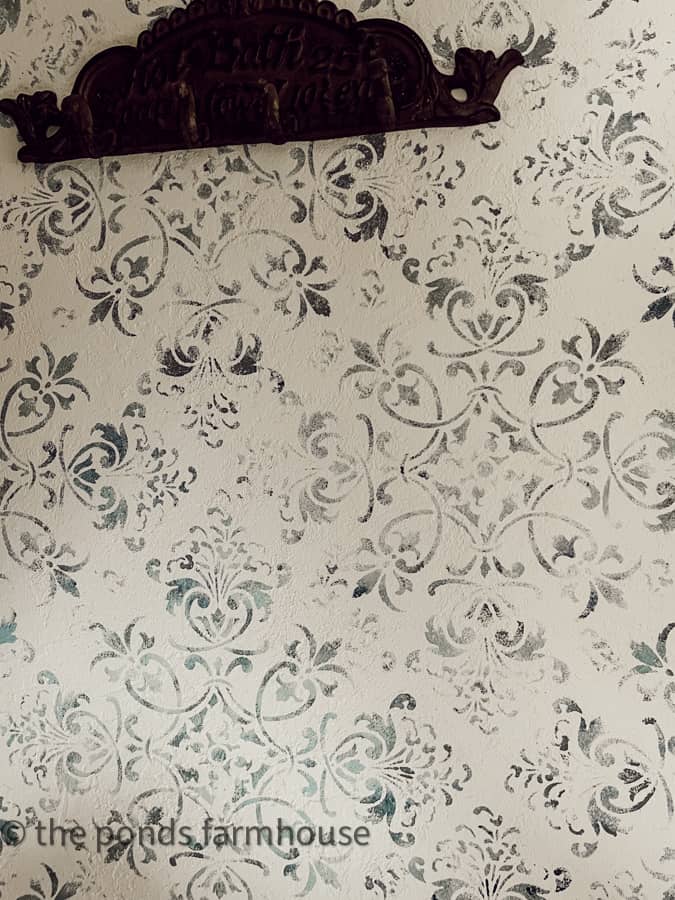
The area is so much brighter, and I love the new look. I can’t wait to finish this project.
Do You Save Money With Faux Wallpaper Technique?
With a simple design such as this, absolutely.
This wall space is small and only took me 2 hours to complete.
I already had the base paint left over from the living room, and I also had the stencil.
In addition, the dark color of chalk paint was left over from the DIY Flour Sack Painted Napkins I made last year.
Therefore, I only need two paint colors, each costing less than $3.00. That’s a $123.00 savings.
However, if you need to purchase a stencil and more paint, your cost will be approximately $30.00 – $35.00 for this faux wallpaper project.
Other Tiny House Remodeling Projects
In case you missed seeing these projects, here is a list for your convenience.
- Tiny House Ideas for Beach Cottage Before & After
- 7 Creative Small Bedroom Ideas
- How To Add A Wood Accent Wall
- How To Build An Open Kitchen Cabinet
- Thrifted Coastal Farmhouse Decor on a Budget
- How to Make A DIY Nautical Mirror
- Clever Ways To Add Light To A Room Without Wiring
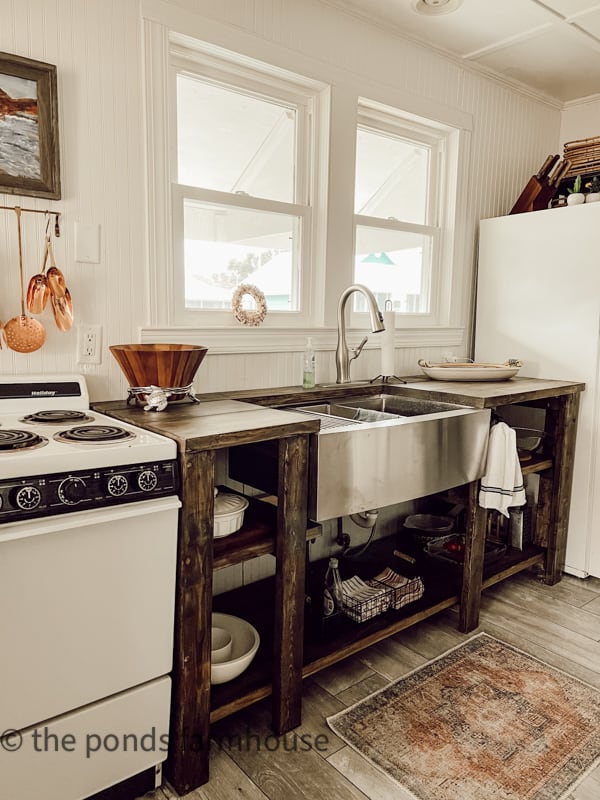
You can see a sneak peek of the new rattan-wrapped mirror and the brushed nickel faucet.
Bathroom Remodel for Under $500
Please look at the money-saving details for this bathroom renovation for less than $500.
I hope this idea will help you with remodeling projects around your home.
Resources
Scroll and click images for additional information.

Pin It To Remember It
Did you find some great ideas you’d like to save for future reference? Hover over the images you’d like to save and pin to your favorite Pinterest Boards when you see the PIN button.


Love your stenciling! You did an awesome job 👍
Gail,
I appreciate this. Thanks for your encouragement.
Good Morning……what a WOW factor……..you are amazing in your DIY work/fun …….love the wall and many other projects you have done…….Just Beautiful…..
Eva,
I’m so glad you like this. I’m so happy with the results and cost.
Rachel the stencil looks amazing!!! Love how it turned out!
Stacy,
I appreciate this.
This turned out beautifully! I can’t wait to see the finished bathroom. Hugs to you, my friend.
Renae,
Thank you for stopping by. I appreciate your compliments.
I love it! Looks so nice and when you tire of it, just a coat of paint, no aggravating wallpaper removal!!!
Robyn,
I agree! Thanks for stopping by.
@Rachel,
Absolutely love this, along with your “can-do” attitude. Just beautiful, can’t wait to see the finished product!
Gail,
Thank you for all your encouraging comments. Thanks for stopping by.
So pretty and job well done! Love the almost muted areas and soft look with this technique, I much prefer your ‘wallpaper’ to the one that inspired this 🙂
LInda,
I appreciate your sweet comments. Thanks for stopping by.
I did a lot of faux painting in our house in Virginia too… LOL Absolutely loving how this turned out!
Anne,
It was the hottest thing for a hot minute. LOL. So glad you like this one.
Love your stencil “wallpaper “! You did a great job and I bet the finished project will be wonderful.
Bonnie,
I can’t wait to share the finished bathroom. I’m so glad you like it so far.
Wowza! That looks fantastic. I’m very intimidated by this even though you make it looks and sound easier than I thought. Love the color too. Looking forward to seeing the finished bathroom. So pretty already!
Cindy,
I’m so glad you like it. Thank you for your comments.
Beautiful job!! You are such a Talented Lady. Love your Home also. Happy Spri g.🌷🐝🌿
Beckie,
I appreciate this so much. Glad you like it.
Looks great Rachel, I used to stencil everything in site! It is such a great way to change up a room on a budget. You did an awesome job.
Wendy,
I really appreciate this. Thank you for stopping by.
Hi Rachel, You did a beautiful job stenciling. I can’t begin to tell you how much I love your crafts and your budget friendly decorating. The projects and thrifting too.You really inspire me to do things. I can not wait everyday to see what you are up too. I just wanted you to know how much I enjoy all the projects…..keep them coming. Have a great day!!!
Gail,
Thank you for making my day. I love sharing my ideas and am so glad you like them. It really helps to know that they are appreciated.
This is a great idea! You did a fabulous job, it looks great. I have not stenciled for very many years, but would love to try this. Thank goodness you had the perfect stencils for this faux finish.
Patricia,
I haven’t stenciled in years, either. I am so glad you like it.
Hi Rachel, have to say I love how the stencilled walls came out, it looks amazing, I love stencilling and you did a brilliant job.xx
janette,
I appreciate your encouragement so much. Thanks for taking the time to comment.
I love it Rachel. It looks great and beats hanging wallpaper. A great budget solution.
Tammy,
I agree. I’m not sure about getting back into the real wallpaper game.
What an amazing transformation, Rachel! I LOVE the way this came together. It looks so good. We stenciled our TINY pantry a few years ago. We have orange-peel textured walls and it was a beast to complete at first but like you I’m so thankful we stuck with it because it changed the look of the entire pantry. Great job sweet friend! Hugs, CoCo
CoCo,
Yes, all those grand ideas that go out of style. LOL
I love this idea, Rachel! It looks amazing and I now want to try it on my office wall! Thanks for sharing.
Kim
I’m so glad you found this helpful
Rachel, I love the transformation!Just beautiful….you are so talented.
Mary,
I appreciate your encouragement.
Popping back in to say I’m featuring this tomorrow on Farmhouse Friday. It’s absolutely gorgeous! Pinned again!
Cindy,
I appreciate you so much. Thank you.
Thanks for sharing.
i love this!
Cheryl,
I am so glad you like this post. It sure save me a lot of money..