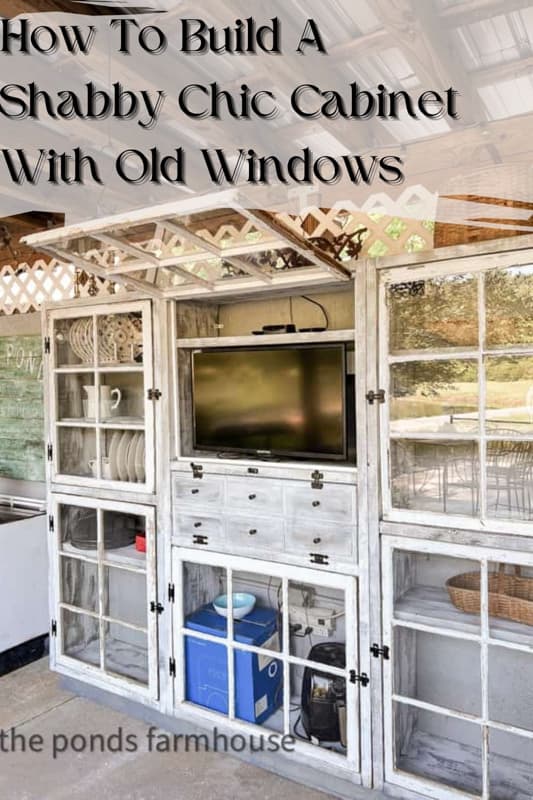
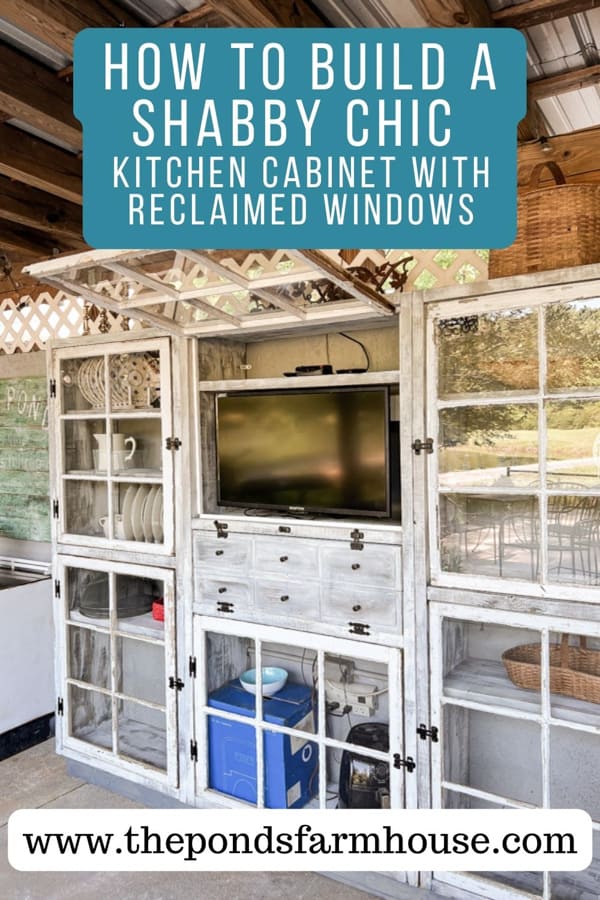
How To Build A Shabby Chic Kitchen Cabinet With Reclaimed Windows
Y’all know that I love the time-worn charm of old chippy paint for a shabby chic style decor. If you love the character and appeal of old windows, wait until you see how we salvaged the windows from our 1940s beach cottage to make a rustic kitchen cabinet. I’ll share the step-by-step process, from the spark of an idea to building a DIY outdoor kitchen cabinet with vintage windows. You will love how this cabinet looks, so let’s get started.
(Posts on The Ponds Farmhouse may contain affiliate links. As an Amazon Associate, I earn from qualifying purchases. See the full disclosure details here.)
What To Do With Reclaimed Windows?
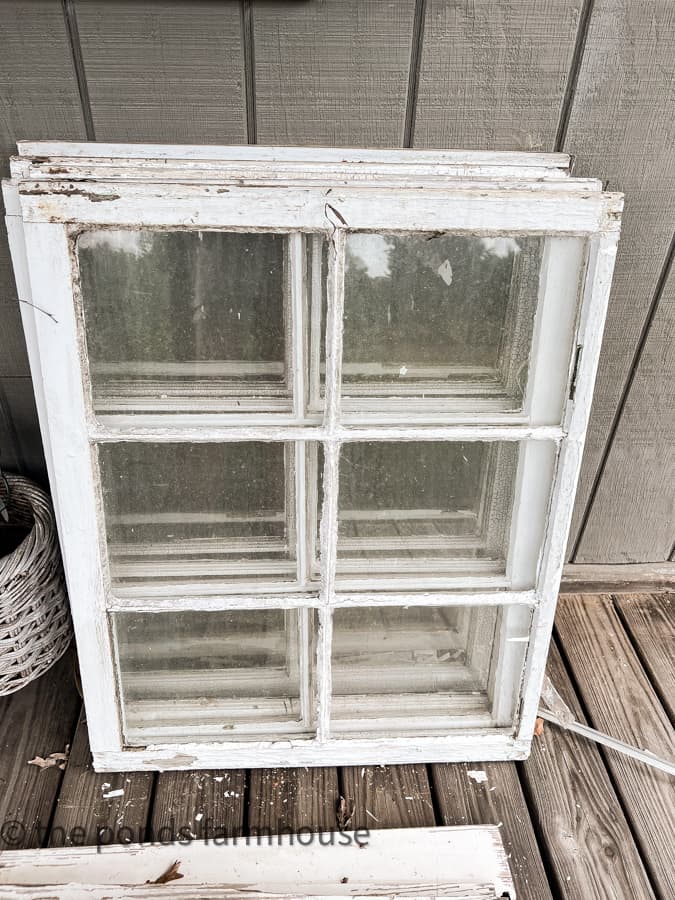
Remember when we remodeled our 1940s beach cottage? Well, we replaced all the old original windows at that time. Although the exact construction date is in question, the cottages endured Hurricane Hazel, which devastated a large portion of the North Carolina coastline in 1954.
We saved the windows without a clue what we might do with them. However, they had survived many storms for over 75 years, and throwing them away was a shame. We have used reclaimed windows for many projects over the years and felt certain that an idea would come to us. I’ll share some other projects and ideas at the end of this tutorial.
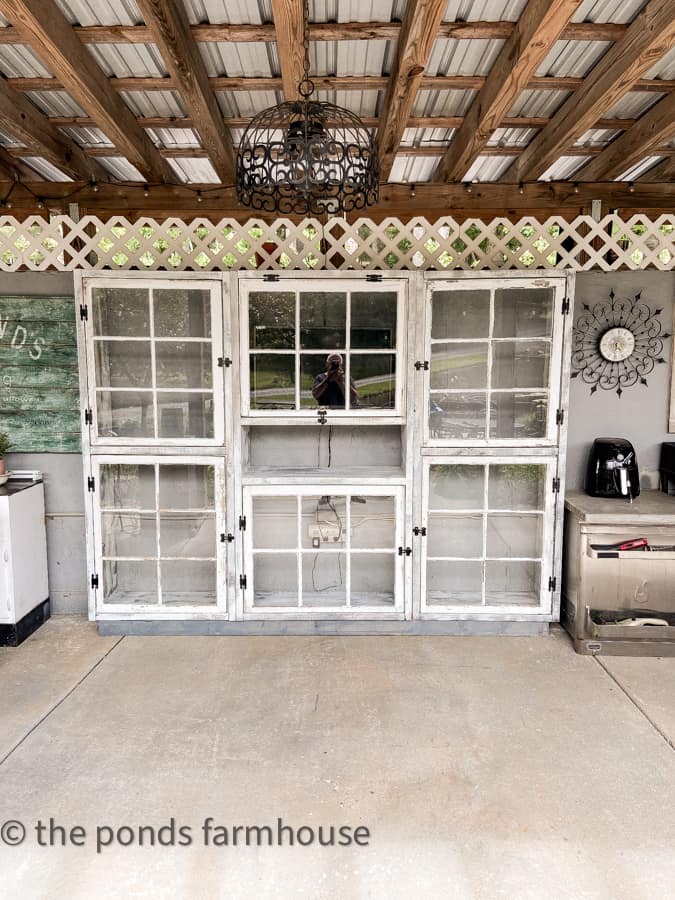
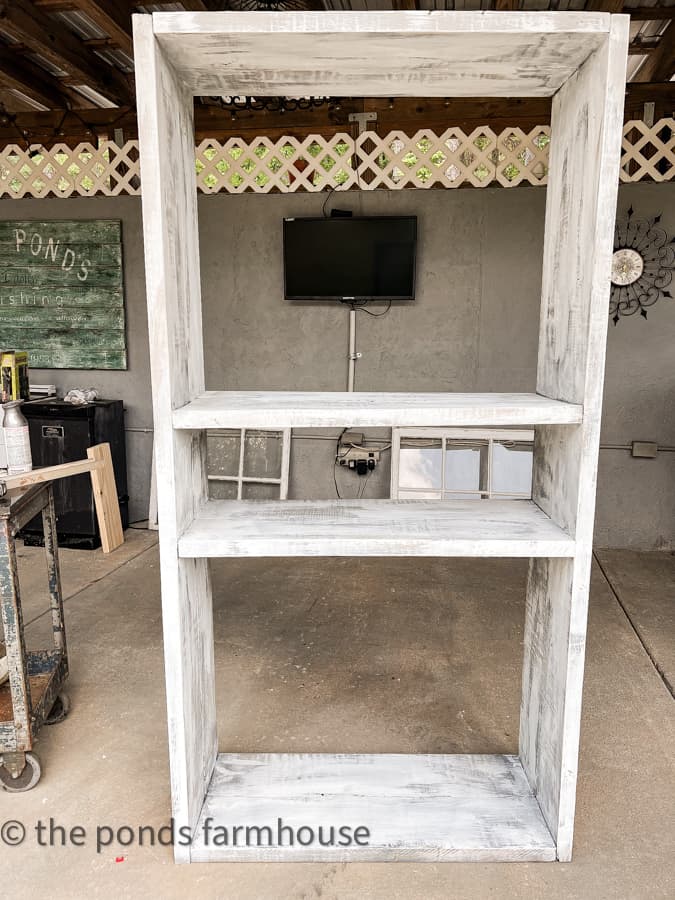
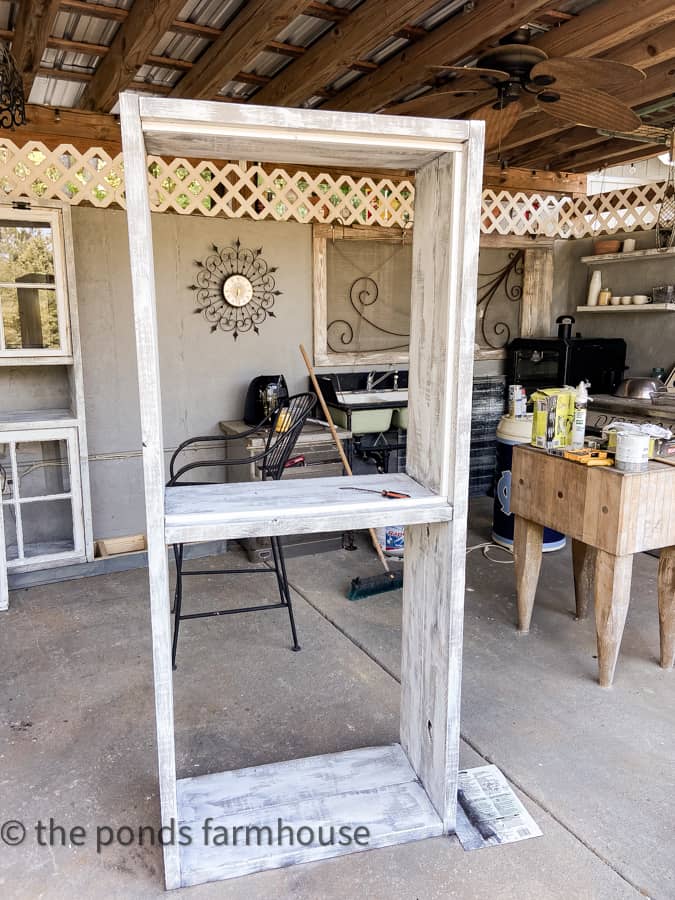
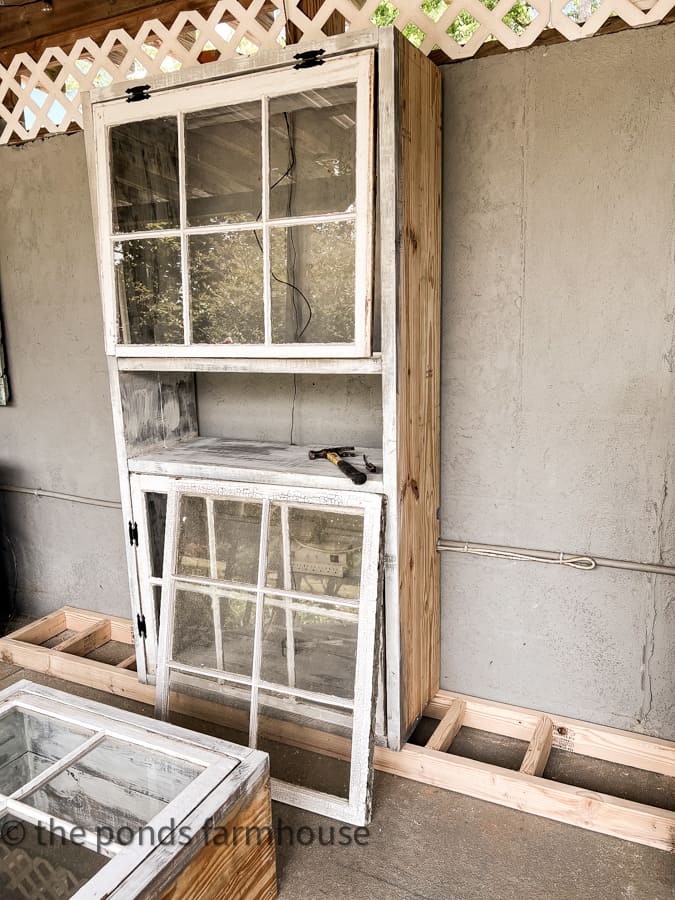
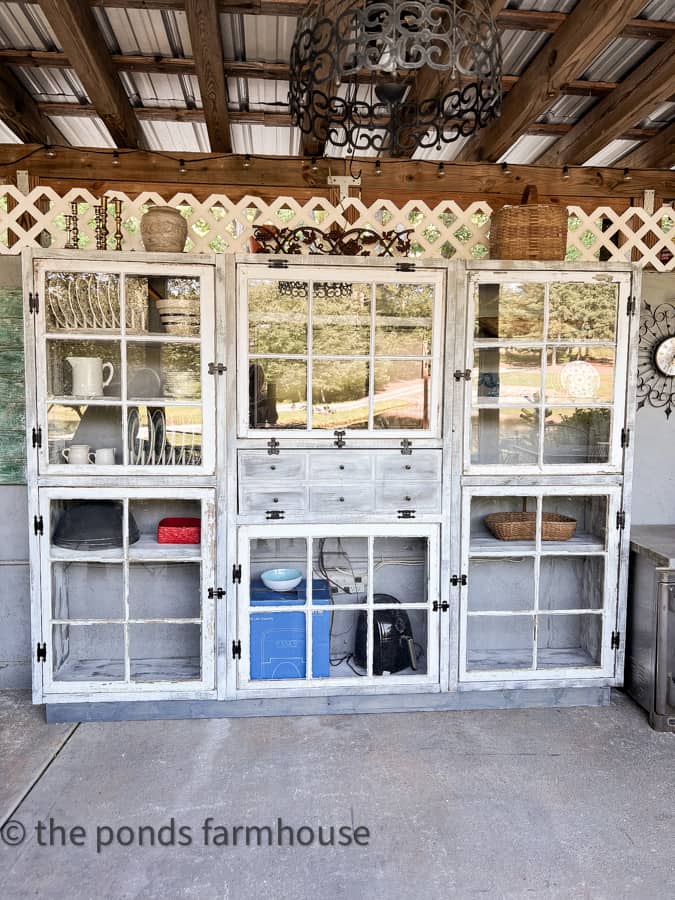
Brad conceived this plan and did most of the work. I can’t wait for you to see the Shabby Chic Kitchen Cabinet he made for the outdoor kitchen. I’ll provide you with the materials and resources we used to construct the cabinets; however, the dimensions may vary depending on the size of the reclaimed windows. The Shabby Chic Kitchen cabinet is almost complete in the image below; however, wait until you see it finished.
The Plan for a DIY Shabby Chic Kitchen Cabinet
Here are the key factors to consider when designing a rustic kitchen cabinet featuring reclaimed windows.
- The size of your windows.
- Do you plan to strip the old windows and repaint them?
- Where are you planning to use the cabinet?
- What is the purpose of the cabinet?
- Hardware choices should be considered.
- How will you finish the cabinet base? Paint or stain?
- Will the cabinet be free-standing or built-in?
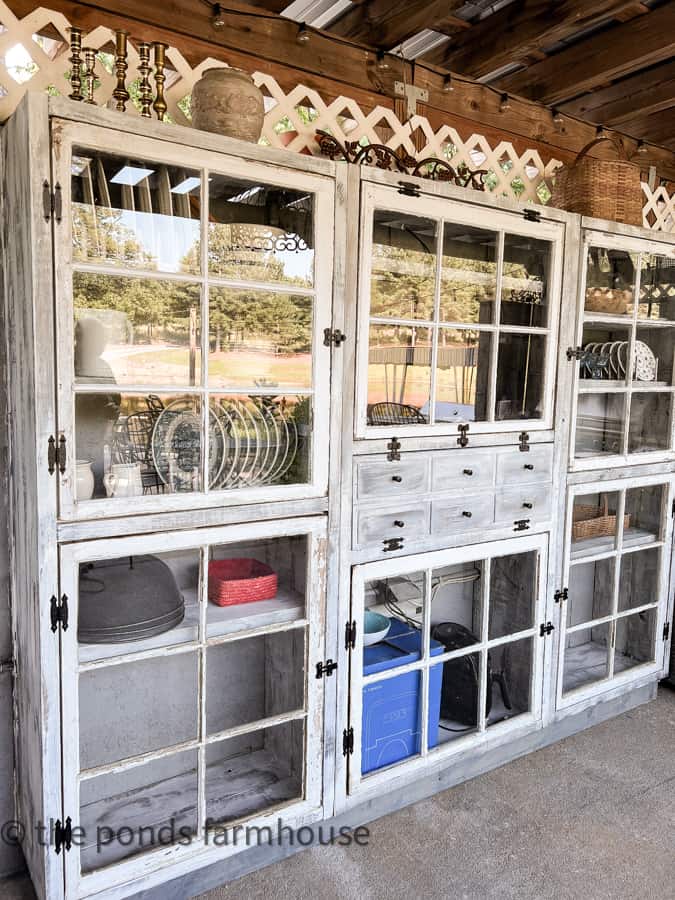
First, we were fortunate that all the reclaimed windows were the same size, making the construction simple. We love the shabby chic look of chippy white paint, so there is no need to repaint the windows.
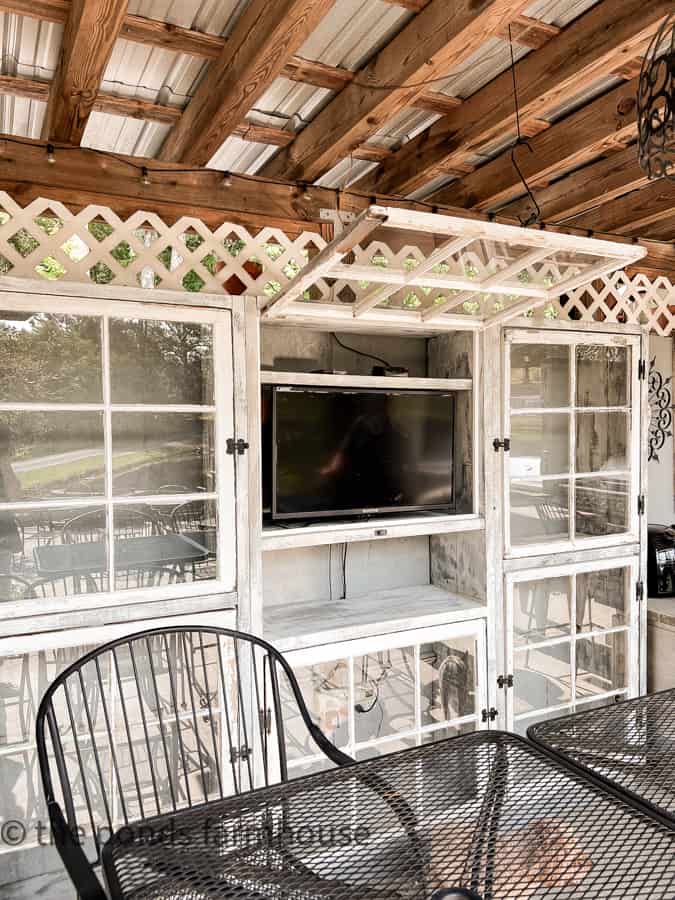
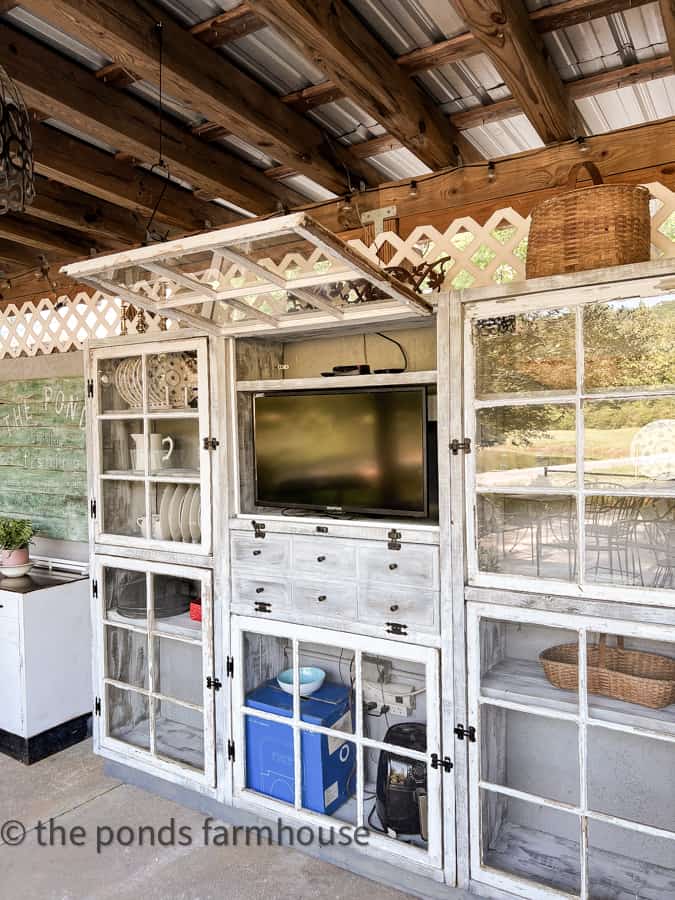
The plan for our cabinet is to provide outdoor kitchen storage and a protective cover for the outdoor TV. Additionally, the cabinet would be built-in, utilizing the outdoor kitchen wall as its back.
To achieve the rustic kitchen cabinet style we desired, a faux reclaimed wood technique was used to paint the new lumber.
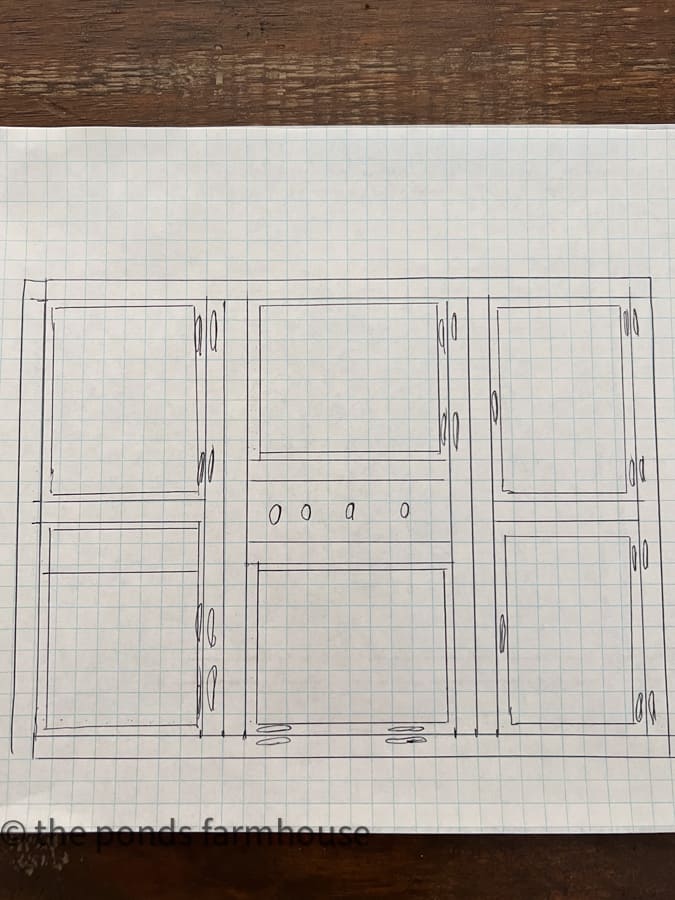
Draw The Plan
The final step was to draw a plan for the DIY cabinet that would consider the desired purpose and window sizes.
It was necessary to install the windows horizontally to provide a space for the TV. However, the side windows must be installed vertically to ensure the cabinet fits within the provided space.
All three cabinets will be 15 inches deep and 6 feet tall. The center unit is 37 1/2 inches to accommodate the width of the TV and horizontal window size. The two side units are 31 inches to accommodate the vertical width of the windows. This was our plan on paper.
Supplies for A DIY Reclaimed Window Rustic Kitchen Cabinet
While determining the materials needed to build the kitchen cabinet, we decided to construct three separate cabinets and then attach them.
The size of the entire cabinet felt overwhelming to manage as a single unit. Plus, the three units can be disassembled and used in other areas if we remove the cabinet from this space.
We began with the center cabinet, which has an open area between the two windows.
Supply List
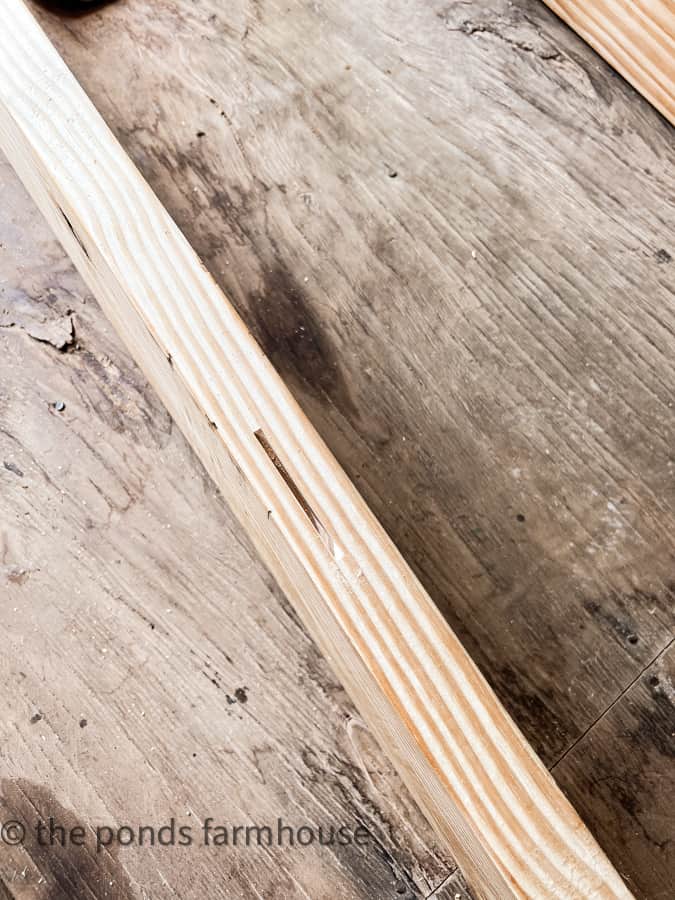
- 18 – 2″x8″x8′ Lumber for Frame
- 6 – 2″x 6″ x 8′ Lumber for Shelves
- 3 – 2″x 4″ X 8′ Lumber for the platform base (optional)
- 7 – 8′ Door Stops
- 1 – 4×4 thin, smooth plywood
- 6 – Door Pulls
- 4 – eye hooks
- 2 – chains
- Wood Glue
- Paintable Caulk
- Wood Screws
- L Brackets
- 28 – Shelf Clips
- 14 – Rustic Door Hinges
- 8 – Barn Door Latches
- Oil-Based Stain Classic Grey
- Antique Pewter Spray Paint
- French Linen Chalk Paint or Aged Grey Chalk Paint
- Old White Chalk Paint or Linen Chalk Paint
Tools for Construction
Here are the tools used to build the DIY cabinet frames.
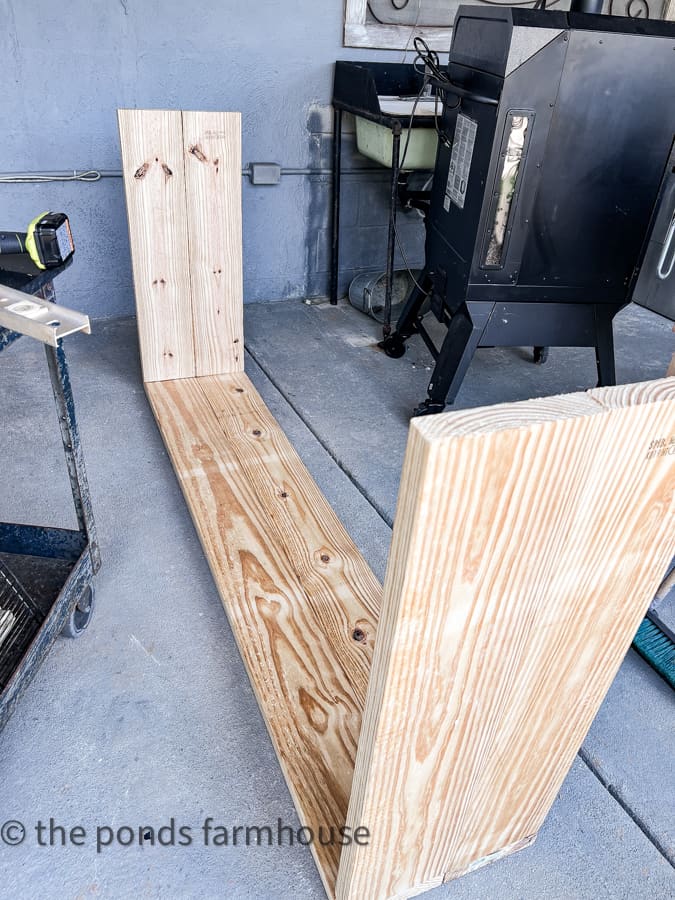
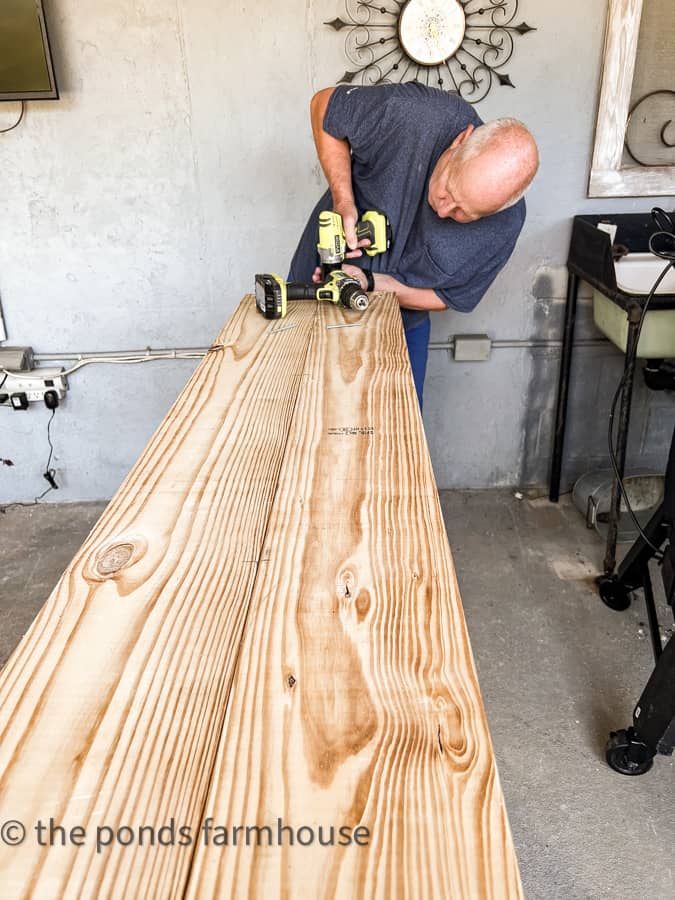
Building The Cabinet Frame
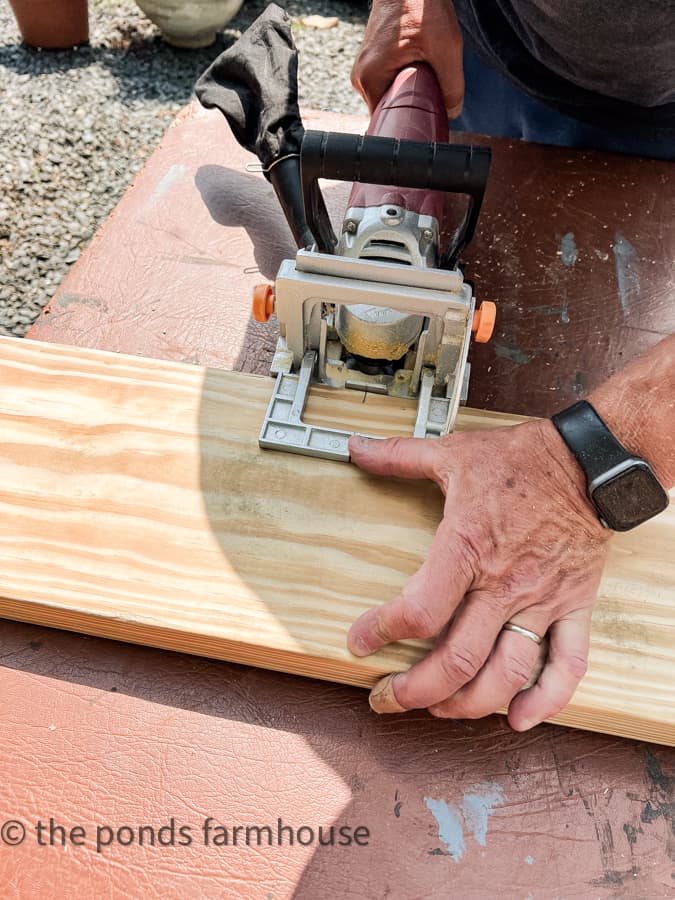
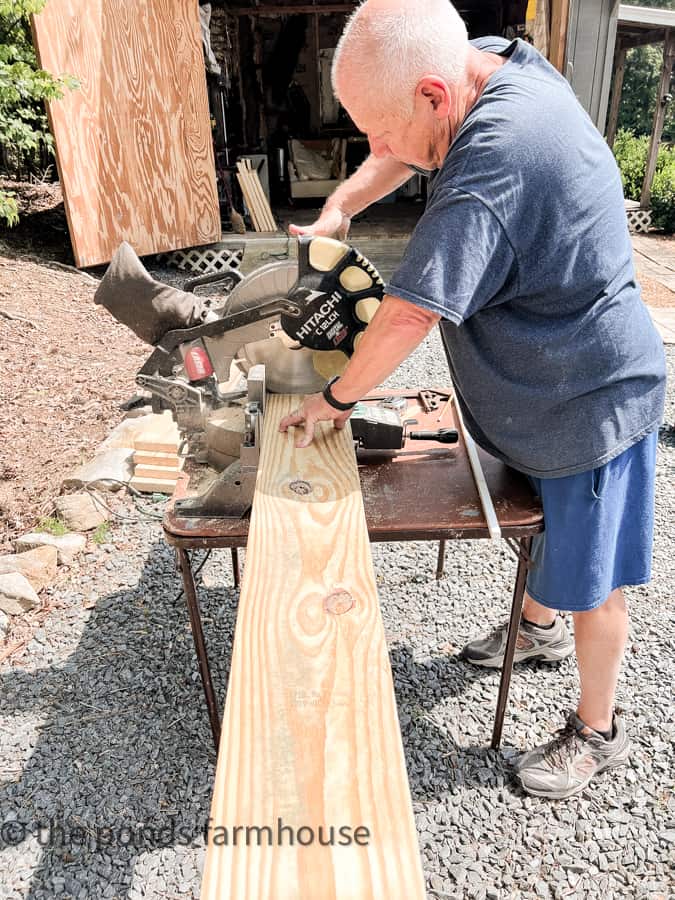
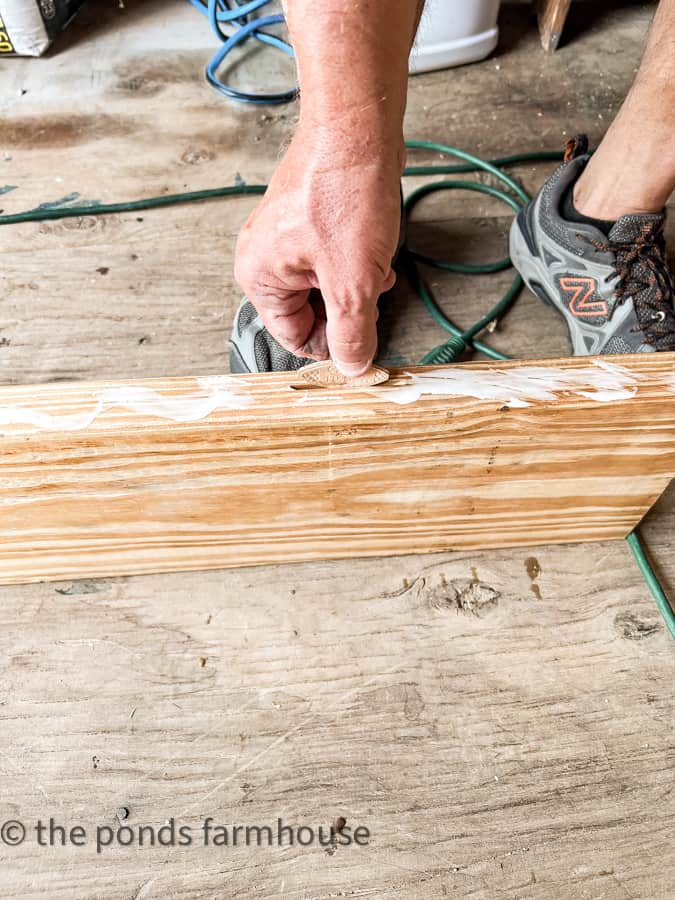
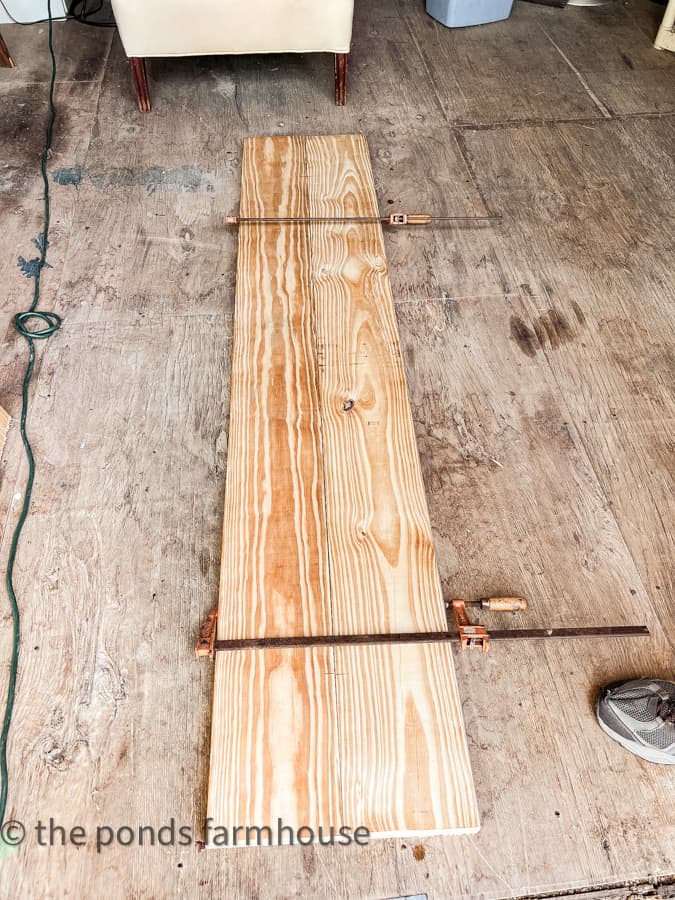
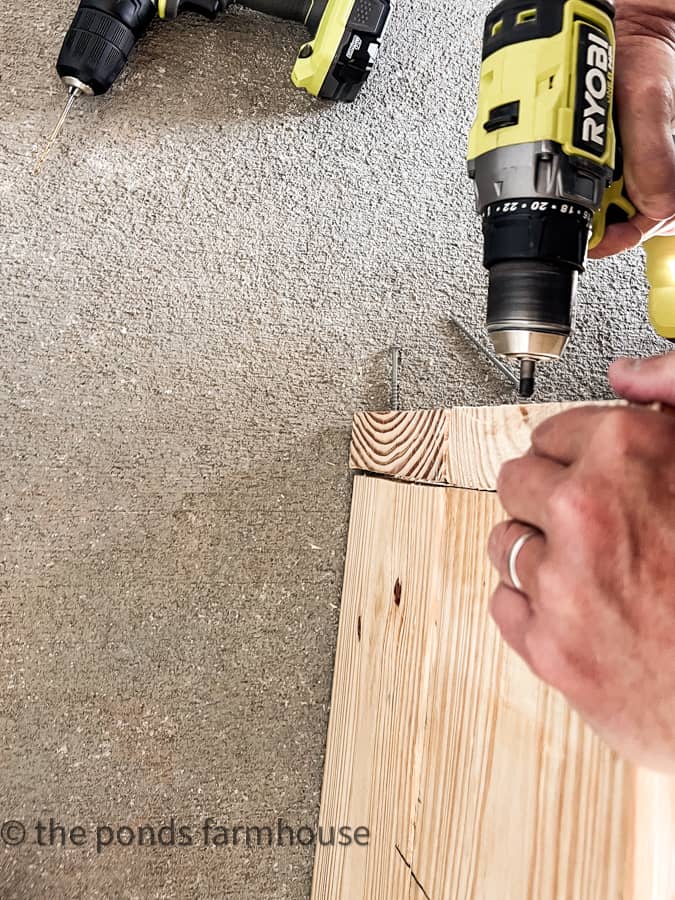
After the lumber is cut to size and the biscuit joiner is used to cut the joints, assemble the cabinet frames. Apply wood glue to the adjoining edges of the lumber and the biscuit joint.
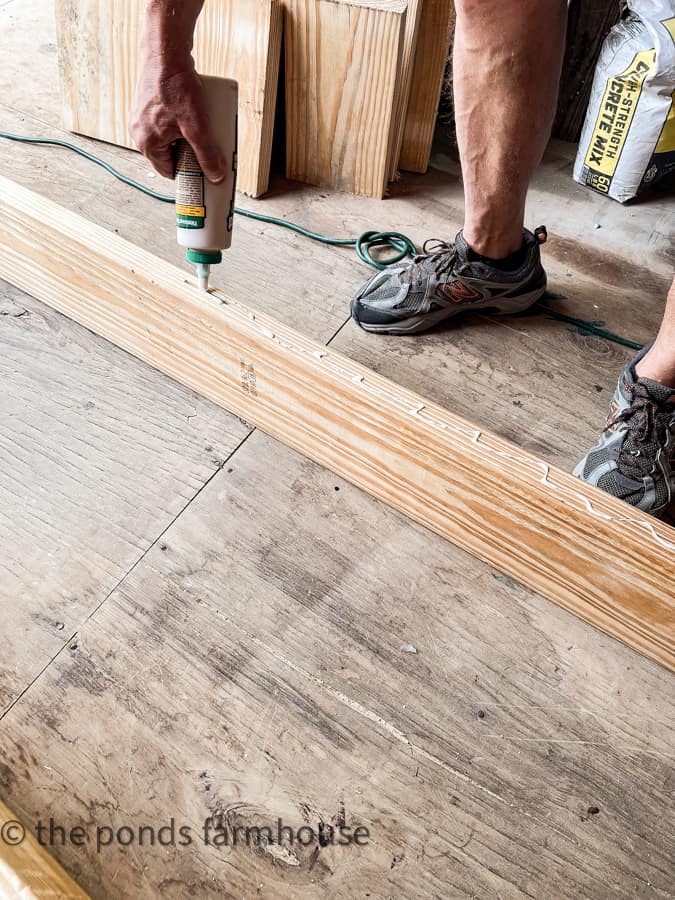
Add biscuits and align the two boards. Use the bar clamps to secure the connection. You will want to leave the clamps on for at least 30 minutes. Then allow the glue to cure overnight before moving to the next step. You will repeat this process for all four sides of each cabinet and all the dividing sections.
Assemble Each Cabinet Frame
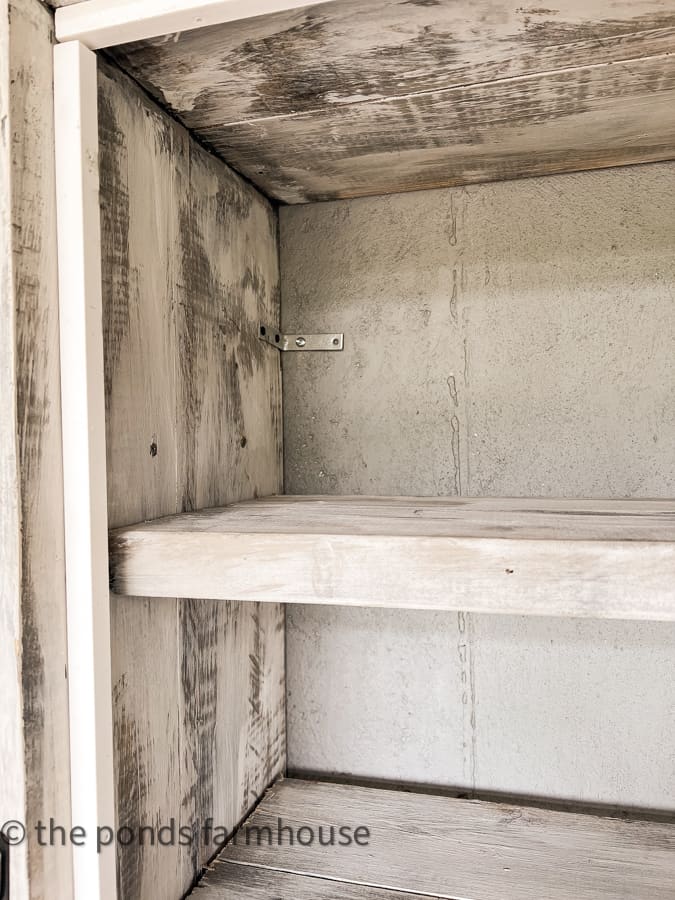
Now you are ready to assemble the cabinet frames. Begin by forming a box with the four sides of the cabinet. Use wood screws to assemble. Finally, position the divider shelves and use the wood screws to secure them into position.
Painting Shabby Chic Kitchen Cabinet
Why Seal With Caulk? (optional)
You may be using your cabinet in an indoor area and, therefore, may not feel the need to use caulk to seal the seams. Since our Shabby Chic Cabinet is in our outdoor kitchen, we wanted to protect the interior as much as possible.
Before painting, we used a paintable silicone caulk to seal all the wood seams. The caulk should be allowed to dry before beginning to paint.
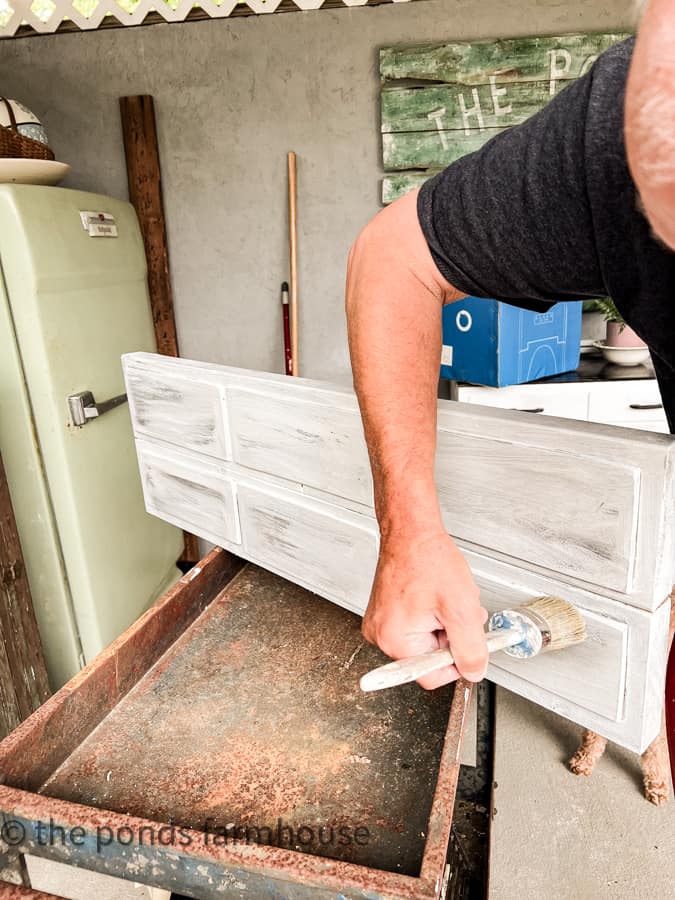
Faux Paint Technique.
I used several different paint choices and techniques to create a faux rustic finish for the Shabby Chic Kitchen Cabinet.
I began with an oil-based stain to achieve an aged look to the new lumber. Here we used MinWax Penetrating Oil Stain. I allowed the stain to dry for about one hour.
Next, to darken some areas of the wood, I randomly used Antique Pewter Spray Paint over the stained cabinets. Then, add some random strokes of the French Linen Paint. There is no need to allow drying time. I continued to build up the colors to create a distressed faux finish.
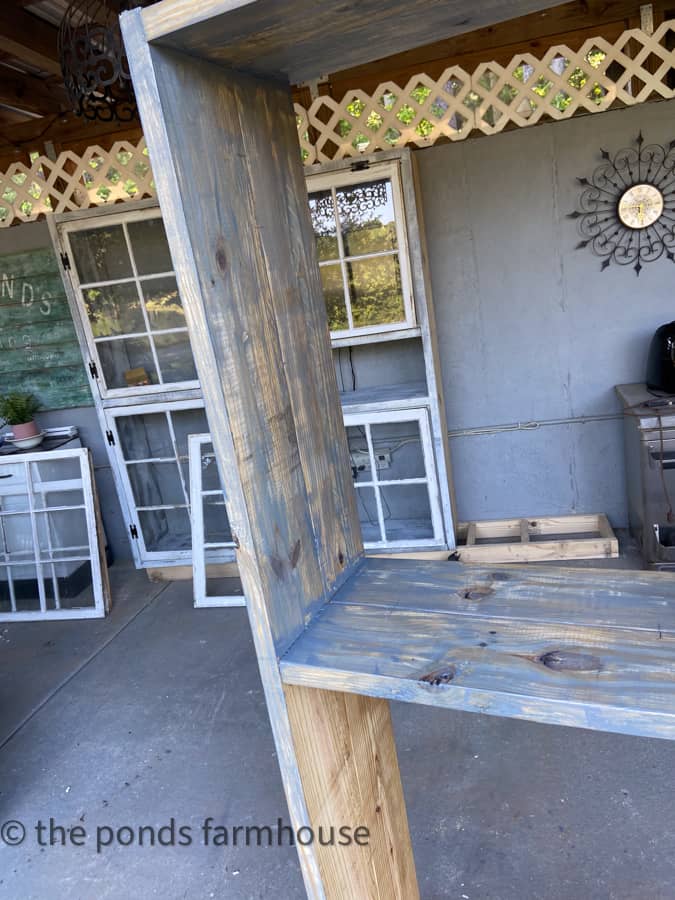

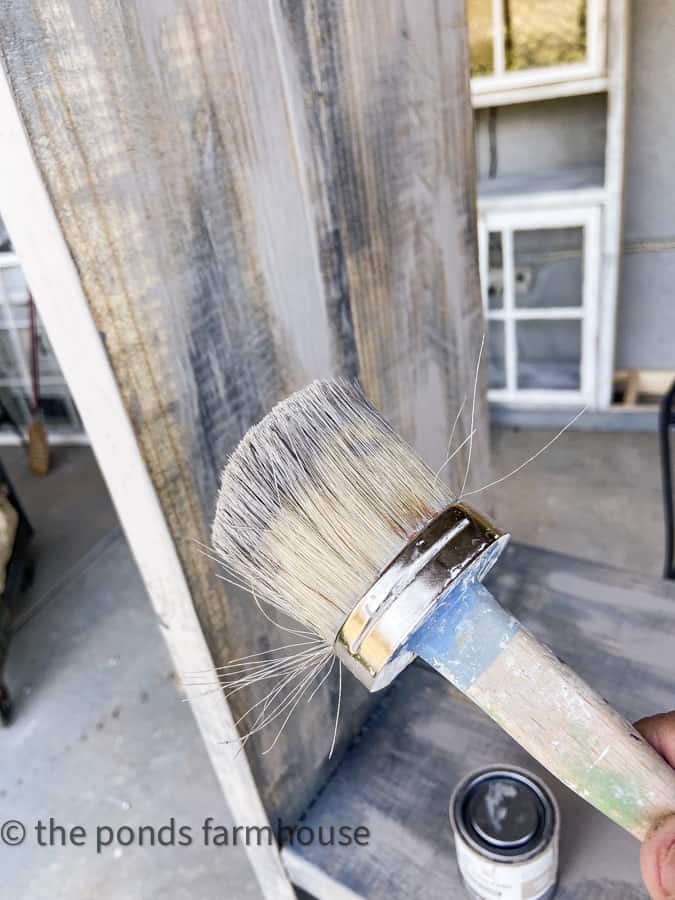
To finish, I applied a dry brush technique on the entire surface with the old white chalk paint. You don’t want to cover the surface completely, but allow much of the previous colors to bleed through.
You can see more faux painting techniques in How To Whitewash Wood – Ceiling Technique and How To Make New Wood Look Like Old Barn Wood.

Add Reclaimed Windows
Once all the cabinets are dry, you are ready to add the windows.
To begin, ensure that the window stops are securely in place and evenly distributed inside each cabinet. Measure the depth of the windows and add the stops accordingly, ensuring that the windows fit securely.
To add the stops, all that’s needed is a hammer and some basic finishing nails. Once the windows are added, they should be flush with the outside of the cabinet frame.
Next, lay the cabinet on its back and fit the reclaimed windows into the frame. The window should be centered inside the opening and flush with the edges of the frame.
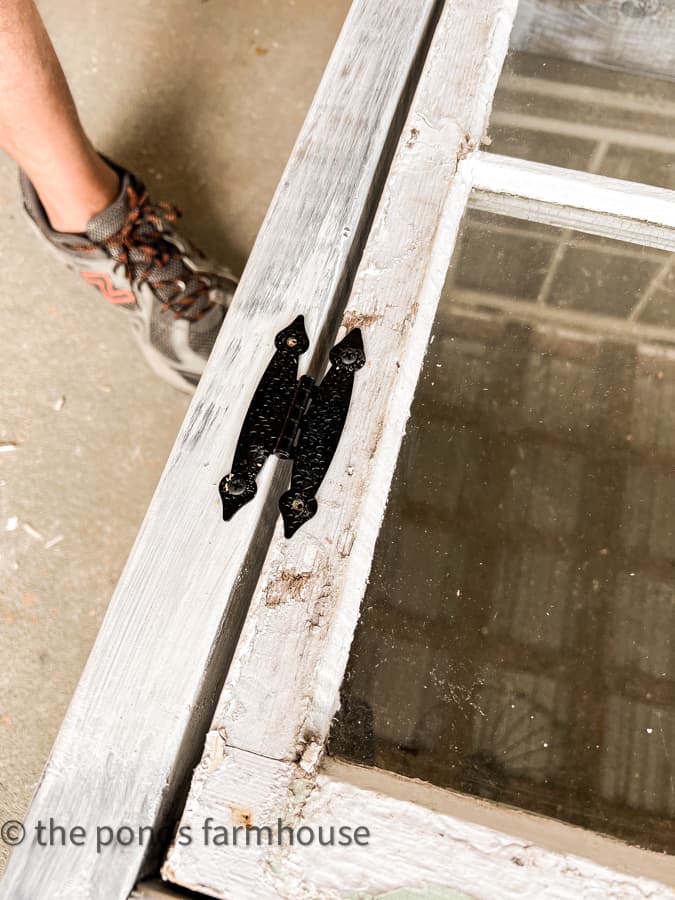
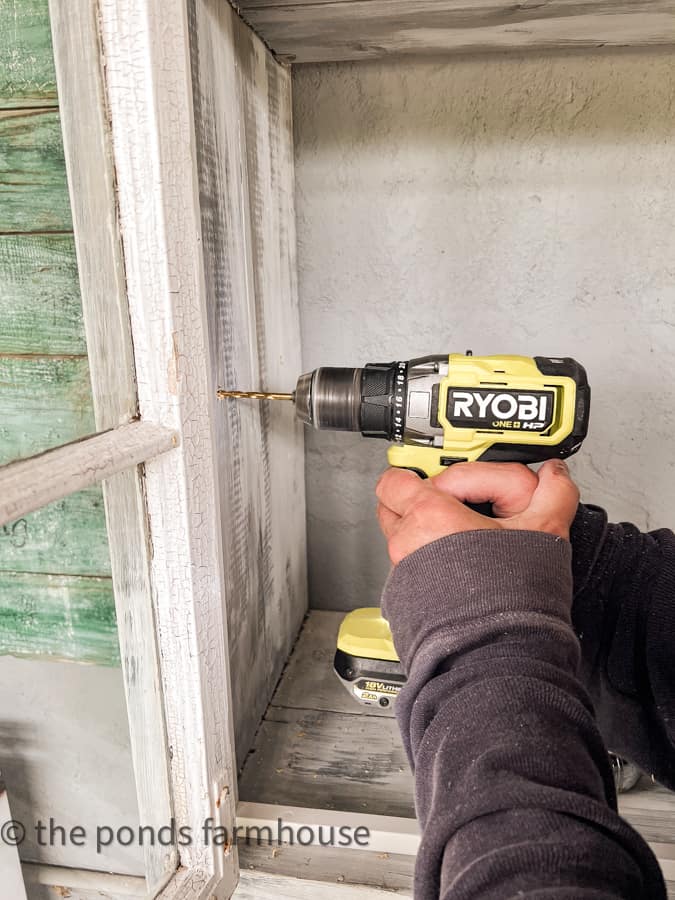
Brad used a cordless drill to attach the hinges to the frame and the window.
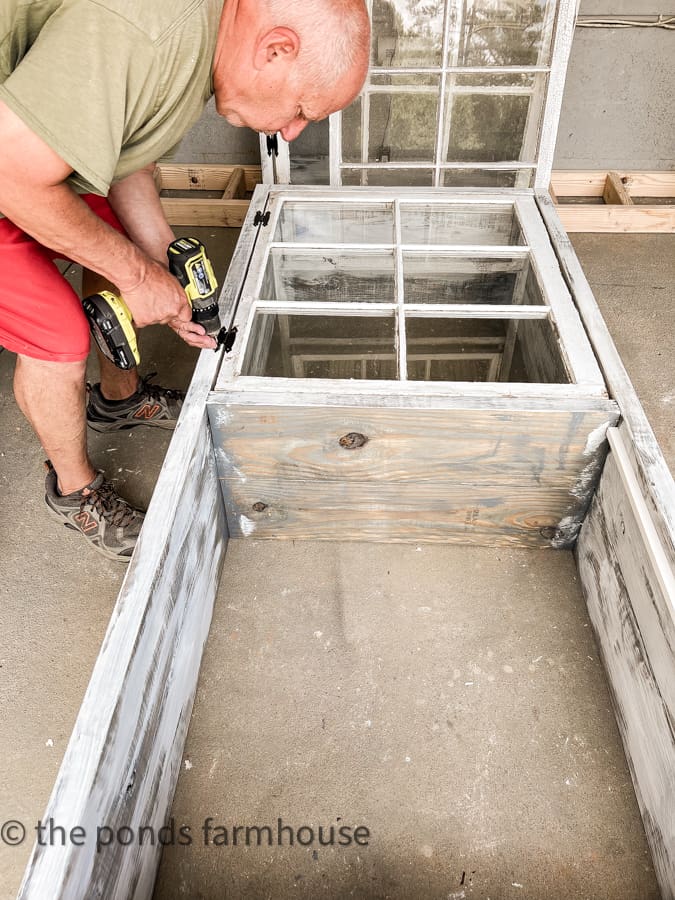
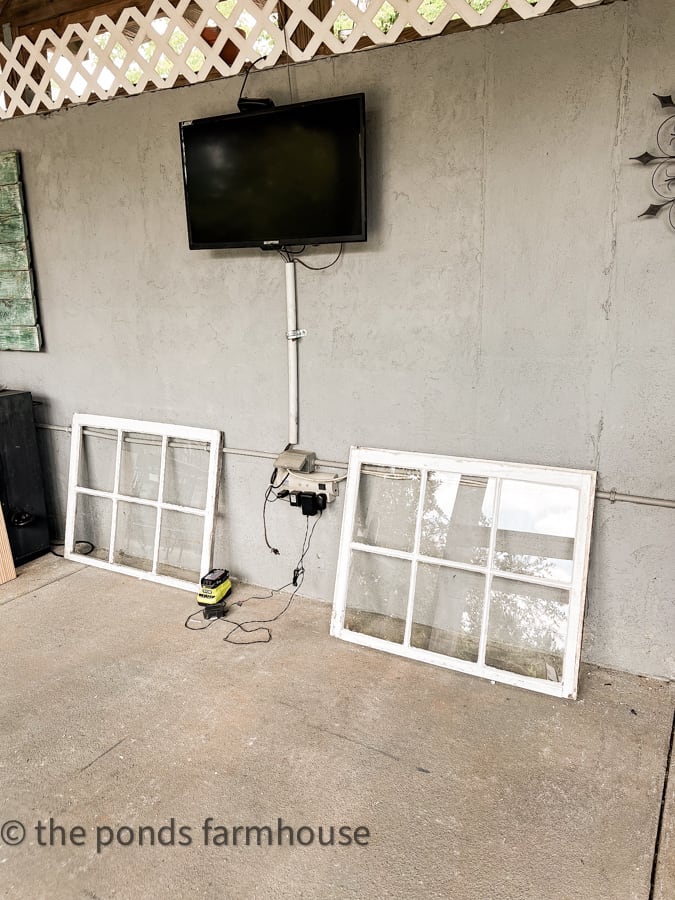
The center window was hinged to lift upward, accommodating the TV. The latch is attached to a hook hanging from the rafters, allowing unobstructed television viewing.
Build a Platform for DIY Cabinet (optional)
Once the Shabby Chic Cabinets are assembled, they can be added to the platform.
We wanted a platform base because the rustic kitchen cabinet would be resting on a concrete floor, and moisture was a concern. If you use your cabinet indoors, you may not need a platform base.
You’ll notice that it was also necessary to notch the cabinet around the electrical conduit, which runs around the wall of the outdoor kitchen.
Install Cabinets
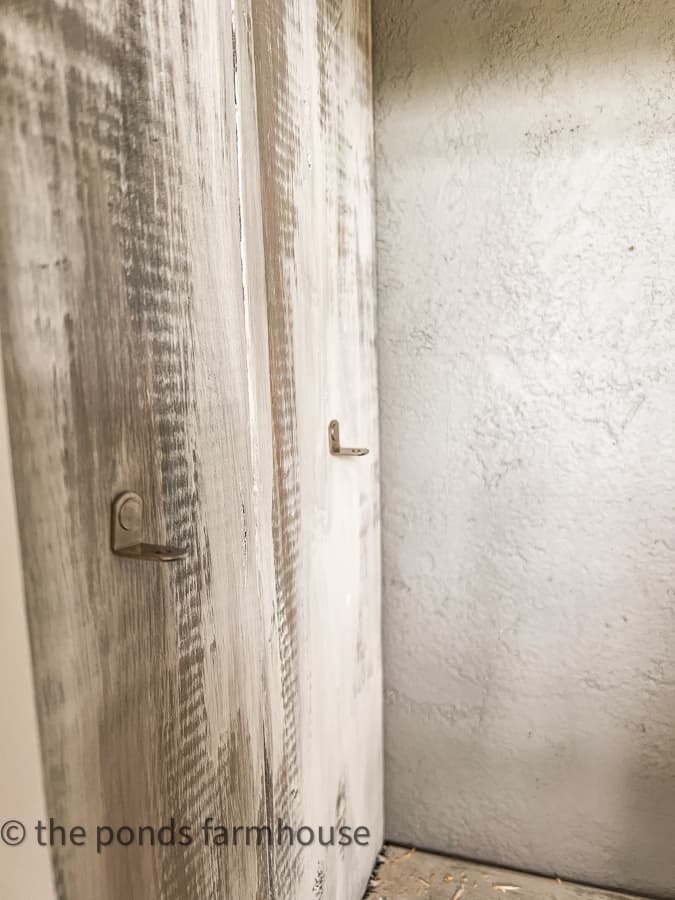
First, position each of the three cabinets in place on the platform. Brad used wood screws to attach the cabinets on each side.
Then he added L brackets to attach each cabinet to the wall. It was necessary to use a masonry bit and wall anchors to attach our shabby chic kitchen cabinet to the cinder block wall of the outdoor kitchen.
Add a Faux Drawer Door
Because the windows in the center cabinet were hung horizontally, a space was created between the two windows. Here, we decided to make the space to resemble six small drawers and a drop-down, rather than a swinging door.
Six small drawer fronts were cut from smooth, thin plywood and glued to the front of the door. The faux drawers were painted with the same technique as the rustic kitchen cabinet frame. This technique was used when we built the Faux Apothecary Cabinet and the Amazing Bedside Table Transformation.
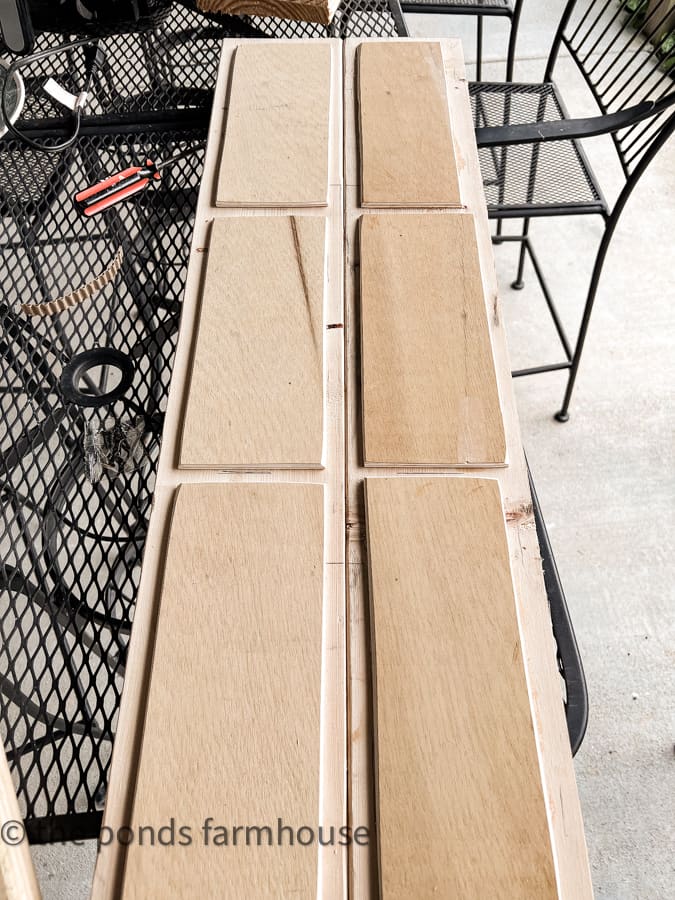
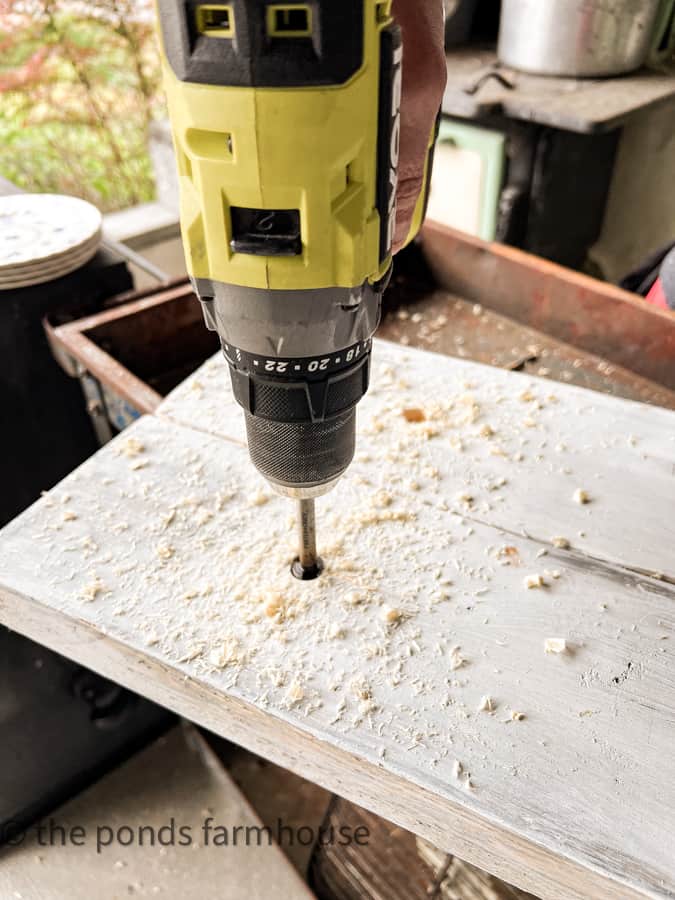
To attach the faux drawer pulls, it was necessary to countersink the holes to accommodate the screws for the hardware.
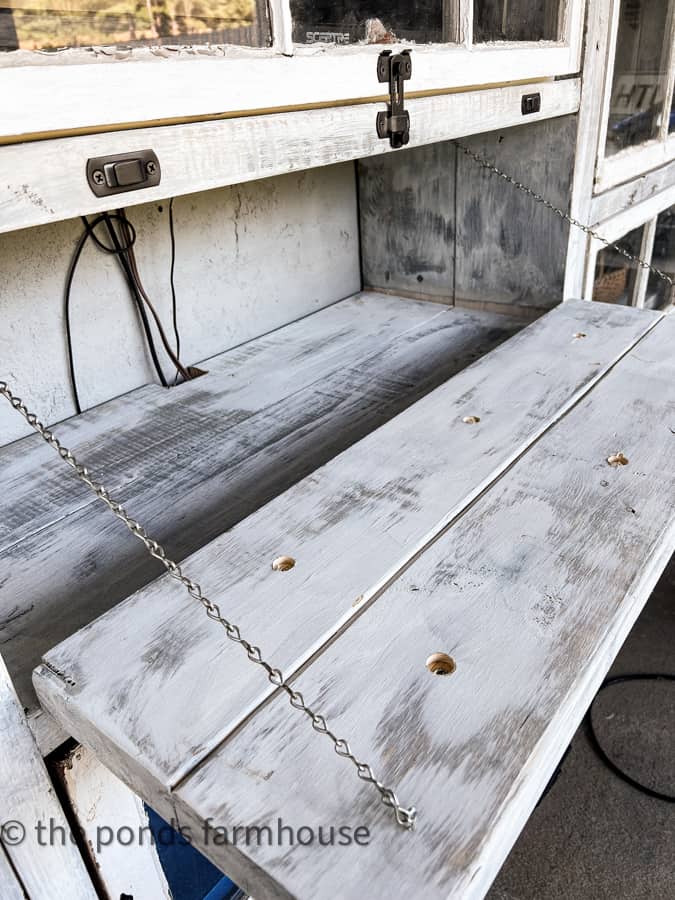
The door was attached with hinges that allow it to drop down, and it is held in place with eye hooks attached to a chain.
The six drawer pulls were added to the faux drawer fronts for an apothecary-style center.
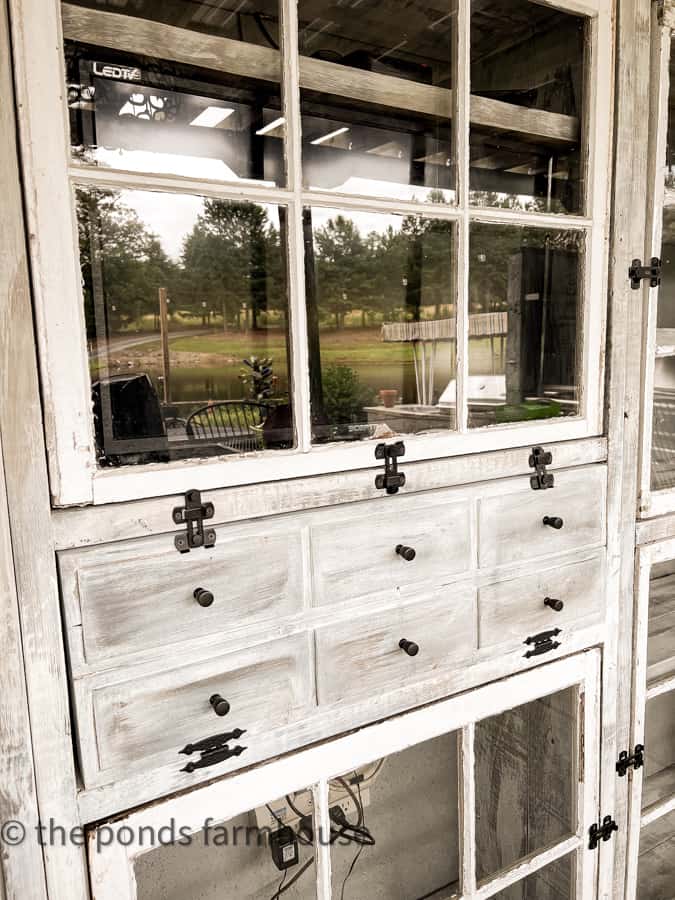
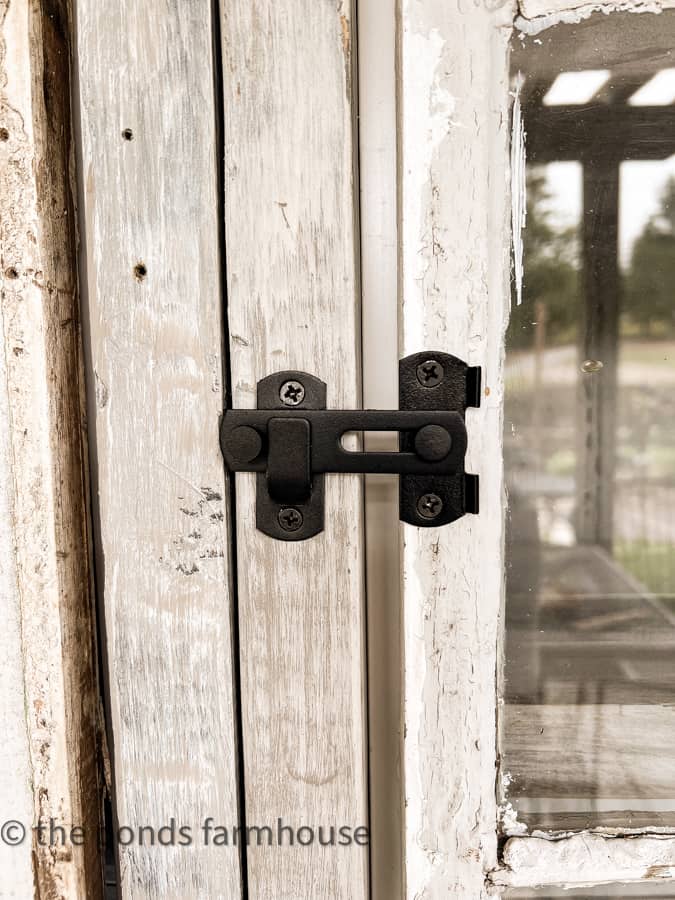
Barn Door Latches
It was necessary to add door latches to keep the reclaimed windows and doors closed.
We choose these barn door latches in black to complete the rustic cabinet style.
Add Shelving
Finally, once the DIY Kitchen Cabinet was completed, we decided to add shelving for additional storage space.
This process was simple, utilizing 2″x 6″ x 8′ boards to create shelving. The shelves were constructed in the same matter as the cabinet frame.
Holes were drilled, and shelf clips were added to hold each shelf.
The final step was adding caulk to seal around the exterior of the cabinet and decorate it.
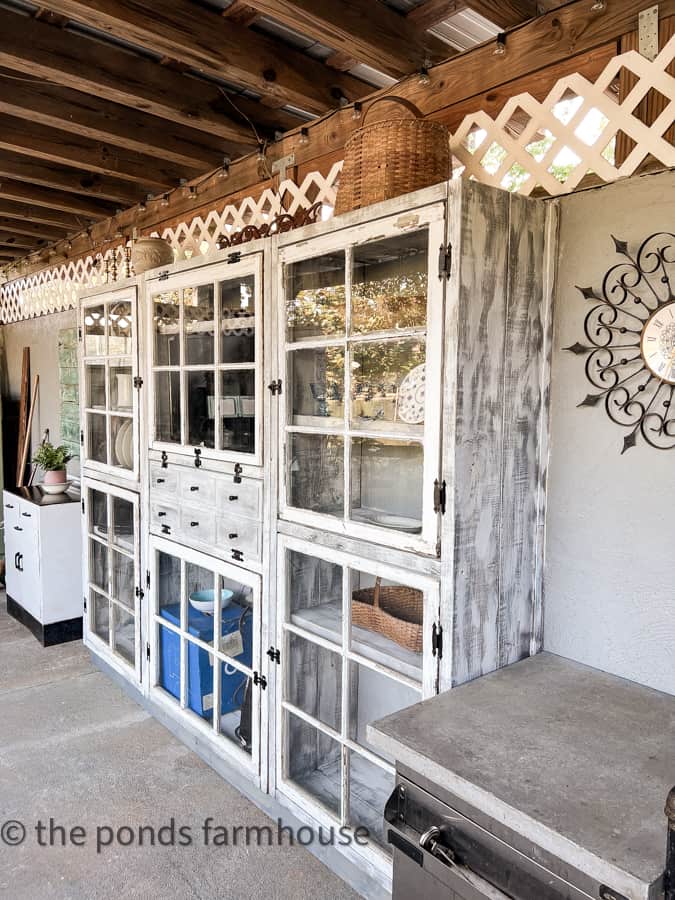
Finished DIY Shabby Chic Kitchen Cabinet With Reclaimed Windows
We absolutely love the DIY Shabby Chic Kitchen Cabinets, and using the reclaimed windows from our 1940s beach cottage makes the space unique and special.
The outdoor kitchen now has lots of storage, and the TV is protected.
This project was a labor of love and took over a week to complete. Brad did much of the work while I was relaxing at the beach. I helped with the painting and some design, but he gets credit for the idea and almost all the work. Didn’t he do an amazing job?
Resources

Pin It To Remember It
Did you find some great ideas you’d like to save for future reference? Hover over the images you’d like to save and pin to your favorite Pinterest Boards when you see the PIN button.


He did. That looks amazing. Good job!
Miche,
I’m so glad you like it. Thanks for stopping by.
I love the cabinets made from former windows. Such a creative idea. Brad, Kudos to you and your handy work. I love everything you and Rachel have designed for your farmhouse. You just amaze me. Thank you for sharing
Deborah,
Thank you for your kind comment and encouraging words
Great job on the window project.
Oh thank you. I’m so glad you like it.
Oh my goodness! This is amazing! I definitely need one of these. So beautiful!
Renae,
I’m so glad you like this project.
I just love your shabby chic outdoor kitchen cabinet you made with those lovely old windows! What a great idea! I don’t know how you come up with all your ideas for everything but each item is so beautiful and so unique! Enjoy!
Mary-Ann,
I’m so glad you liked this project. It was a labor of love and it was my hubby’s idea. He did good.
Y’all never cease to amaze me. This is an outstanding project and it looks awesome. The convenience alone seems worth it!
Cindy,
Yes! We are excited to have the storage and it’s a perfect design for our rustic outdoor kitchen.
This is so fun Rachel, what a great addition to your outdoor kitchen.
Wendy,
Thank you! He did such a great job.
Oh my gosh, Amazing, Amazing, Amazing!! Brad did an absolutely beautiful job….truly….and how fortunate you have a husband who can do these projects! Very talented man to go along with a very talented woman!! Your projects never cease to amaze me…thank you so very much for sharing all of your great visions and ideas! Love following your posts!!
Karolyn
Thank you so much for your kind words and encouragement. We love doing unique projects and this one turned out great thanks to Brad.
How in the world do you come up with these ideas – I love all the hardware and chippy finish you created to make it extra special. And what a great way to preserve history too. You and Brad totally nailed it! Hugs, CoCo
CoCo,
I have to give Brad this credit for this one. He came up with the idea and together we designed it. Thank you for your encouraging words.
Popping back in to say thank you for linking this on Farmhouse Friday. I’ll be featuring it tomorrow. Love it and pinned again!
Cindy,
I really appreciate this.
This is an amaZing piece. The windows, the hardware, the fabulous paint job it all came together beautifully. Plus you get to display all your pretties in it- bonus! You will enjoy this forever! XO- MaryJo @ masterpiecesofmylife.com
MaryJo,
Thank you so much for stopping by. I appreciate your comments and I’m so glad you liked this project. Have the best weekend.