DIY Pottery Barn Dupe: Transforming Thrifty Finds Into a Designer Dinnerware Collection
I was absolutely blown away by this Spring’s Pottery Barn Midsummer Night’s Dream collection by Cynthia Rowley. The ethereal, wildflower aesthetic is stunning—but unfortunately, the price tag was just as breathtaking! But you know me, I’m not going to give up easily, so I set out to create the look for less.
By pairing the perfect floral napkins with thrifted clear plates, I recreated that designer style using a reverse decoupage technique. The best part? They are completely food-safe and surprisingly durable. Let me show you how to transform simple thrift store finds into a high-end dinnerware collection! Plus, I’m sharing 3 ways to style your table using this project. Let’s get started.
(Posts on The Ponds Farmhouse may contain affiliate links. As an Amazon Associate, I earn from qualifying purchases. See the full disclosure details here.)
Pottery Barn Inspiration Dishes
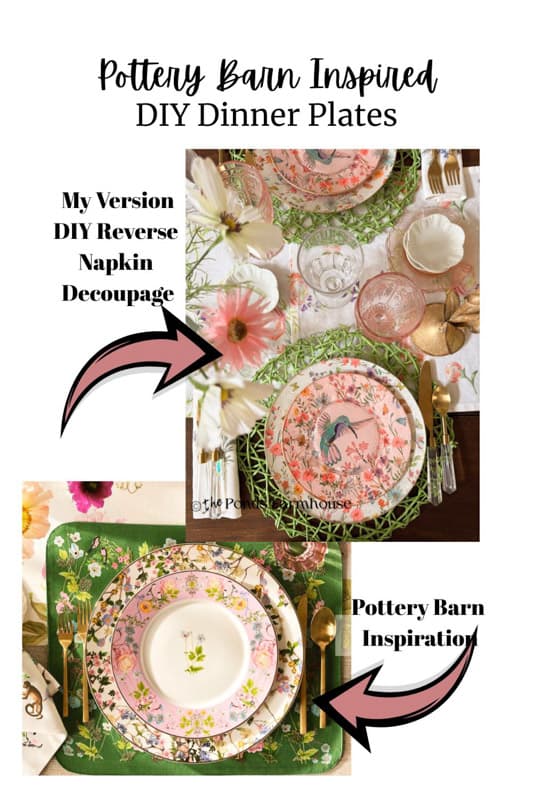
First, let me share the Cynthia Rowley Midsummer Night’s Dream inspiration dishes. They are stunning, and I wish I could order the whole set. But my budget-minded self will not allow that splurge.
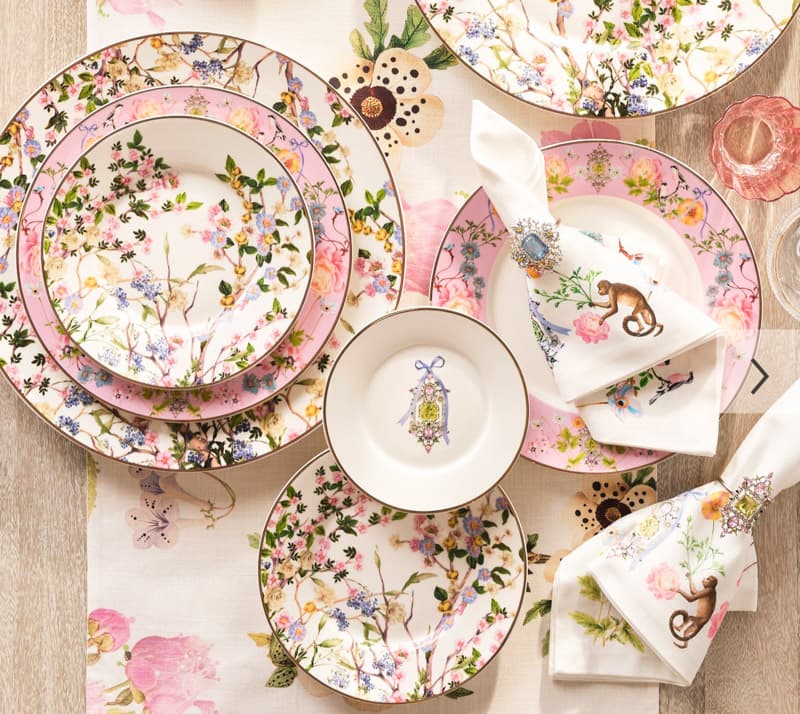
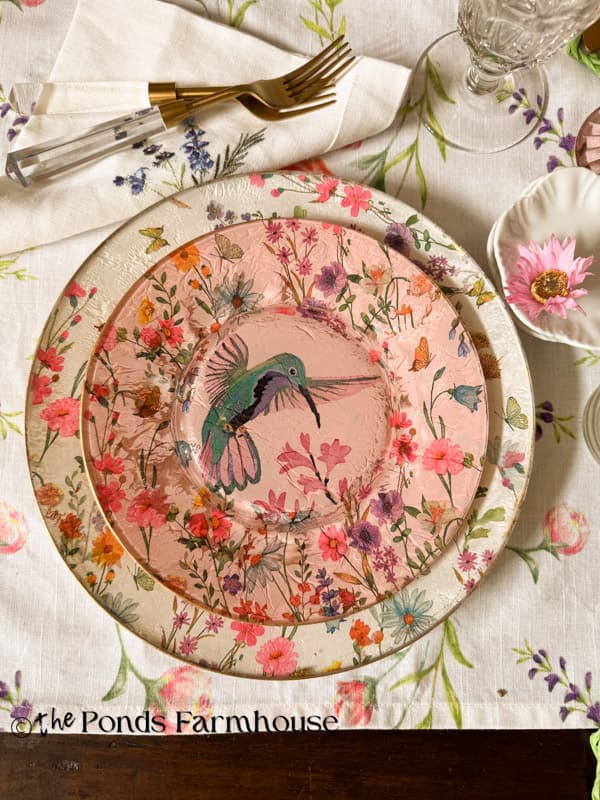
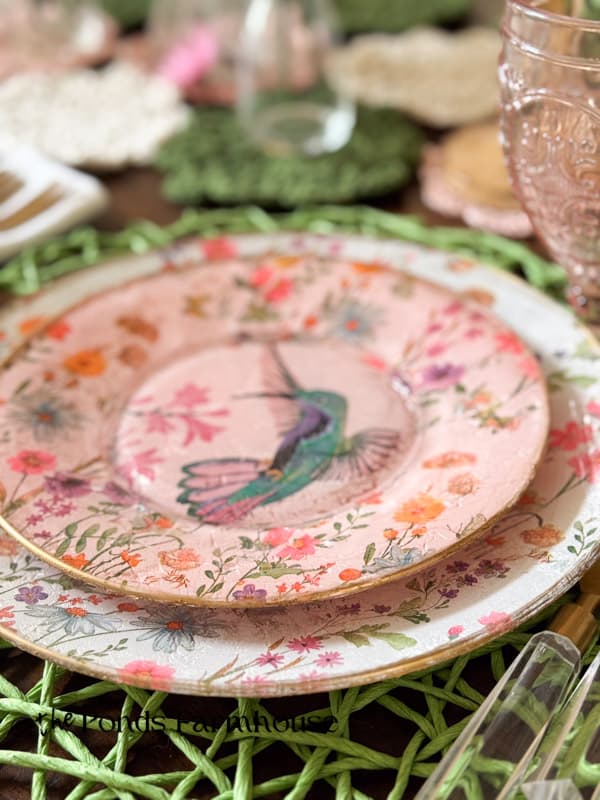
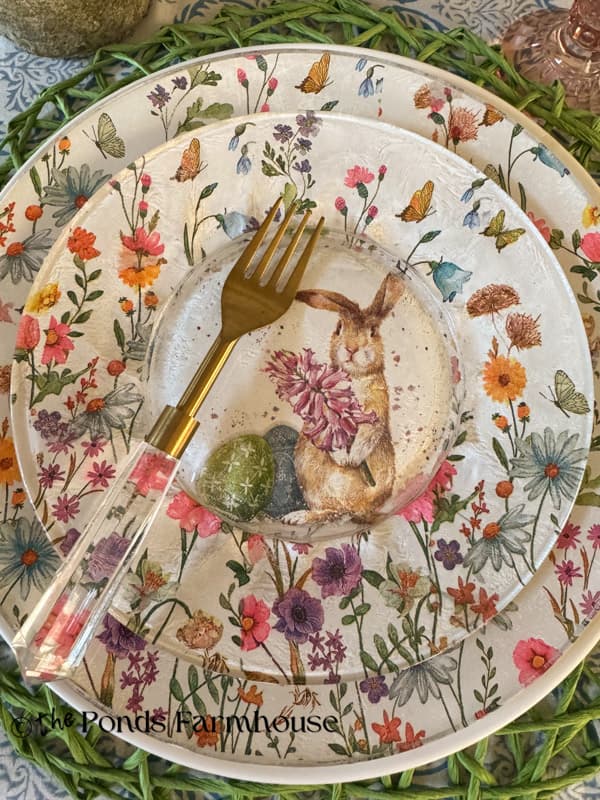
I didn’t set out to match the design exactly and created two versions of salad plates. One with a bunny for Easter and one with a hummingbird for Spring & Summer. Not only do they look pretty, but they are food safe and can be washed without damaging the design. I’m thrilled with how they turned out, and I’m going to walk you through the process step by step.
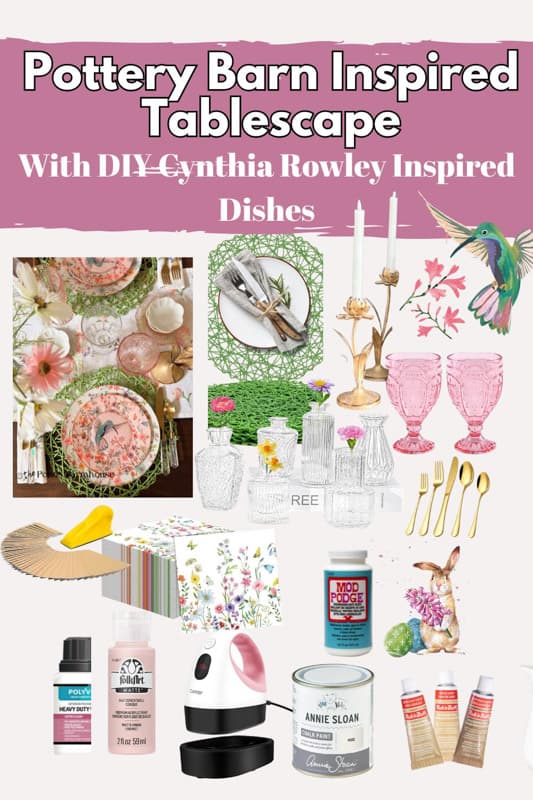
Supplies For Reverse Napkin Decoupage On Plates
I experimented with a few new products and techniques to get the desired effect and durability. Here’s what I used.
- Clear Glass Plates – Salad & Dinner
- I found the salad plates at a thrift store for 25 cents each
- The clear dinner plates came from Dollar Tree for $1.25 each.
- Wildflower Paper Napkins
- Hummingbird Napkins
- Bunny Napkins
- Annie Sloan Pure White Chalk Paint
- Clear POLYVINE Varnish Satin
- Mini Handheld Heat Press
- Mod Podge Dishwasher Safe
- Foam Roller
- Mini Finger Sander
- Gold Leaf Rub N Buff
- Scissors
- Small paintbrush
How To Prepare The Glass Plates Reverse Napkin Decoupage
First, there are several layers involved in the reverse napkin decoupage technique, and you need to allow drying time between each layer.
- Find a designated area for your work station. This should be an area where you can leave the dishes for a few days. Protect your surfaces with wax paper or other non-stick disposable materials.
- Wash and remove stickers from plates. Rub the backside of the plates with alcohol and allow them to dry.
- Gather your supplies and let’s begin.
Step 1 – Apply Varnish or Mod Podge
I’ve always used Gloss Mod Podge for my napkin decoupage, and I used it on the bunny salad plates. However, I decided to try the varnish technique for the hummingbirds since I was painting them pink. The varnish is clearer than the Mod Podge, and I felt the color would be more vibrant.
- Place the plates on a riser upside down. I used plastic yogurt containers.
- Use a foam roller and coat the backside of each plate with the varnish or Mod Podge.
- Allow to dry for several hours or overnight
Step 2 – How to apply the Napkins To The Plates
Begin by separating the napkin layers using only the top printed layer. We are using two napkins on the salad plates and only one on the dinner plates. So let’s begin with the salad plates, and then I’ll share the simple dinner plate techniques.
How To Apply The Napkin To Salad Plates
First, if you are using a contrasting napkin, such as the bunny or the hummingbird, you will want to place it in the center of the plate.
Applying Decorative Center
Lay the napkin on the plate and trace around the center with a pencil. Cut the napkin to size.
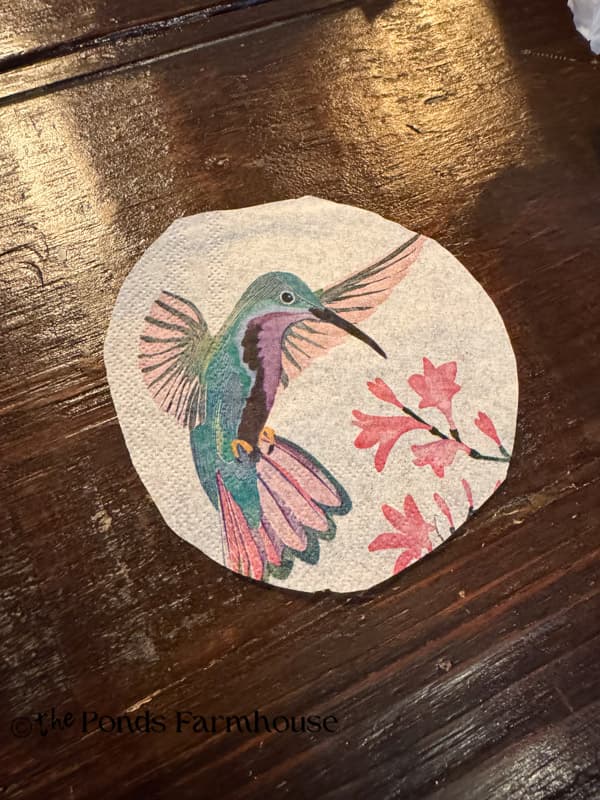
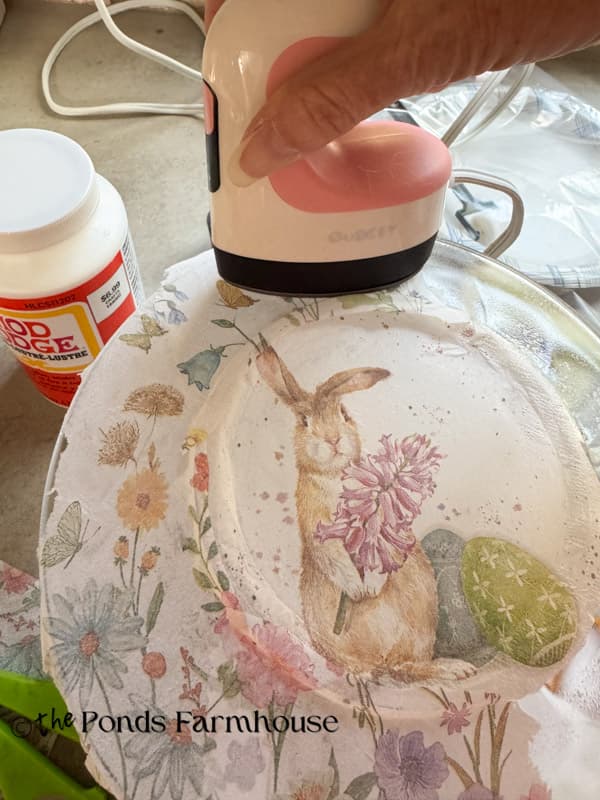
Place the napkin on the backside of the plate at the center, upside down. Begin at the center of the plate and use the heat press to smooth the napkin over the plate. The heat will activate the glue, and the napkin will adhere to the plate. Be gentle so you don’t rip the napkin as you smooth it on the plate.
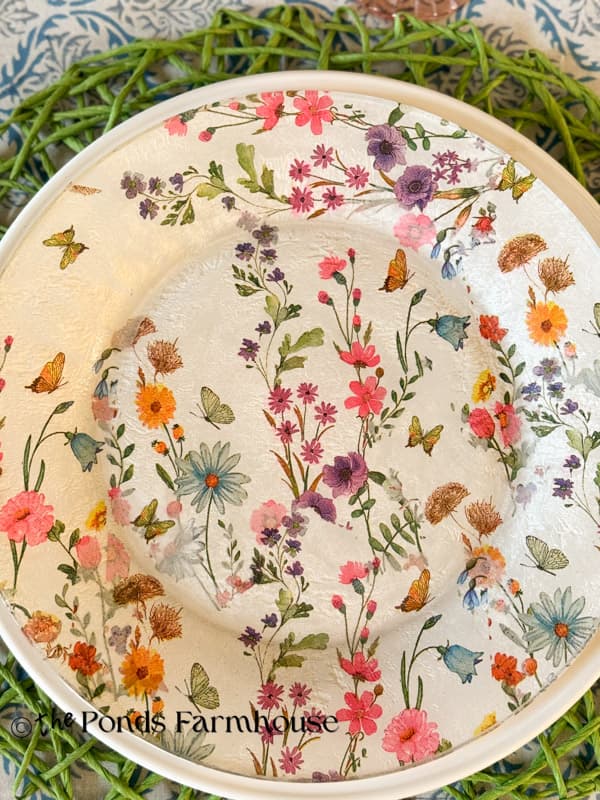
Applying the Wildflower Napkin to the Salad Plate
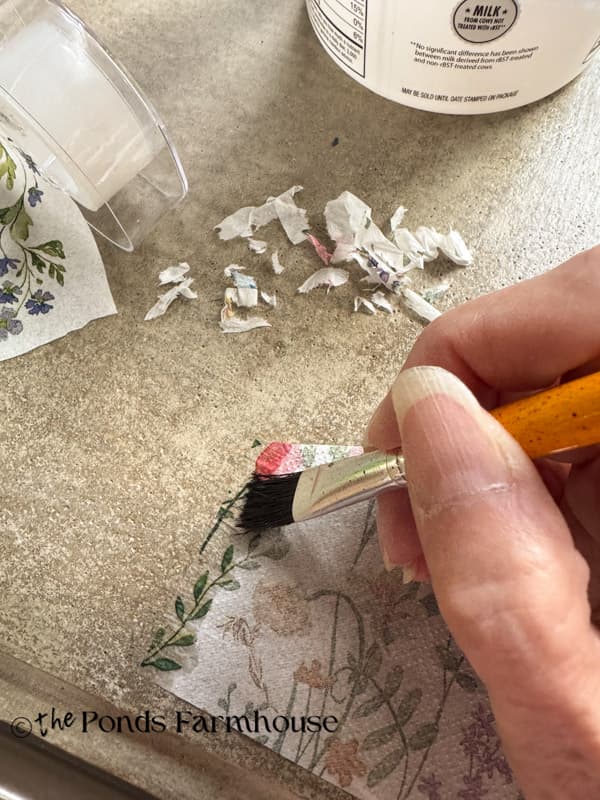
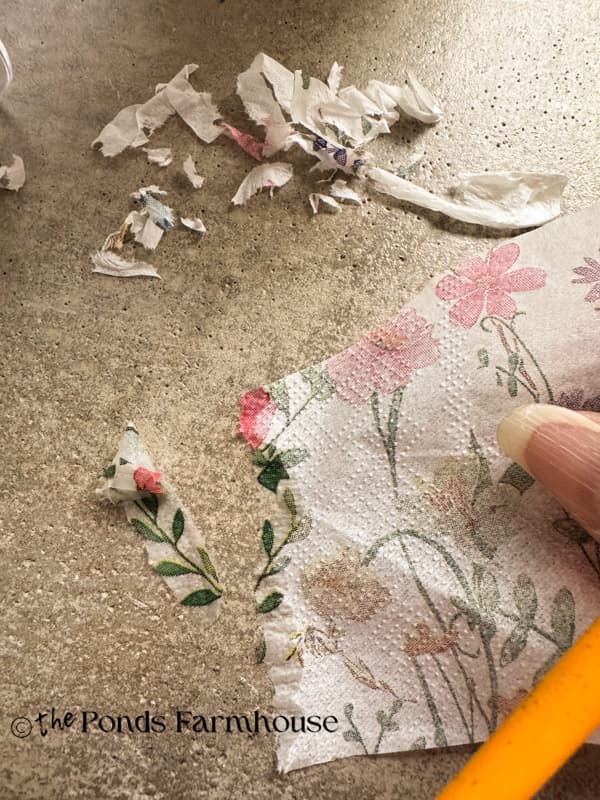
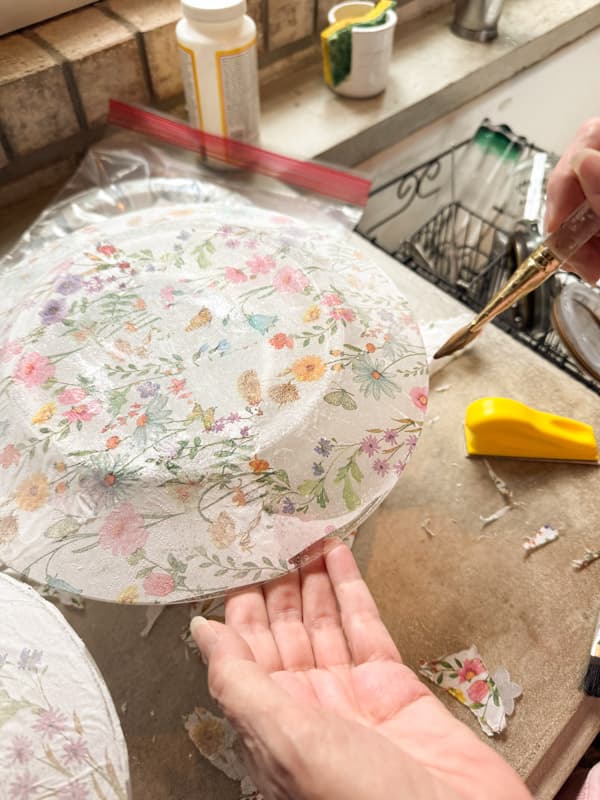
Lay the floral wildflower napkin on the plate and cut away for the center. It’s okay if the napkin drapes off the outer edges. I like to leave as much of the napkin whole as possible. Then fill in the rest of the plate with smaller napkin pieces. In all the areas where the napkin will overlap, tear the napkin so that there will not be a harsh line.
- Use a small, damp paintbrush to wet the napkin along the lines where they will overlap.
- Once wet, the napkin is easy to tear.
Once again, use the heat press to adhere the napkin to the plate, working gently around the edge.
How To Add a Wildflower Napkin to a Clear Dinner Plate
Open the napkin and lay it upside down over the backside of the plate. Determine where the napkin’s edges will be and cut away the excess. I used approximately 1/2 of the napkin, covering the center and lower sides of the plate.
Then fill in the rest of the plate with other pieces of the napkin. In all areas where the napkin will overlap, tear the napkin so there is no harsh line, as described for the salad plate.
Arrange the napkin on the plate, ensuring that all pieces are upside down.
Begin at the center of the plate and use the heat press to smooth the napkin over the plate. The heat will activate the glue, and the napkin will adhere to the plate. Be gentle so you don’t rip the napkin as you smooth it on the plate.
Step 3 – Seal the napkin on the plate
Once all the napkin pieces are adhered to the plates, you can immediately apply another coat of varnish or Mod Podge. Work from the middle of the plate outward to smooth any bubbles that may appear. Allow sealer to dry overnight.

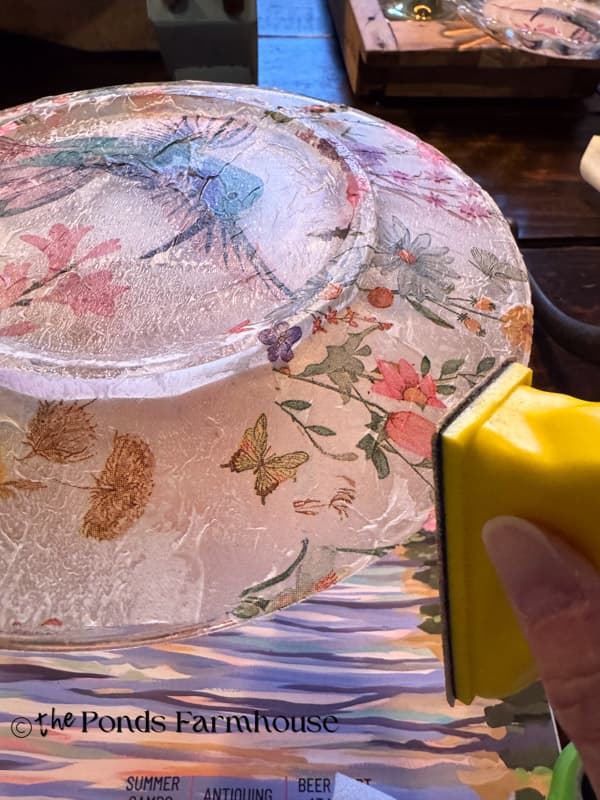
After the project is dry, remove any rough edges or overlapping napkin using the small finger sander.
Insider Tip
You don’t have to rinse your brushes & rollers when using several coats of paint or sealer that requires dry time between coats. Instead place the wet brushes or roller in a ziplock bag to keep them from drying out. If I’m storing overnight, I place it in the refrigerator to ensure the paint will still me wet the next day. Then rinse completely after your have finished with that color or product.
Step 4 – Paint Back of Plates
Now you are ready to paint the backside of the plates. I used pure white on the dinner plates and Shell Pink on the salad plates.
I applied one light coat of each color with a small paintbrush and let it dry for several hours. Then I applied a second coat and let it dry overnight. Once dry, the plates look amazing.
Step 5 – Waterproof Dishes
Next, I applied Mod Podge Dishwasher-Safe Sealer to the entire back of each plate. Allow the sealer to cover the edges of the plates also. Allow to dry overnight.
Note: This sealer needs to cure for 28 days before washing. I applied two coats and have not washed them as they have not cured 100%. I’ll report back on how well this works.
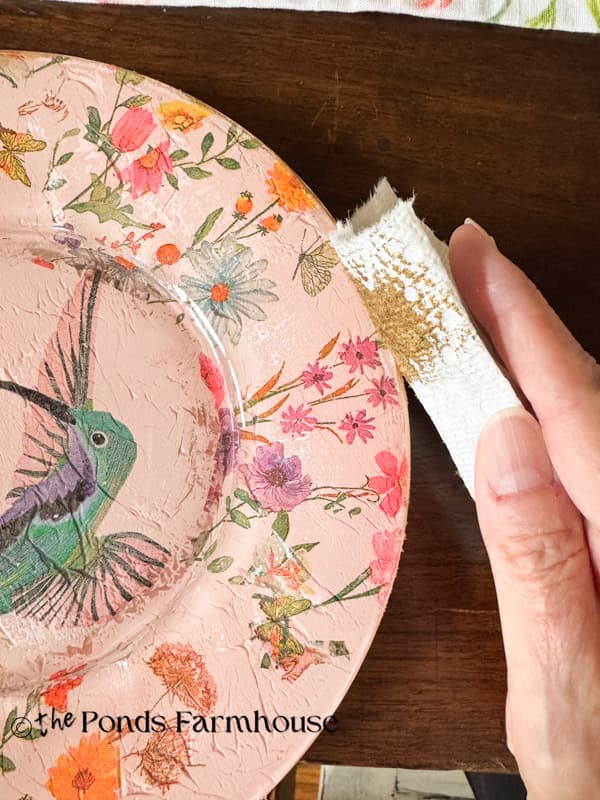
Step 6 – Optional Gold Leaf Edge
To achieve the high-end look of the inspiration dishes, I added gold leaf Rub N Buff to the edges of the plate. Apply a small amount of the Rub N Buff to a paper towel and rub around the edges.
Styling The Pottery Barn-Inspired Dishes
I’m so excited about how the Pottery Barn-inspired dishes turned out. First, I’ll share how I styled the bunny dishes for Easter, and then some options for the hummingbird dishes for Spring and Summer tablescapes.
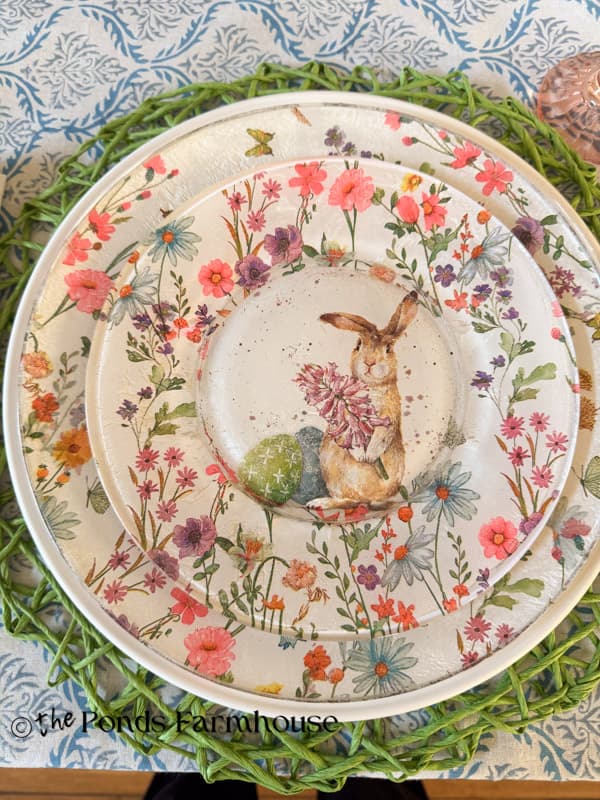
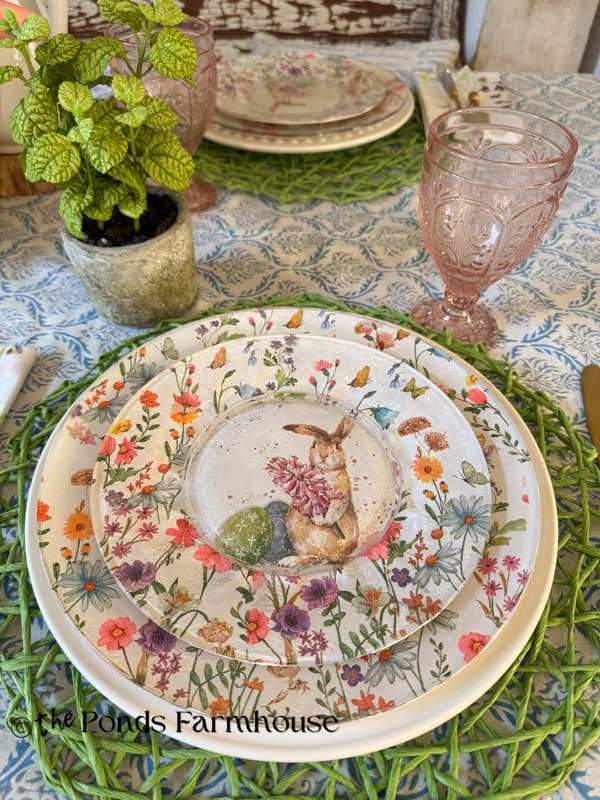
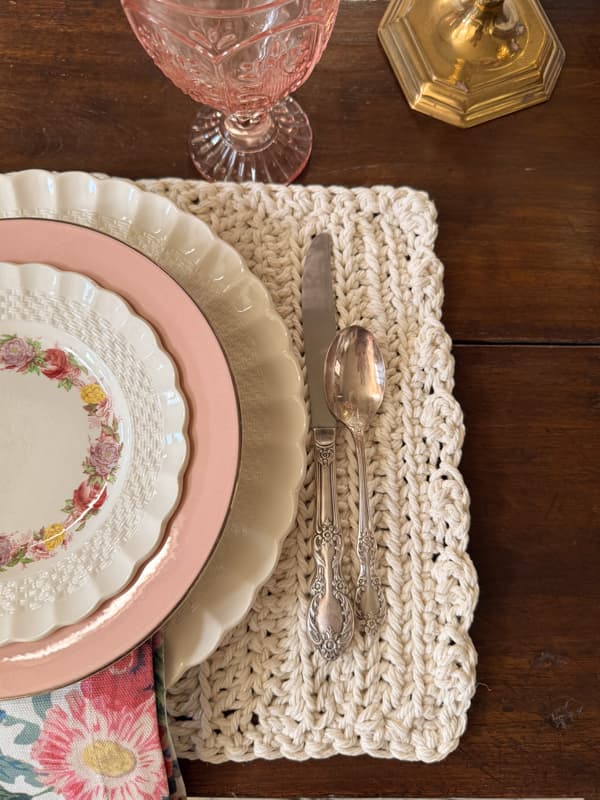
1 – Easter Bunny Table Setting
The bunny napkin was so cute, and I wish I could use it year-round. However, it’s definitely an Easter bunny.
I paired these DIY Napkin Decoupage dishes with a large white plate charger, green woven placemats, and pink water goblets. The place setting pops against the block-print blue-and-white tablecloth.
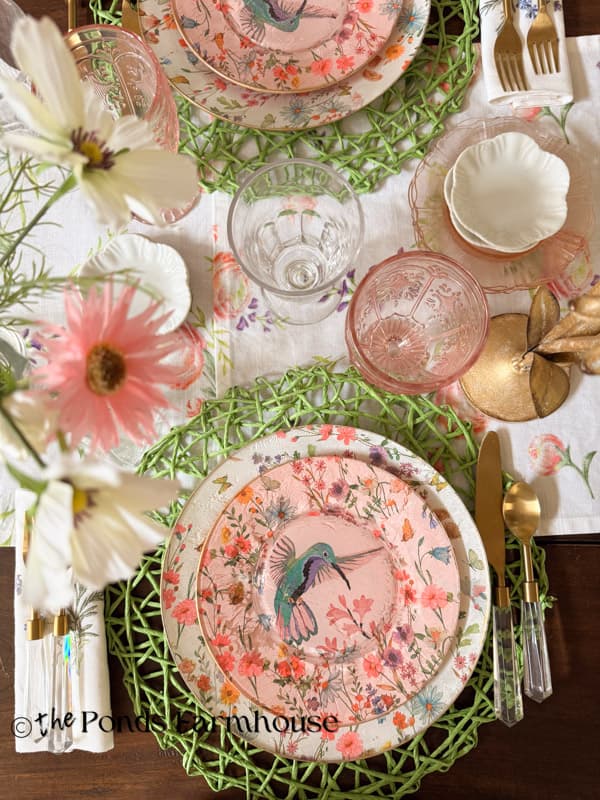
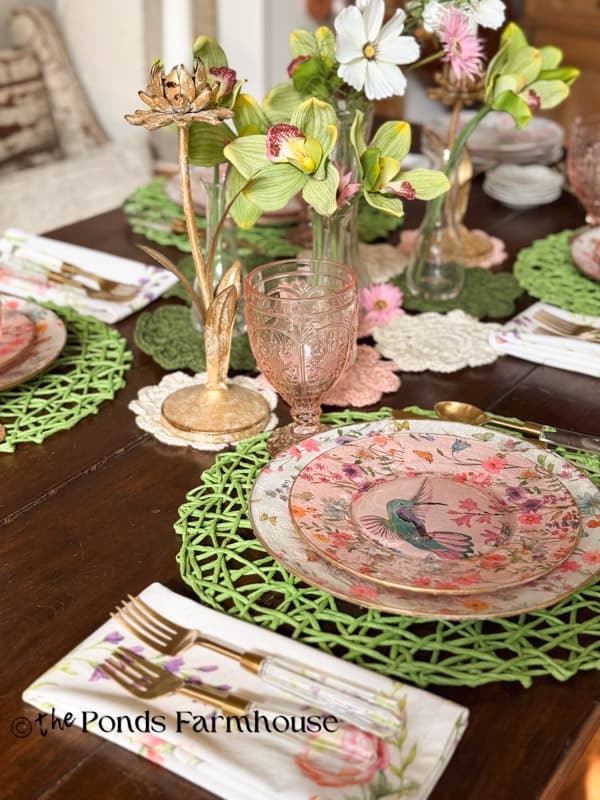
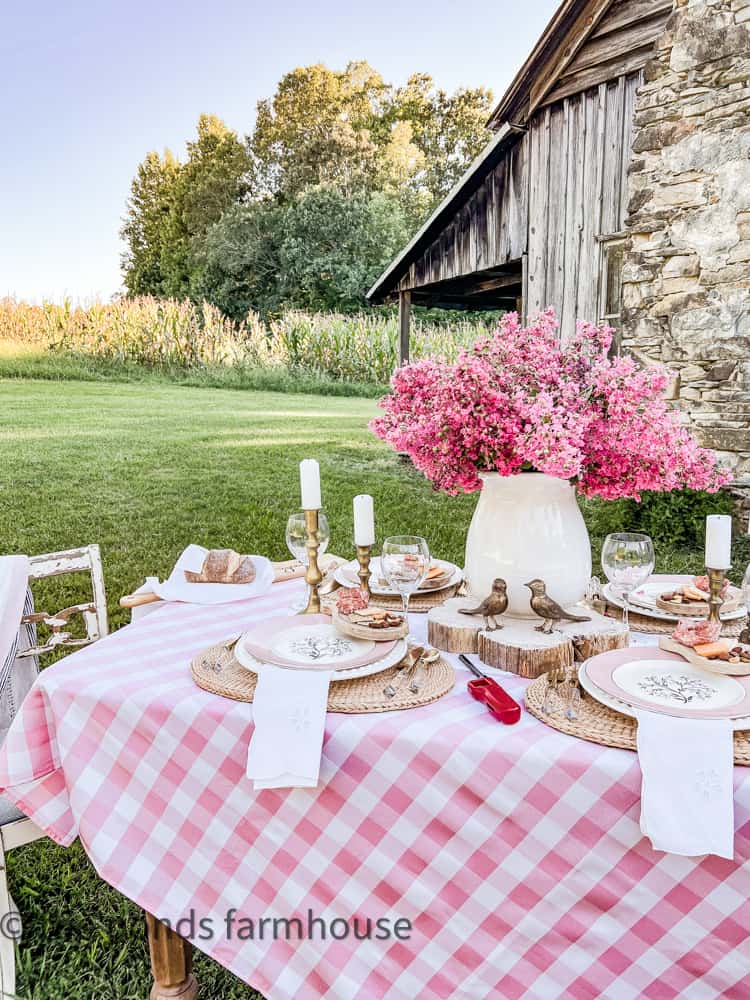
2 – Midsummer Night’s Dream Inspired Tablescape
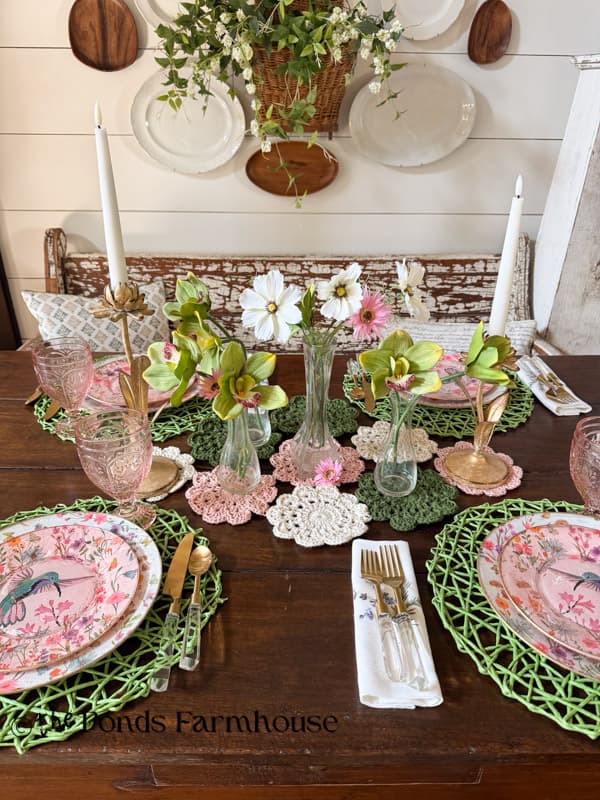
Next, I used the hummingbird salad plates to create my version of the Midsummer Night’s Dream tablescape. I incorporated elements from the Pottery Barn table settings to achieve the look for less.
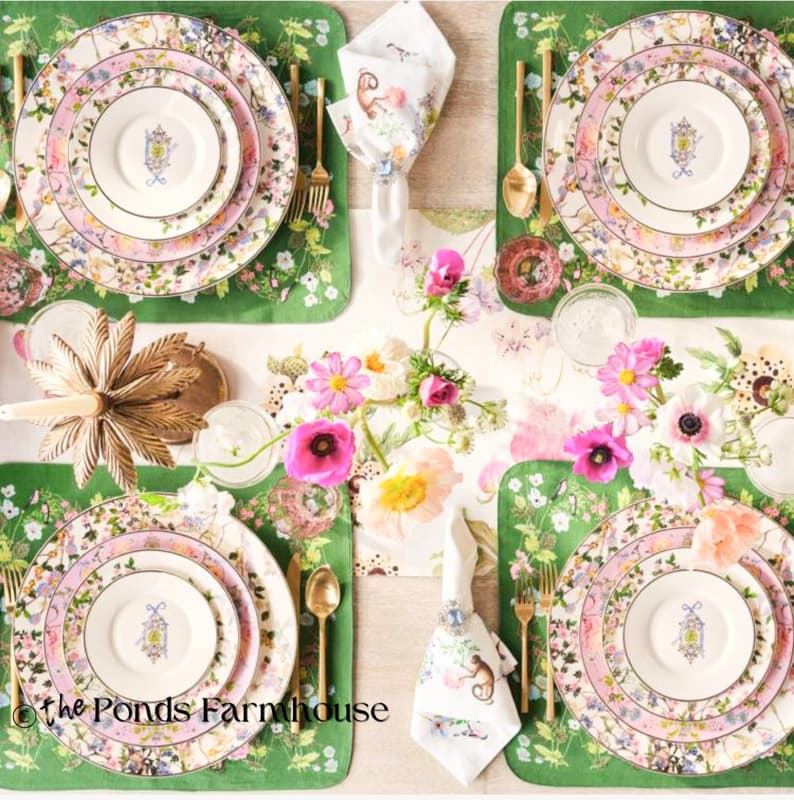
To duplicate the above tablescape, I used the white DIY wildflower dishes and the hummingbird salad plates on the green woven placemats. Here’s what I added to complete the look.
- I used floral napkins for my table runner to mimic the Pottery Barn runner.
- The metal flower candlestick holders are somewhat similar to the palm tree ones on the inspiration table.
- My gold and acrylic flatware shines like solid gold.
- Pink and clear glassware
- Small, clear vases filled with whimsical flower stems.
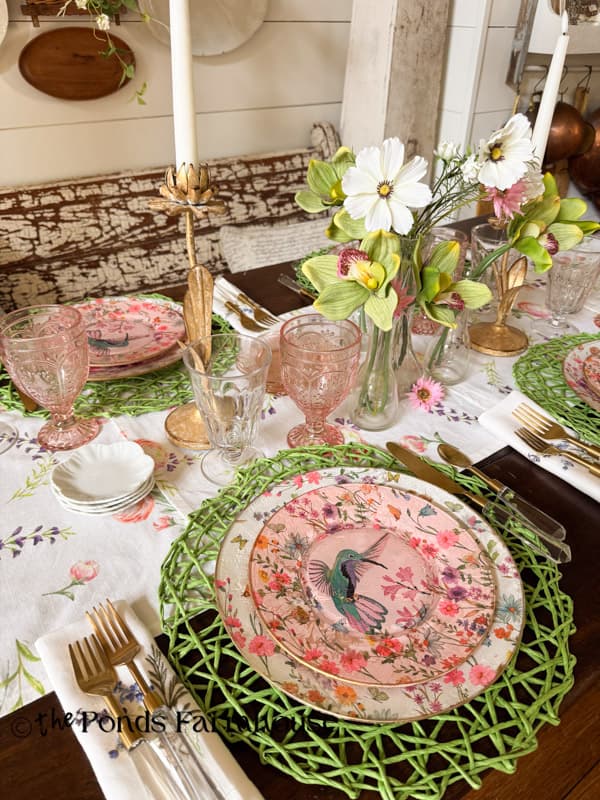
I wanted to capture the whimsical feel of the inspiration table with a similar centerpiece and color palette.
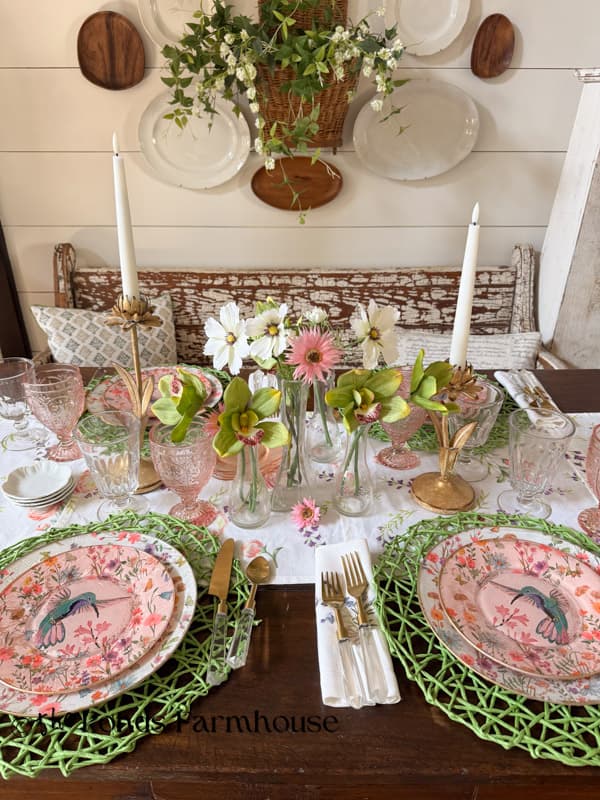
Do you think I’ve captured the essence of the designer table?
3 – My DIY Tablescape Ideas
After arranging the table to look like the Pottery Barn version, I decided to style it with my own personal touches and taste.
I decided to leave the cute floral centerpiece but switched out the table runner. I wanted to add texture with the crochet doily table runner. You can see the DIY crochet doily tutorial for complete instructions.
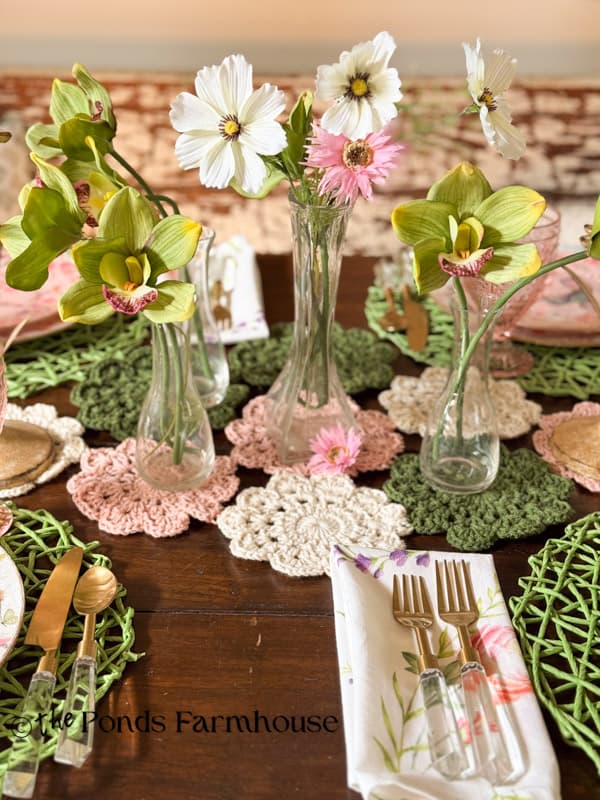
In addition, I replaced the napkin with my makeshift table runner, floral napkins.
Which is your favorite version of the Midsummer Night’s Tablescape?
FAQ
Resources
Click the image below for shopping details.
I hope you enjoyed today’s Pottery Barn Dupe. I look forward to sharing my next adventure with you.


You are AMAZING and FEARLESS!!! Seriously I’m in awe of how you aren’t afraid to just “get in there ” and create something beautiful ! I can’t even begin to think of how to recreate these dishes but you make it seem so easy that I might give it a try – thank you for sharing
Marilyn,
The supplies aren’t expensive and if you make a mistake, you can wash the napkin from the plate. Just take it one step at a time and I know you can do this. I’m so glad you like them. Let me know how they turn out. I appreciate your comments. Have a blessed Easter Weekend!
Rachel, the plates you created are so pretty, your tablesettings using the plates are beautiful. I love best the tablescape with your crocheted doilies as the center piece runner. The colors look gorgeous. Angie
Angie,
Thank you so much. I agree! I love Pottery Barn for inspiration but I like to add my own style. I hope you have a great holiday weekend.
Gorgeous! Do you think the Rub N Buff will stay on the plates with washing?
Kris,
I applied the sealer so I hope so. Thank you for stopping by.
Thank you for the inspiration Rachel. So gorgeous! Is there another link to the wildflower napkins? I don’t see them but perhaps they sold out? Thanks again, Sheri
Sheri,
Thank you for stopping by. I don’t have another link sorry! If I run across them from another source, I’ll let you know.
Your creativity never ceases to amaze me, Rachel. I cannot get over how these plates turned out. It looks just like the PB version, but at a budget-friendly price point. Thank you for introducing us to the dishwasher-safe sealer. I had no idea they even made one! Can’t wait to hear how they wash and to share these too. They’re so pretty! Hugs, CoCo
CoCo,
I was thrilled with them too. I don’t want to ever change the tablescape. It’s so refreshing. I appreciate you for sharing and taking the time to comment. Have a blessed weekend.