How To Turn Recycled Book Pages into Stunning DIY Paper Flowers
Have you ever tried making paper flowers from old book pages? I’m excited to show you how to create stunning paper roses using simple folding techniques. This eco-friendly craft is perfect for unique table decorations, bowl fillers, or as a vintage touch for wreaths.
I originally started making these roses as place cards for a book-themed tablescape, and the result was so charming! While I’ll be sharing the full table setting soon, I wanted to jump right into the tutorial first. So, grab your old books and a hot glue gun—let’s dive into this easy upcycled craft project.
(Posts on The Ponds Farmhouse may contain affiliate links. As an Amazon Associate, I earn from qualifying purchases. See the full disclosure details here.)
What Can You Do With Paper Flowers?
Although my inspiration for making paper roses is to use them in a tablescape, there are several reasons to make paper-folding flowers.
One of the most common uses is for weddings. Paper flowers work great for corsages, bridal bouquets, and hair accessories.
In addition, they are popular for table accessories, such as centerpiece arrangements and table garlands. Add them to wreaths, garlands, and swags. You can also use easy paper flowers to fill a bowl or display them individually.
Today’s DIY project utilizes vintage book pages, but imagine the possibilities with floral paper, colorful craft paper, and customized, hand-painted paper.
Supply List
- Old Book or Magazine Pages
- Elmer’s Glue or Glue Stick
- Paper Clips
- Small Paint Brush
How Do You Make Paper Flowers Easy?
There is no limit to the paper choices you can make for these cute DIY flowers. However, I chose to use vintage book pages.
The paper flowers can be large or small. I wanted a larger rose design to serve as a place card at each place setting.
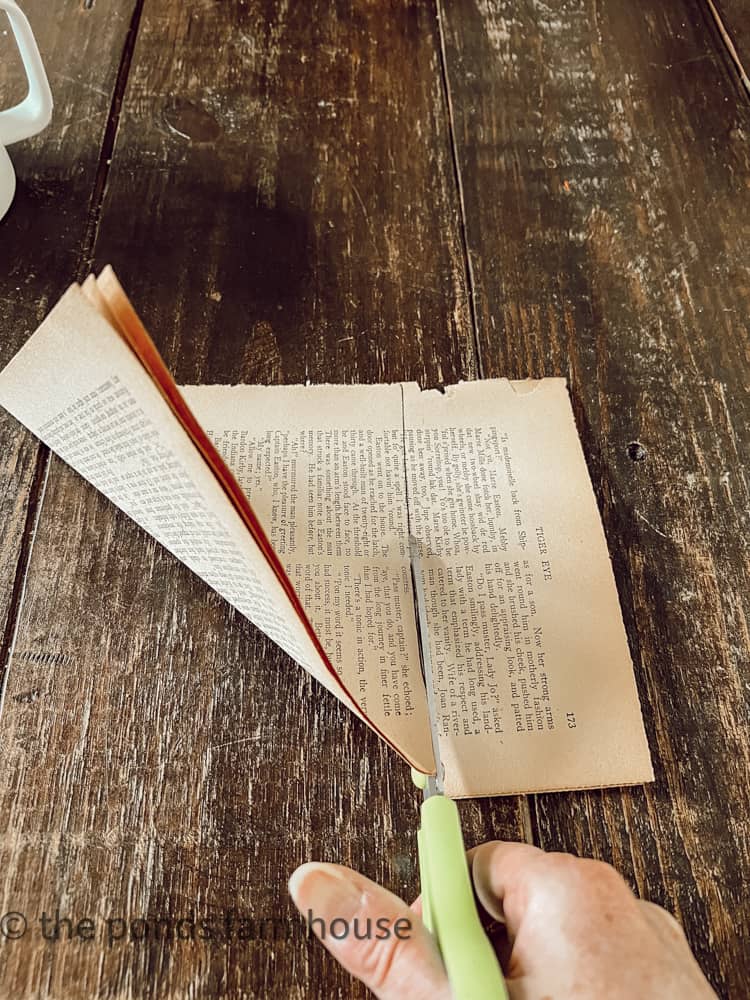
You will need 4 pieces for each paper flower.

How To Fold Old Book Page Paper
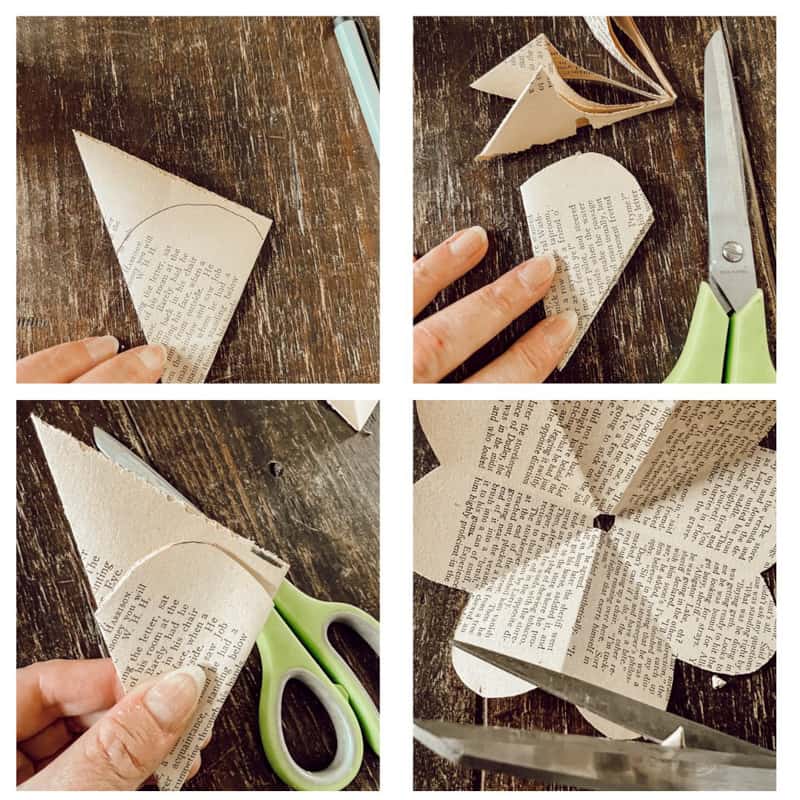
First, you will want to cut the four pages into squares. To speed up the process, I cut all the pieces at once.
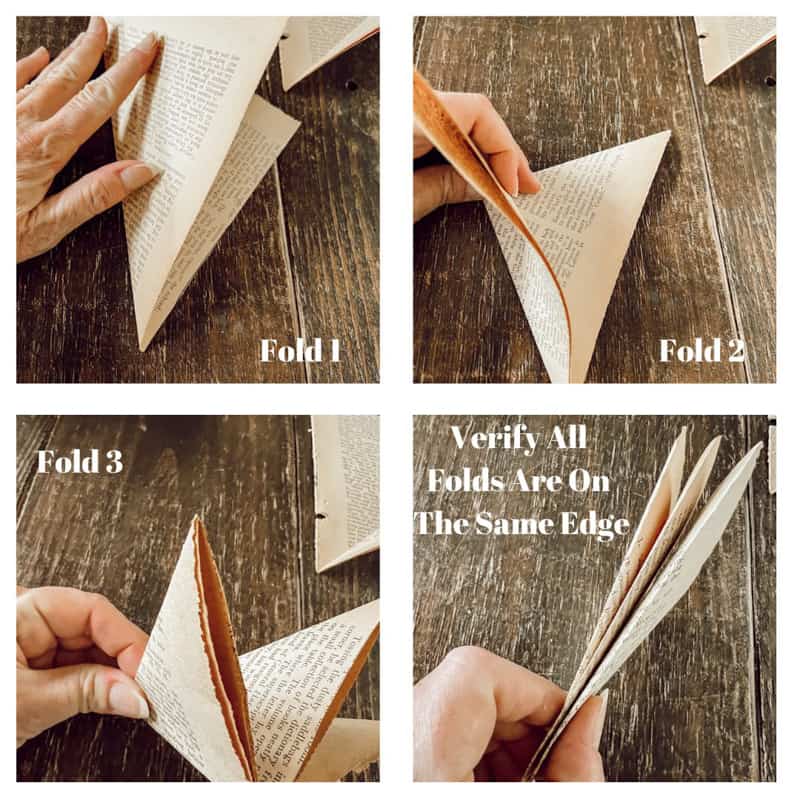
Next, fold each square individually three times. Ensure all the folds align on the same edge of the triangle.
How To Make Paper Rose Petals
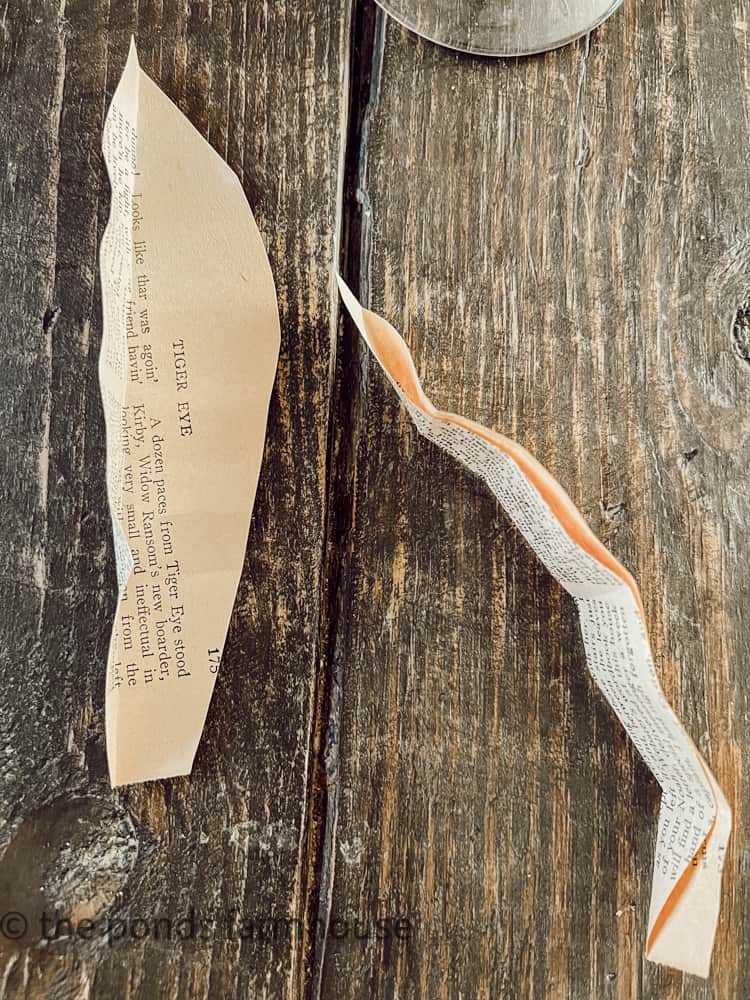
Draw a half circle to make the rose petals, as shown below.
Next, cut away the exposed edges of the triangle. Ensure the folded edges are still intact.
Use your first triangle as a template to cut the other three petals.
Finally, cut the tip of the triangle, leaving a small hole in the center of each petal.
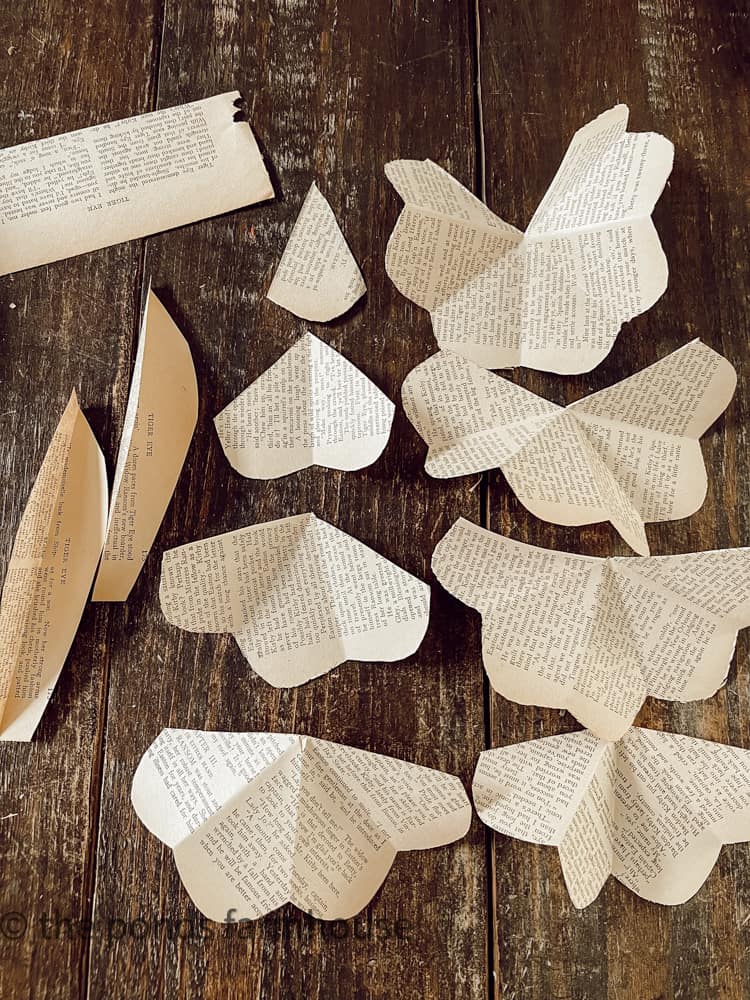
Next, remove one petal from one of the paper flower pieces, two from the next one, and three from the third piece. Finally, cut the last piece in half. Save all pieces to form the rose petals.
How To Form Petals for Paper Flowers
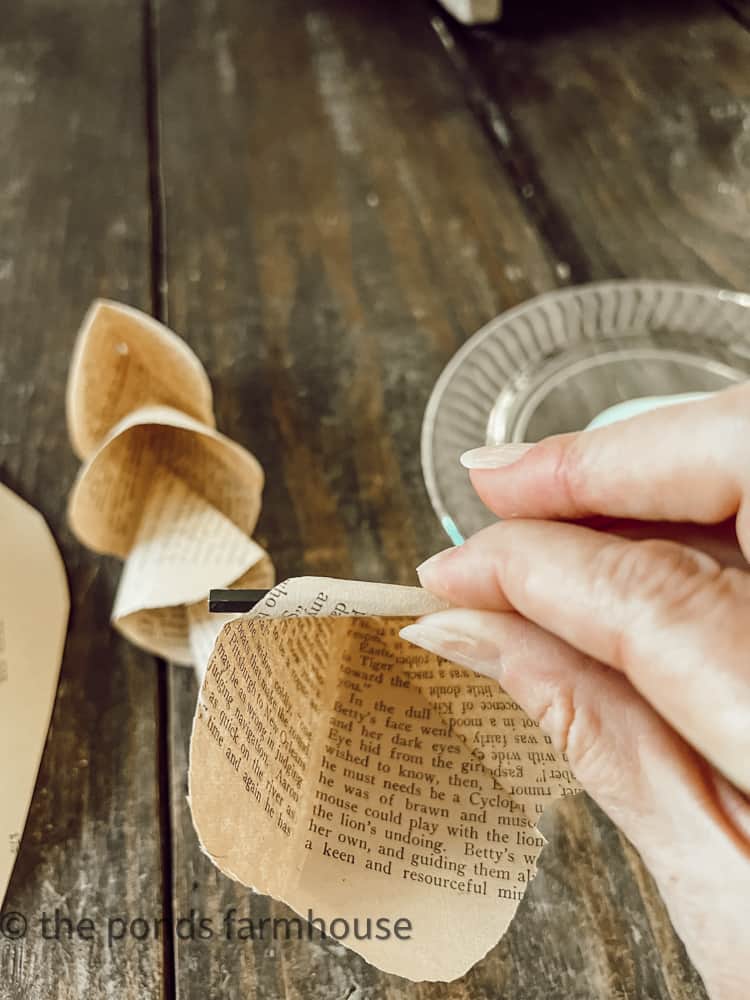
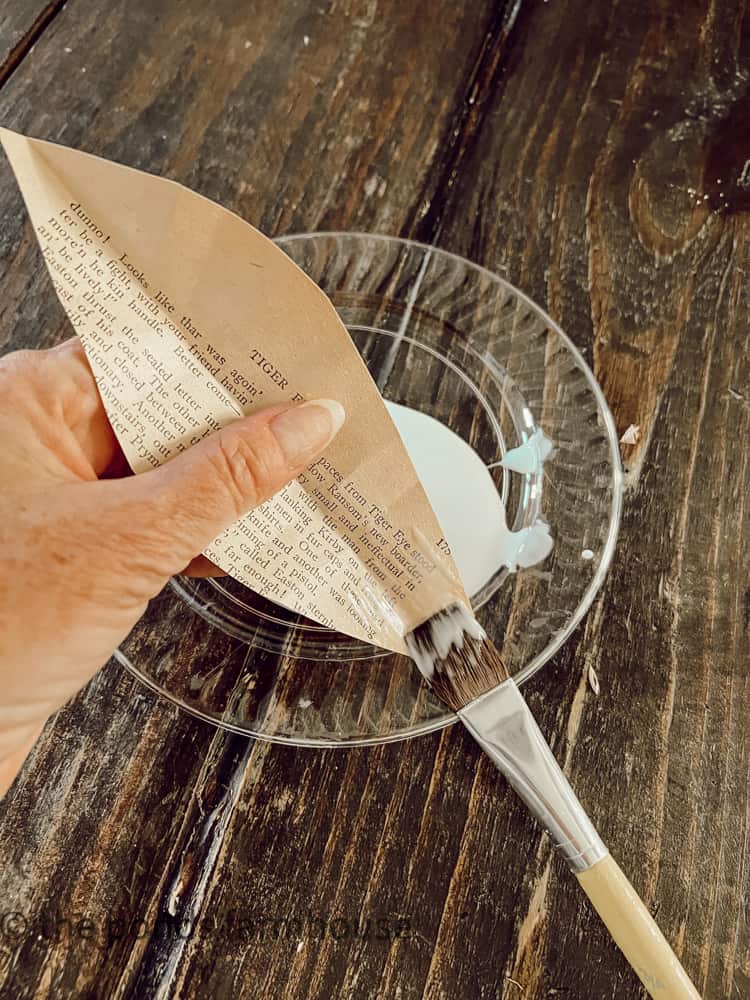
You need a small paintbrush and craft glue for this next step. Begin with the largest pieces and apply the glue with a small brush, overlapping the two edges.
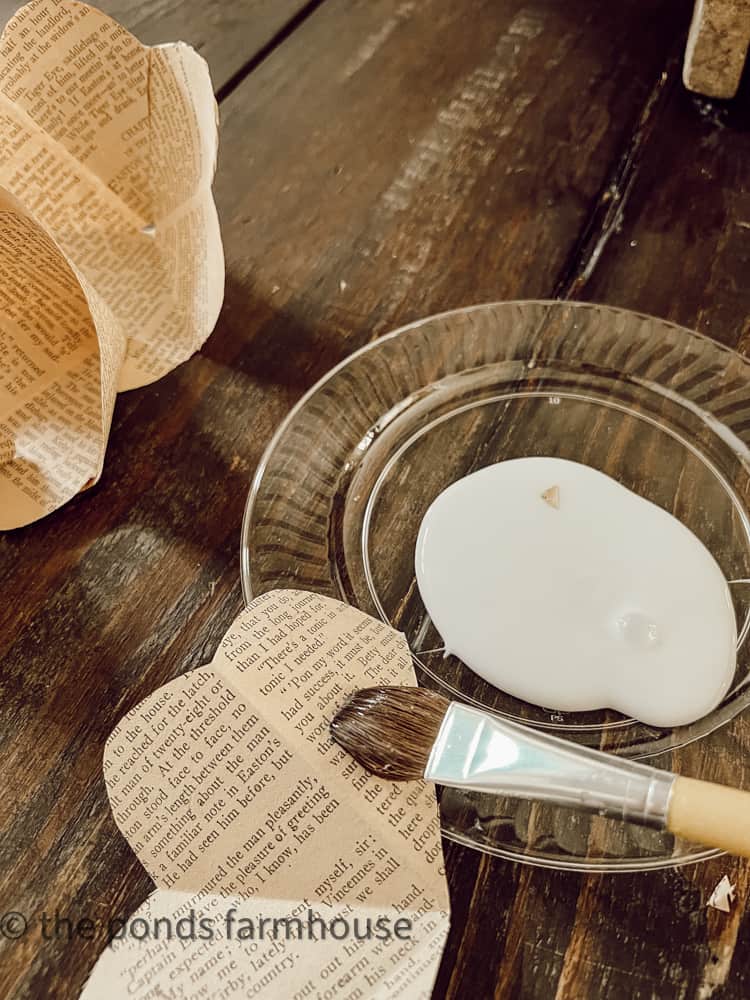
For the larger pieces, overlap the two end petals completely and hold them in place until they adhere.
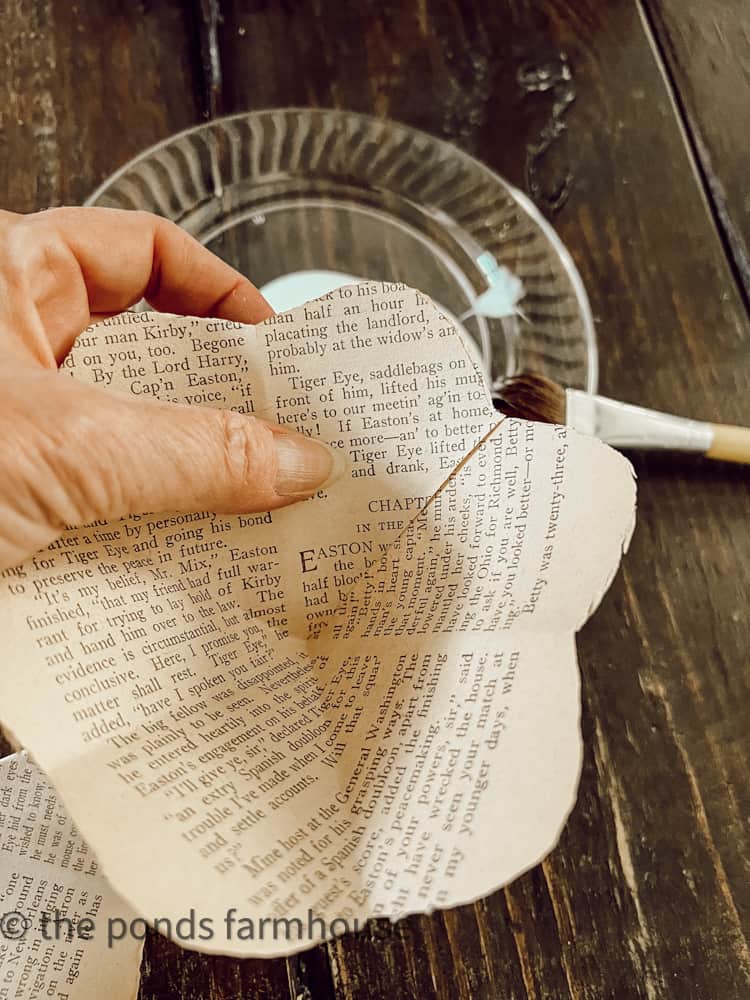
Continue until all eight cones are completed.

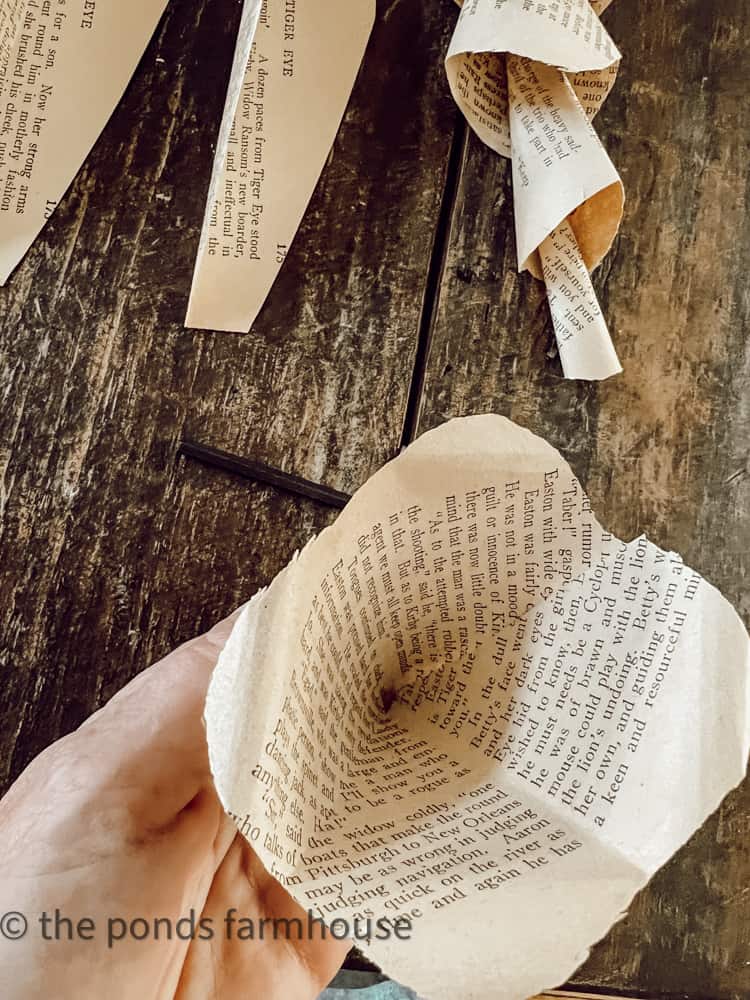
Next, roll the top edges of each petal outward using a small round cylinder. You can use a small paintbrush handle, a pencil, etc. In addition, use a toothpick for smaller roses.
Continue until the tops of all but the two smaller petals are rolled outward.
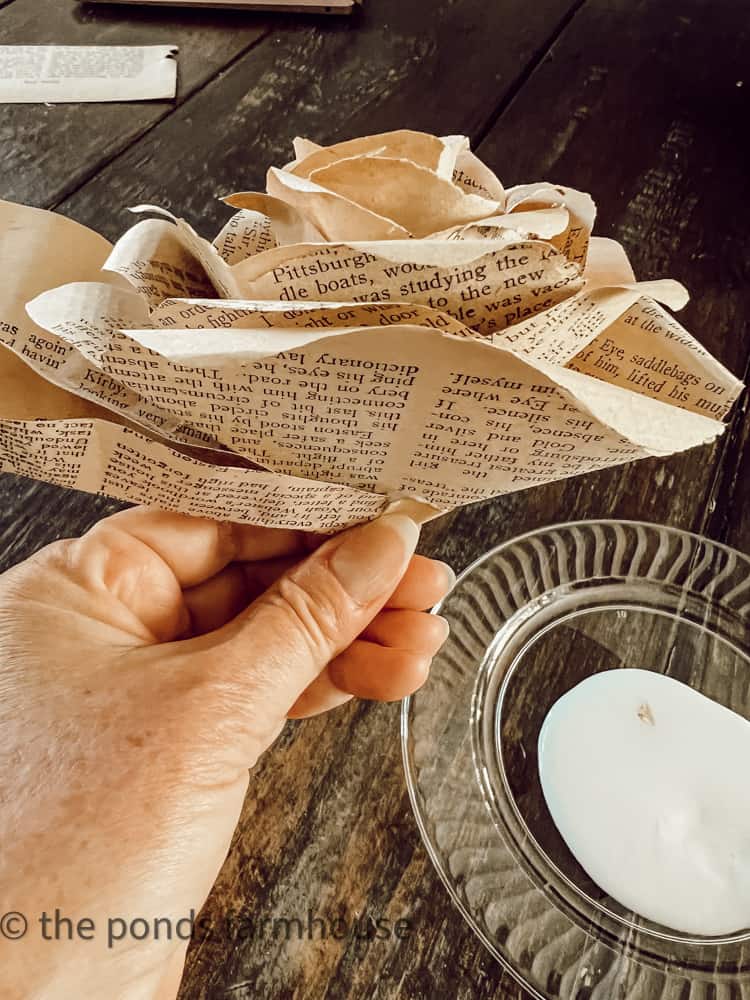
How To Assemble Flowers With Paper Folding
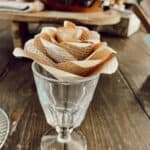
Now, you can begin assembling the folded paper flowers. I recommend holding the flower in a glass or jar as you make it.
You can begin with the two largest petals and add glue to the tip of the smaller one. Place the smaller one inside the large one and allow them to adhere.
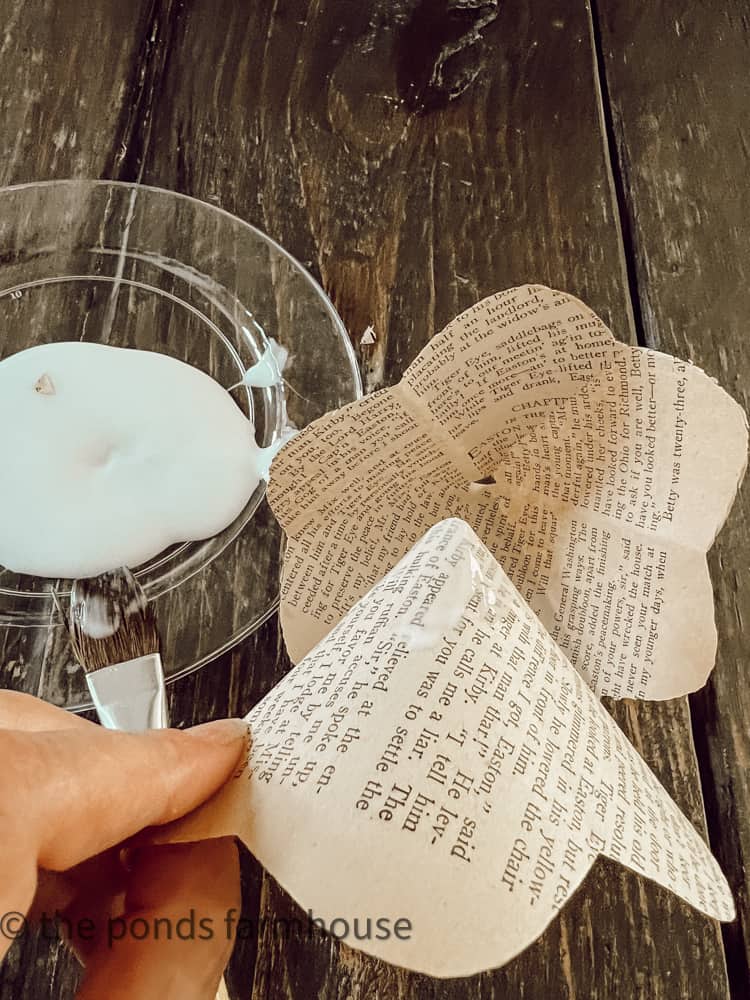
Repeat this method, working from the largest to the smallest petals. Allow the adhesive to dry.
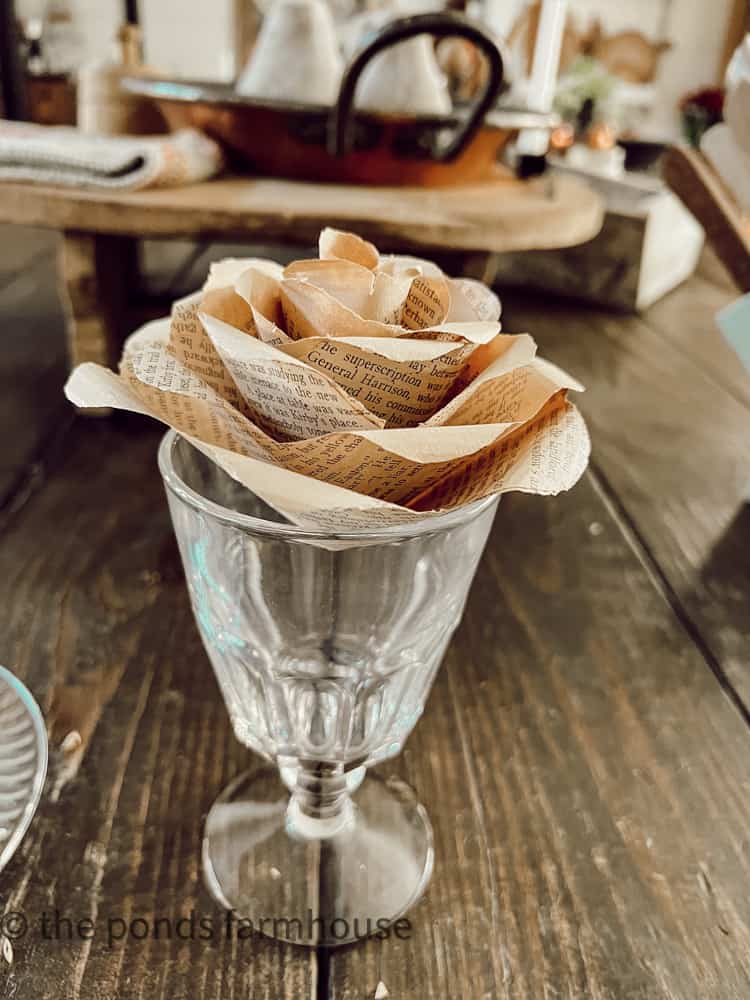
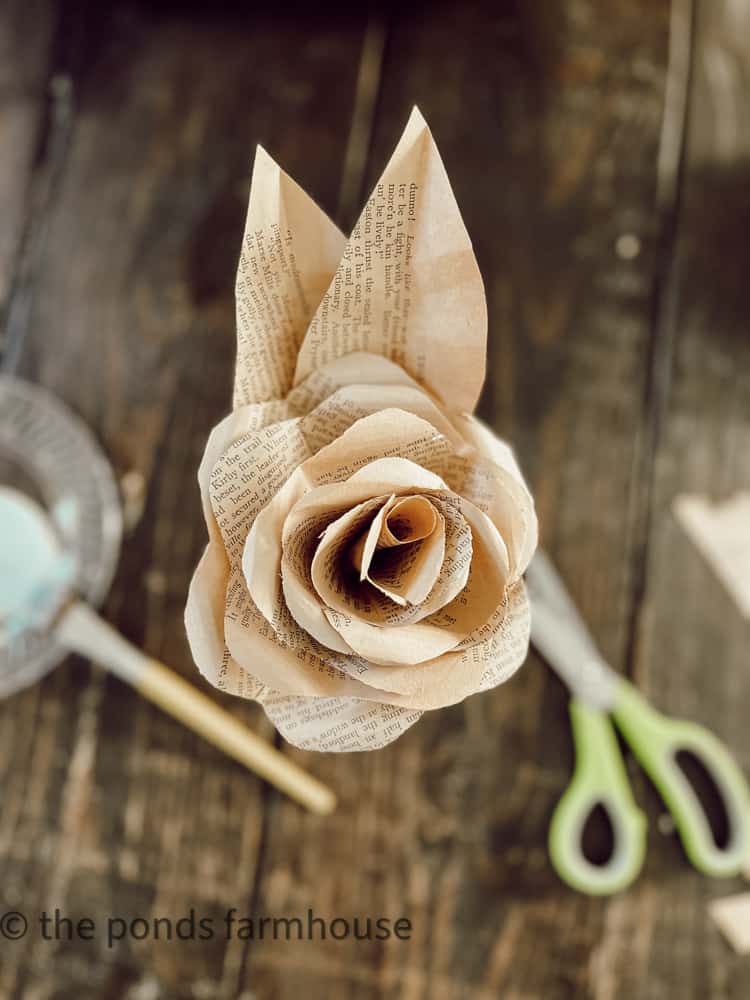
Don’t you love how the paper roses look?
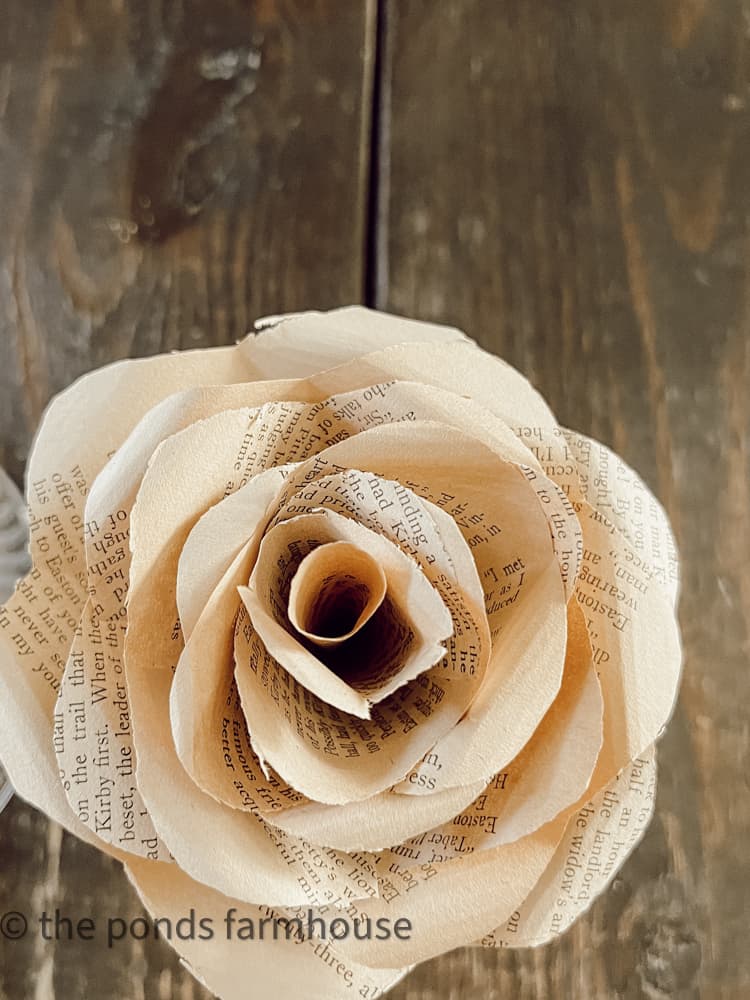
How to Make DIY Paper Roses from Vintage Book Pages
Equipment
- Scissors
- Toothpick
Materials
- vintage book pages
- Glue
Instructions
- Cut Four Squares from book pages
- Fold each square into a triangle 3 times.
- Ensure that all folded edges are on the same side.
- Cut a half circle to form the tops of each petal
- Snip the point of the triangle to form a circle in the middle of each piece.
- Cut away one petal, then two petals, then three petals and on the 4th pieces cut in half. Keep all pieces.
- Add glue to the edges of each piece and form a cone shape by overlapping the two ends.
- You will have 8 cone shapes when you finish.
- Use a round cylinder, such as a small paintbrush handle or toothpick to roll the tops of each petal.
- Begin to add adhesive to the points of each cone and stack one inside the other from largest to smallest.
- Place in a glass or jar to allow dry time.
- Add paper leaves as an option. Cut from the leftover book pages and adhere to the outside of the rose.
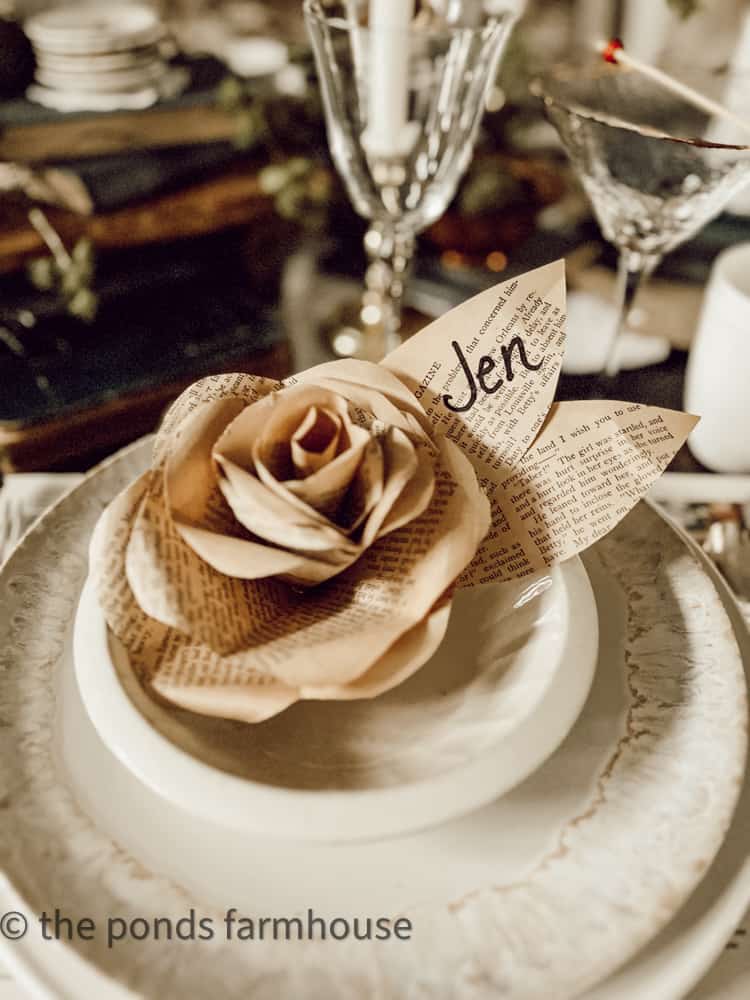
How To Add PaperLeaves (optional)
Because I plan to use the paper roses individually as place cards, I decided to add leaves.
Cut two leaf shapes, folding them in half using scrap paper left over from the original book pages.
I also crinkle-folded for a more authentic leaf look.
Add glue to the end of the paper leaf.
Wrap it around the bottom of the paper rose and hold it in place until it adheres. The glue doesn’t need to dry completely. You can place it back in the glass to allow it to dry.
Once dry, you can add it to your table, create a garland, or incorporate it into a wreath, among other uses.
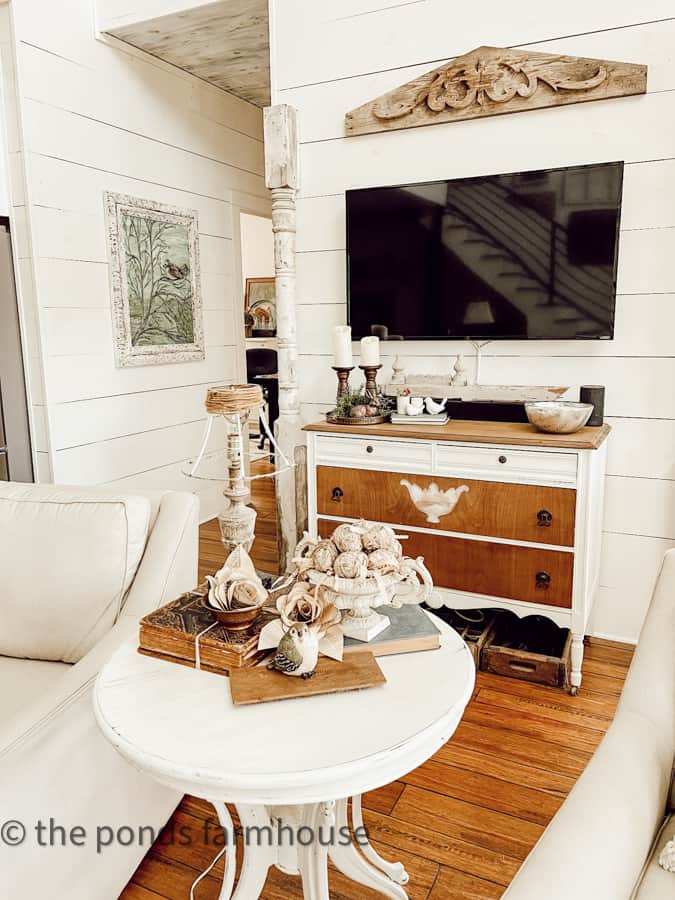
Creative Ideas To Decorate with Vintage Paper Roses
The vintage-inspired roses are perfect to add to other craft projects, bowl fillers, and table decor. Let’s take a look at some of the ways I’ve used this budget-friendly craft around the farmhouse.
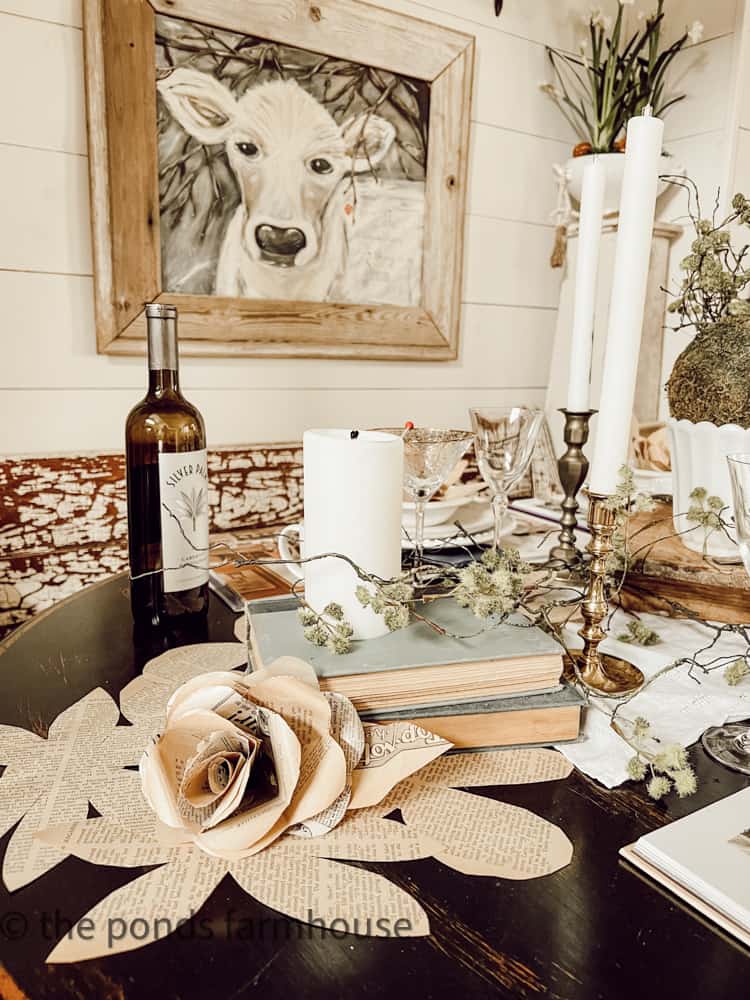
Tablescape Decor
My original plan was to use the flowers on a book-themed tablescape, and it turned out better than I had imagined. Here are the different ways to use this fun craft for a table setting.
- First, I added guests’ names to the flowers as place cards for each place setting.
- You can also leave the name off and gift the roses to each guest.
- Scatter them along the table runner.
- Include them in the table centerpiece.
Check out the book club-themed Supper Club table that inspired these roses.
If you enjoy unique tablescapes, check out these Kraft Paper Tablecloth ideas, these burlap napkin rings, and this coffee filter garland.
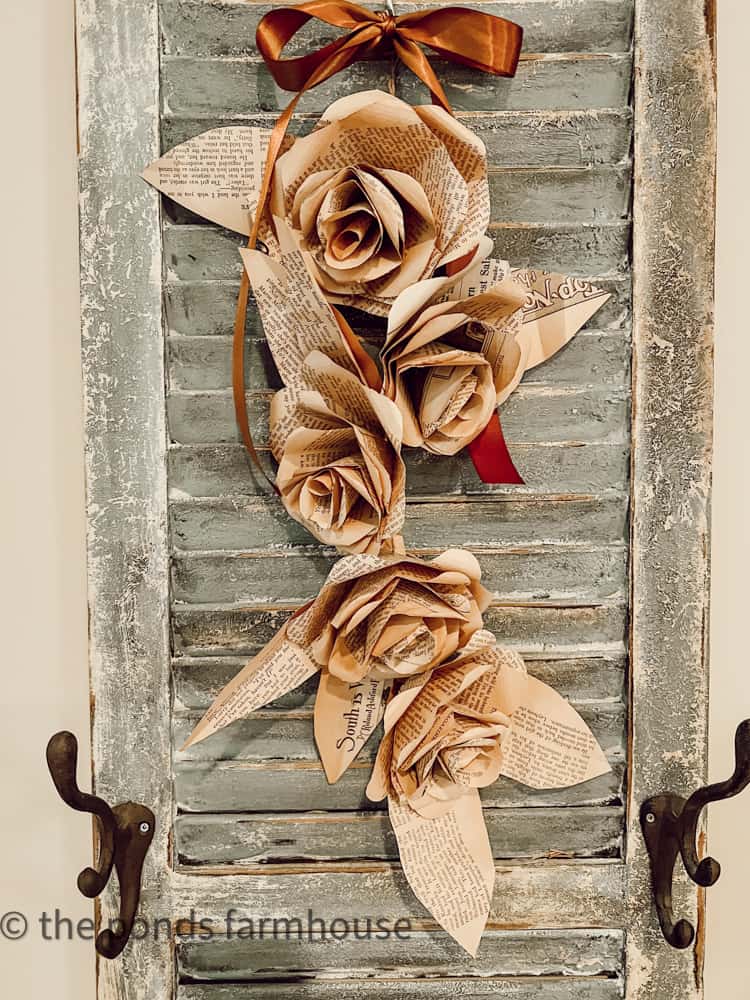
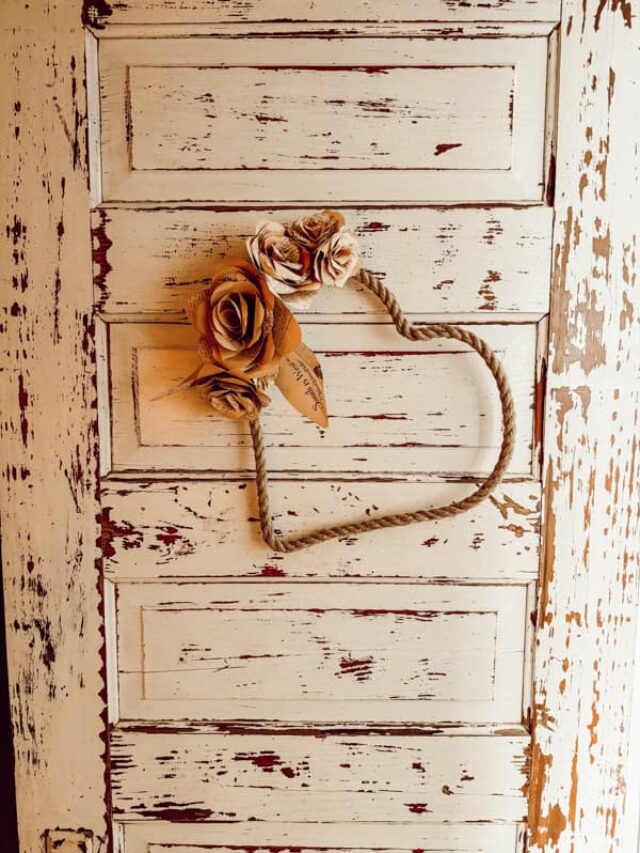
Create A Paper Flower Swag
After using the flowers on the dining table. I decided to make a swag with them. I used jute twine to string the paper roses together and created a simple sway on a vintage shutter.
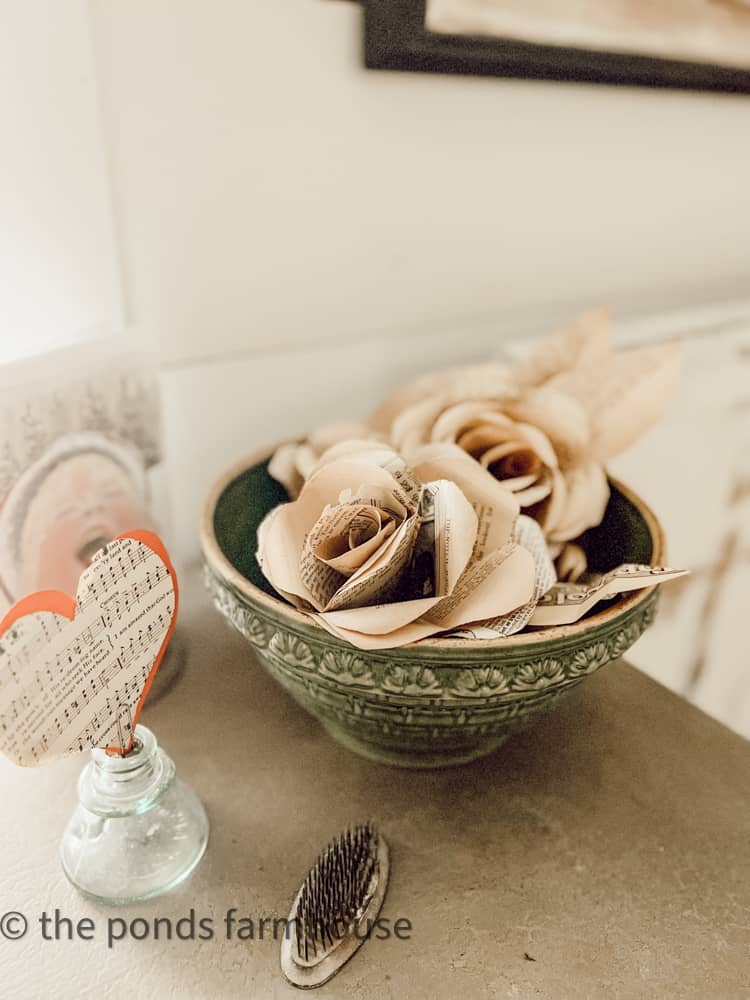
Use Paper Roses as Bowl Fillers
Add a single rose to a small decorative bowl to work with seasonal vignettes. This DIY Book Page Decoupage Easter Egg works great with them.
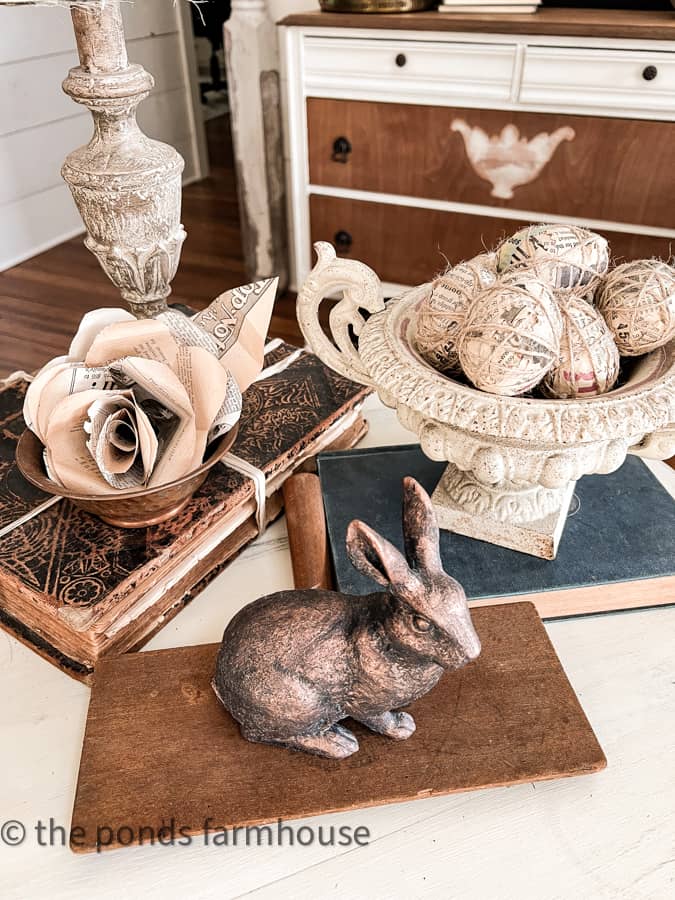
Adding several to a larger bowl creates another unique and stunning display.
Glass Cloche Rose Display
You can display paper roses under a glass cloche for added impact. You can see more ideas in Inspiring Ways To Decorate with Glass Cloche Domes.

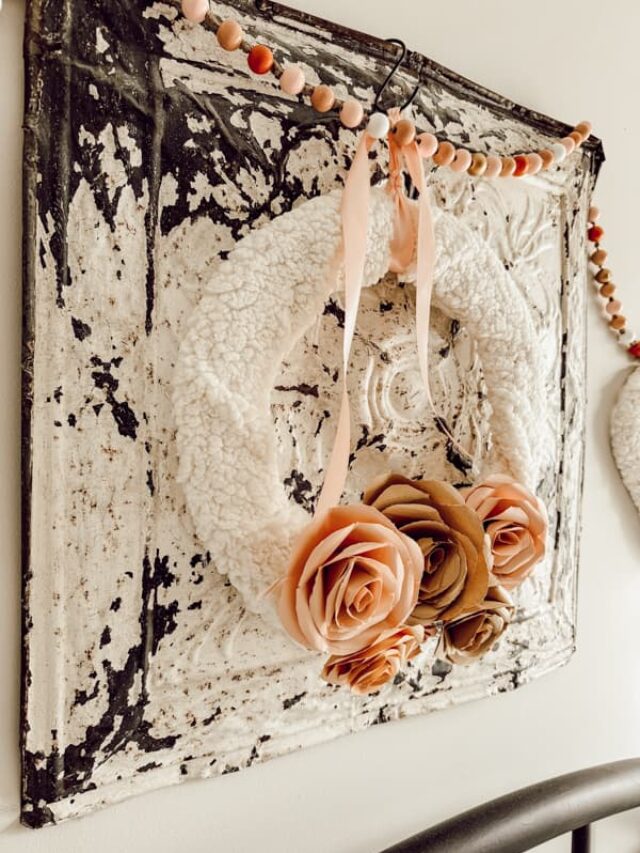
Use Flowers To Enchance Other Craft Projects
I recently added them to Dollar Tree wreaths for Valentine’s Day. These adorable heart wreaths are perfect for displaying year-round. You can see 5 Valentine’s Wreaths with Dollar Tree Frame and Paper Roses for more ideas.
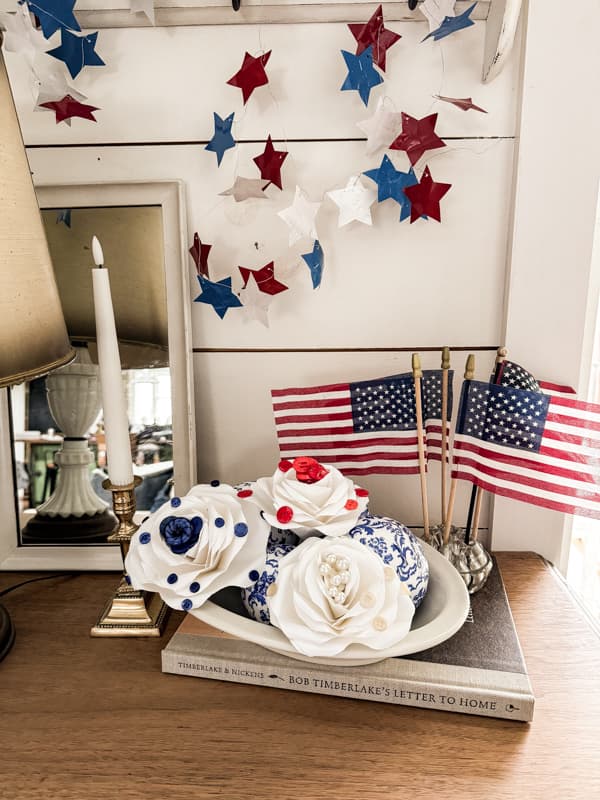
And white paper roses look stunning, decorated with vintage red, white, and blue buttons for unique patriotic decorations.
Regardless of how you display them, they are a great addition to your farmhouse decor.
FAQ
Video Tutorial
Related Old Book Page Articles
- Easy Vintage-Inspired Christmas Bells With Old Book Pages: Dollar Tree Craft
- Upcycled Magical Christmas Village
- Big Christmas Ornaments with Old Book Pages
Resources
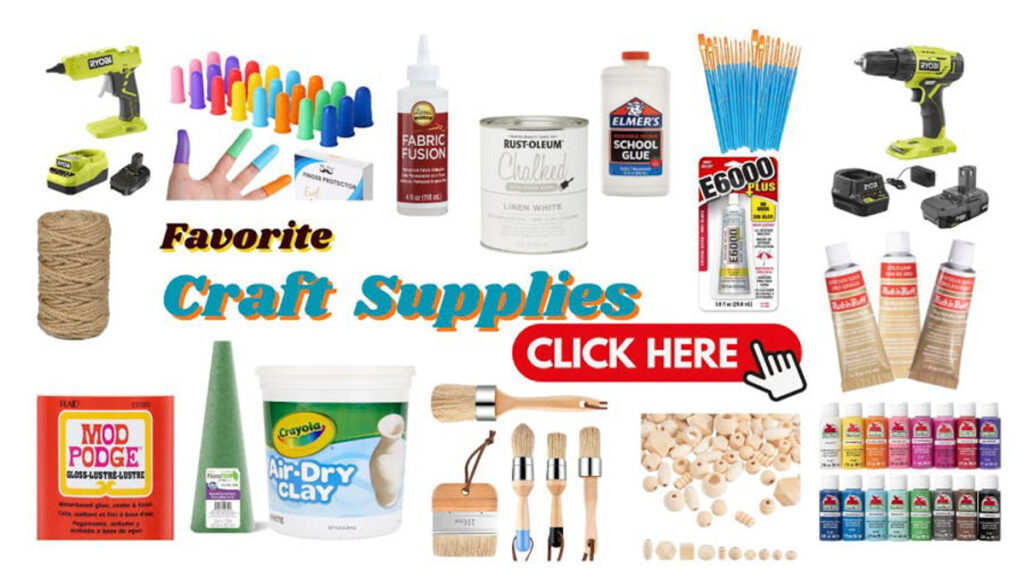
See all my favorite craft supplies on my Amazon Storefront. Click below.
I hope you enjoyed today’s tutorial. Let me know what projects you plan to make with paper flowers.
Thanks for stopping by. I look forward to sharing my next adventures with you.

Pin It To Remember It
Did you find some great ideas you’d like to save for future reference? Hover over the images you’d like to save and pin to your favorite Pinterest Boards when you see the PIN button.

Rachel, they are beautiful!!! What a cool project!!!!
Jennifer,
I can’t believe it took me this long to make these. Thanks for stopping by.
I need some information and help. I loved your mantel shelf above your bed and have found one to do a similar project. Can you tell me how you attached it to the wall? You’ve been a great inspiration to me since I found your blog. Thanks for your help.
Gail,
We actually determined where the wall studs were and then used long screws to attach the mantel to the wall. Drilling through the mantel into the studs to ensure a secure and firm attachment. Since it is over our bed, we didn’t want to take any risks. Also the metal pieces which we used at each end, help to secure the bottom shelf to the back of the mantel. We didn’t want to risk the bottom breaking away. You could also add brackets under the mantel if you have the room.
Girl, how do you come up with all your super duper pretty creative DIY ideas?! You amaze me. Love these flowers! Especially because of the book pages. Thanks for sharing this. pinned
Cindy,
I really appreciate this.
This is so pretty. What a great idea. I would love to share this on my newsletter. Hugs to you.
Renae
Absolutely. I appreciate this.
So gorgeous!! but yes, I can imagine it took a bit of time to get these made! pinned!
Debra,
Not too long. the more I made the quicker the process went. thanks for stopping ny.
Super cute Rachel, I will be sharing this post soon!!!
Wendy,
Thank you so much.
So so cute!! I wished I had patience to do this craft. I don’t like standing still too long….lol
Nancy,
It goes quickly. Thanks for stopping by.
Rachel, I love your paper flowers. Adding your guest’s name is a great idea! Thanks for sharing this fun project!
Kim
I’m so glad you like this.
What a cool idea!!! I love this! xoxo
Stacy,
I can’t wait for you to see the whole table.
This is just the cutest idea, Rachel. I absolutely love it!
Kim,
I’m so glad you like it. Thanks for stopping by.
Thanks for sharing.
These are beautiful Rachel! I can’t wait to see your tablescape! And I can’t wait to join you ladies for this month’s supper club!
I’d love it if you shared this at my weekly link party
https://www.ourtinynest.com/2023/01/18/weekly-link-party-331/
Nicole,
Thanks so much.
@Rachel,
Thanks so much for sharing!!! I’m happy to be featuring you this week <3
https://www.ourtinynest.com/2023/01/25/weekly-link-party-332/
Thanks so much for sharing.
Thanks for sharing.
I’m so glad you like them. Thanks for sharing.
I love this so much! My girls and I will have to make these this weekend.
Cheers,
Jenn (www.shawave.com)
Jenn,
Thank you. I’m glad you like this idea.
FABULOUS tutorial, Rachel!
I’d love for you to join us over at the Creative Crafts Linky Party every Wednesday through Sunday
https://creativelybeth.com/creative-crafts-linky-party/
Followed and Pinned!
Creatively, Beth
Beth,
Thank you so much for stopping by.
Popping back in to say I loved these so much I’m featuring them on Farmhouse Friday tomorrow! Thank you for linking up. You are greatly appreciated! pinned – again!
Cindy
You are so kind. I appreciate this so much.
Thanks for sharing.
I have no idea how you come up with half the things you do, Rachel, but I am always excited you are willing to share your genius with us. These roses are just beautiful and seeing them as a swag totally melts me in the best possible way. Loving and pinning and totally obsessing lady. I can’t wait to share this post on Friday, CoCo
CoCo,
You are so sweet. I’m glad you liked these roses. Thank you so much for sharing.
CoCo,
I appreciate the share.
Hey Rachel, your paper flowers are amazing! What a fantastic idea. Also, I wanted to drop a quick message to let you know that I featured your tutorial on Crafts on Display, a growing community of crafting enthusiasts. You can check it out here – https://craftsondisplay.com/paper-crafts/how-to-make-paper-flowers-with-book-pages-30404/
Violeta,
Thank you for sharing.
Rachel, do you seal your paper flowers? For instance, bridal bouquets that the bride wants to display. What product do you suggest?
Tammy,
I have never sealed my flowers, however I would probably use mod podge.
Thanks for sharing.