Vintage-Style Fluffy Lamb Cross Stitch: A Nostalgic Series Free Pattern
Hey friends! I’ve been so inspired by all the charming lambs popping up this season, and I knew it was the perfect time to add a Free Fluffy Lamb Cross Stitch Pattern to my Old School Nostalgic Series.
If you’re a beginner at cross-stitch, don’t worry—I’ve included my best tips to help you complete this project with ease. You can download and print the free pattern to follow along as we create something special together. In addition, I’ve included a smaller, simple lamb pattern if you want to start small.
Whether you turn this adorable vintage-inspired lamb into a sweet pillow or frame it for a gallery wall as I did, it’s sure to add a touch of handmade heritage to your home. Let’s dive into all the details!

(Posts on The Ponds Farmhouse may contain affiliate links. As an Amazon Associate, I earn from qualifying purchases. See the full disclosure details here.)
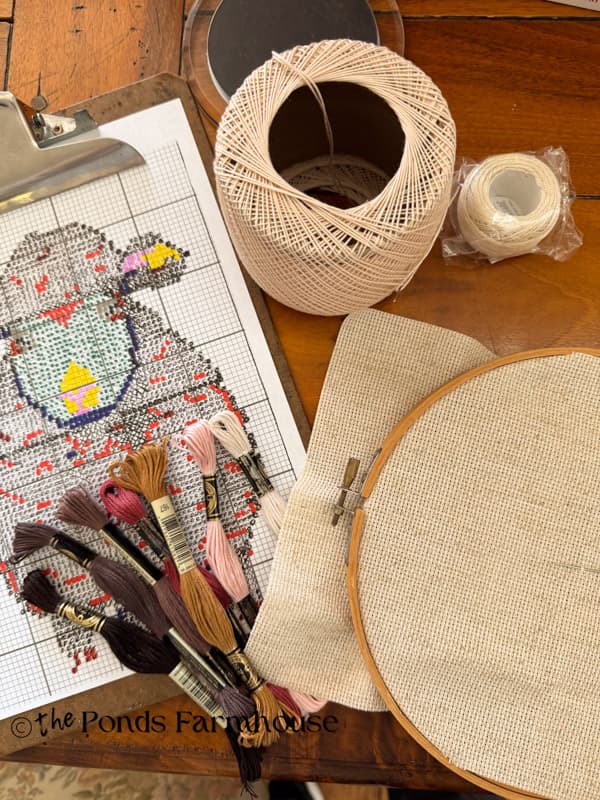
Supplies To Start Cross Stitching
If you are new to cross-stitching, no worries, because it’s a very simple process. I’ll guide you through step-by-step. First, you need the proper supplies, which are readily available at any craft store and on Amazon. Here is a list of items you’ll need for this Fluffy Lamb project. Click the underlined items to link.
- Aida Cloth 14 count – I use a precut rustic oatmeal color for a vintage feel.
- DMC Embroidery Needles
- Cotton Pearl 712 Cream Yarn (for the fluffy colonial knot stitch)
- If you are new to cross-stitch or embroidery, it may be more economical to order this embroidery floss kit.
- DMC Embroidery Floss used in the following colors:
- 3860 – very dark taupe
- 60 – very dark coca
- 225 – very light shell pink
- 167 – dark yellow beige
- 3726 – dark antique mauve
- 3864 light mocha beige
- 3371 – dark rich black/brown (used for the eyes only)
- 3866 – ultra very light mocha brown
- Small Embroidery Hoop (optional)
- Scissors
- Needle Threader
- Download and print the FREE Fluffy Lamb Cross Stitch Pattern here.
Why Should I Do Cross Stitch?
You may be looking at the list of supplies and the complicated-looking pattern, and asking yourself, “Why should I cross stitch?” Here are the reasons you may want to try this or another cross-stitch pattern.
- Learning a new craft keeps your mind sharp.
- A low-stress hobby that helps you relax, clear your mind of worries, and improve mindfulness and focus.
- It provides a sense of accomplishment and boosts your self-esteem with a lovely finished product.
- Focusing on the pattern helps with hand-eye coordination and improves mental clarity.
- Cross stitch is the easiest of several needlework crafts and is great for beginners or those who don’t believe they are crafty.
- It is a customizable project. You can create family samplers with names and dates. Creating family heirlooms can create a sense of history in your home. (I made a sampler back in the day, and I guess I sold it along with all my cross-stitch pieces. What was I thinking??? I’d love to find one of my early pieces in a thrift store!!)
- Modern heritage decor is the look that everyone is seeking right now to make their home feel like Grandma’s house. Whether you have your family’s heirloom pieces, find a needlework piece while thrifting, or create one yourself, you can achieve this decor style with cross-stitch. Can you see a cross-stitch sampler in your future?
Important Tips For Understanding Cross Stitch & The Pattern – Please Read Before Beginning
First, when you first see the pattern, you may feel overwhelmed, but I promise you can do this. Here are some tips to help you avoid mistakes.
- First, the pattern is enlarged for easier reading. The actual size of each grid is 1 x 1 inch, and there are 14 squares in each grid.
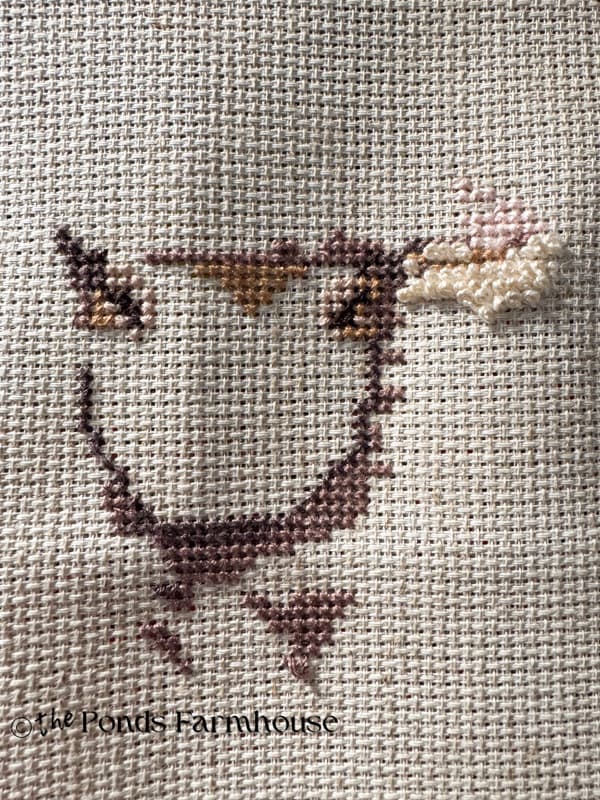
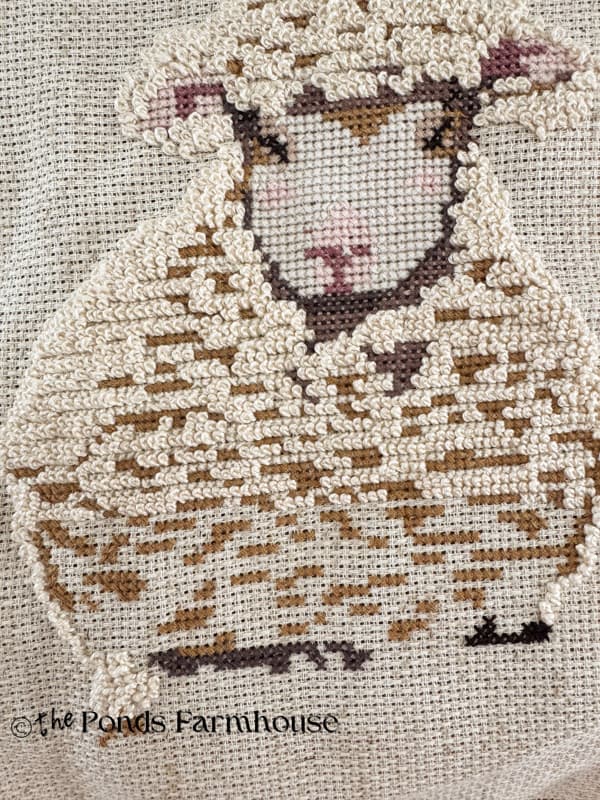
- Please note that I drew this pattern myself, and it’s not perfect. I think you’ll be able to read it except for the dark blue dots and the black, as they look similar in the pattern. However, the dark blue dots are found around the head and body. The black dots are only in the eyes.
- This lamb is approximately 5 x 7 inches when finished. You will need a piece of fabric at least 9 x 11 to wrap around a frame or make a pillow.
- I made the mistake of cutting mine closer to the recommended size and had difficulty framing it.
- It is recommended that you start in the middle of the pattern and work outward.
- To determine the middle, measure the pattern and find the horizontal and vertical center, and mark to determine which stitch you will begin with. Or fold the pattern in half in both directions, ensuring there are equal amounts of printed pattern on each side.
- In turn, you need to determine the middle of your fabric. Insert your needle to mark the spot.
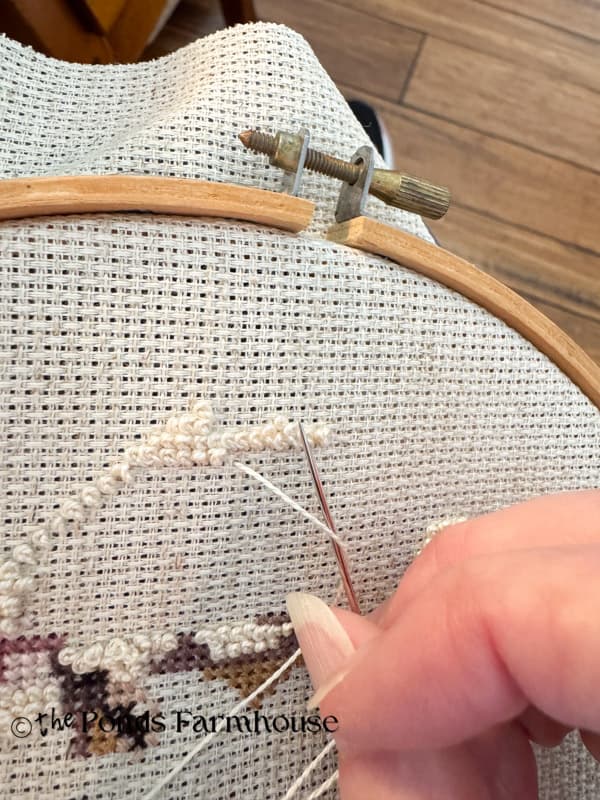
- Add your fabric to a small embroidery hoop if you desire. This is optional. I began with a hoop but quickly realized that with a small project, it was easier to hold the fabric in my hand. Working with larger fabrics, the hoop would be necessary.
- Note: if you do use an embroidery hoop, remove the fabric from the hoop each night. Otherwise, you will have a hard time getting the crease out of the piece.
- To read the pattern, you will count the number of each stitch and work outward, filling in with stitches in the colors as the pattern dictates.
- You will begin with the X-3860 Very Dark Taupe on this pattern. I placed all the X stitches, then surrounded the face with darker black-brown stitches. Once you have counted these stitches correctly, you will have a good outline and can then fill in with the remaining colors with ease.
- Thread your needle with your beginning floss color.
- Use two strands of floss.
- Note: each DMC Floss has 6 strands, so you will need to separate them and load them onto the needle. To separate, cut to the length you need, then at the center of that length, separate and pull two strands apart. It’s easy to tangle if you pull from one end.
- The Cotton Pearl Cream is just one heavy strand for all the stitches indicated.
- You will notice several candlewick (or colonial knot) stitches in this pattern.
- I used a mixture of both the colonial knot and cross stitch to achieve the fluffy lamb design. This will help to speed up the process.
- Another common problem is the thread knotting up.
- This happens if you try to use extra-long pieces at a time, so keep each piece a reasonable length. When I pull through the thread, I like to only extend just beyond the fabric. Another reason is that the thread begins to twist as you work. To adjust, allow the needle and thread to hang from the fabric, and the needle will spin to unwind.
- (Note: Ensure that the needle is secure about halfway along the floss, so that it doesn’t fall off the thread.)
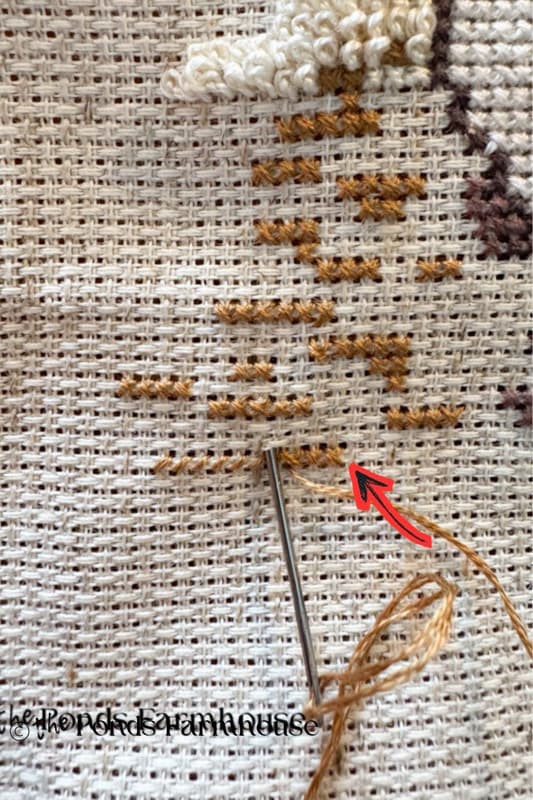
- In addition, the orange dot (167 DMC Color) is randomly located on the lamb’s body. Don’t worry about following the pattern exactly. I added several more of these stitches than the pattern called for, and just placed them randomly as I desired.
- This is a very forgiving pattern except for around the face and ears. Therefore, I recommend finishing that area first.
- Lastly, cross-stitch is not a two-hour project. Consider it a project that you will work on for several days. One you will pick up and put down several times until it is finished. It took me a week to finish the lamb, which included drawing the pattern.
How To Cross Stitch
Cross-stitch is one of the easiest stitches to make. It is exactly as it sounds: you are making a cross with the embroidery floss. However, there are some key tips that will make your project much easier and neater.
The Aida fabric is designed with tiny squares (14 per sq. inch).
- Thread your needle with two strands of your first color.
- To begin, bring your needle up from underneath the fabric in either the right or left lower corner of your first square. I like to work from left to right (like I’m reading a book), but either direction works; you just need to pick the direction before you begin. For the totals tutorial, I’m going to work left to right.
- Pull the needle up through the first hole, leaving a small tail of thread underneath. Hold the tail under the square so that as you make your first few stitches, you secure the end of the thread to the back.
- Begin adding your first row of stitches by pulling the needle up from the left bottom corner and crossing over the square to the upper right corner of the square.
- Don’t begin making crosses immediately; instead, add the whole section left to right and then work your way back by bringing the needle up on the lower right corner, cross over, and insert the needle into the upper right corner to form crosses until you reach the beginning.
- This will keep your stitches uniform and use less thread.
- You’ll also notice that you want to work as many stitches as possible in the same yarn
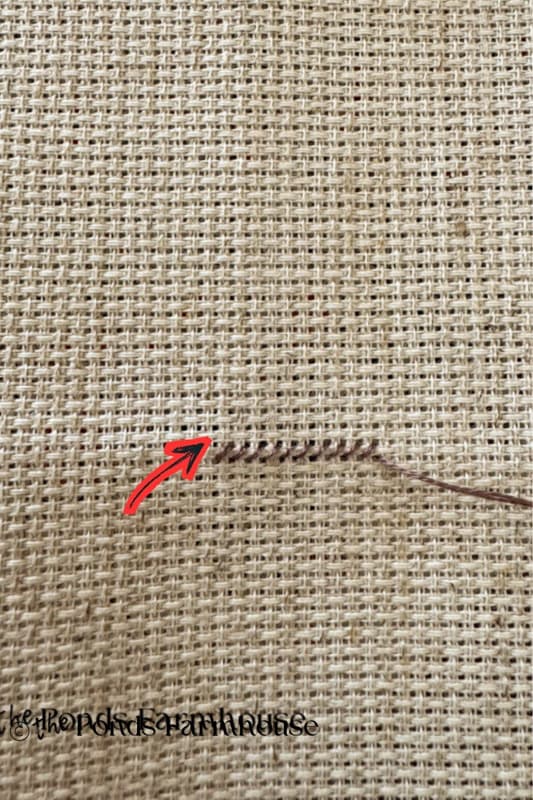
How To Create The Colonial Knot or Candlewick
I recently shared how to make a candlewick pillow that uses only colonial knots. For this pattern, I used a combination of both colonial knots and cross stitches to fill in the body and head of the fluffy sheep. Both stitches were completed using one strand of the Pearl Cream thread.
I began by adding the colonial knot along the outside edge of the body so that I wouldn’t have to count as I filled in. In addition, I added random cross stitches in DMC 167, dark yellow beige. I found that adding a row of cross stitches under most of the beige color worked well. I also mixed the regular cross stitch with the rows of the colonial knots to speed up the process.
Here’s a quick reminder of how to make a colonial knot.
- First, bring the needle up from beneath the fabric at the lower-right corner of the square.
- The “C” Shape: Lay the thread on the fabric in a backwards “C” shape.
- Place your needle over the top of the curve and under the thread emerging from the fabric.
The Figure-8 – Wrap the thread over the top of the needle, then under the tip, forming a figure-8 around the needle. Holding the original loop next to the needle helps secure the figure 8.
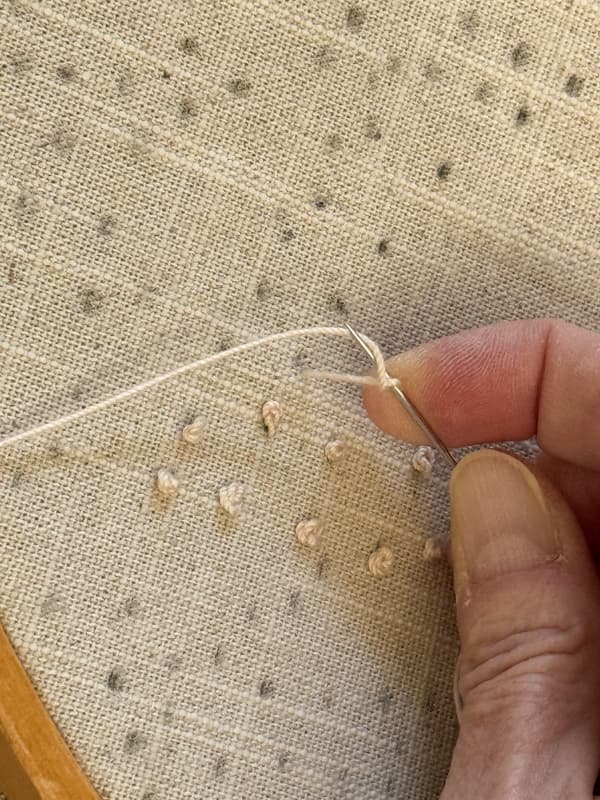
- Insert the needle in the left upper corner of the square. Pull the thread to tighten the loops around the needle and hold tight as you pull the needle through the hole.
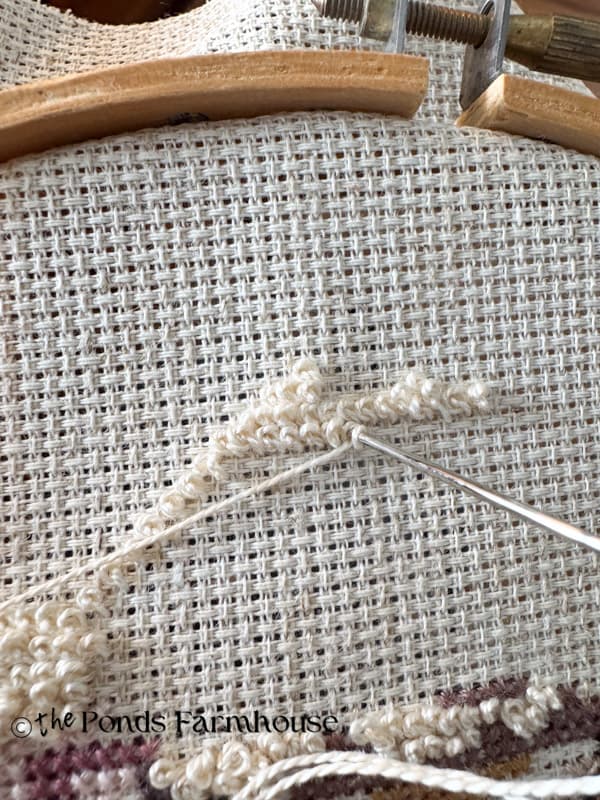
You can see how I added several more dark yellow-beige stitches to my design. Then I filled in around those with the cream thread.
Insider Tip
I found it extremely important to work from left to right for the colonial knot. It is almost impossible to see the holes if you are working the other direction. The knots obsecure the holes. If you are filling in around an area that the knots have already been placed, you may need to pull it to the side to reveal the holes.
Vintage-Inspired Nostalgic Cross-Stitch Design
After completing the vintage-inspired cross-stitch pattern, I decided to frame mine using a thrifted vintage frame. It would also be cute as a pillow.
I mentioned that I cut my fabric close to the pattern before beginning, and therefore was limited as to what size frame I could use. Fortunately, I had this one that worked perfectly.
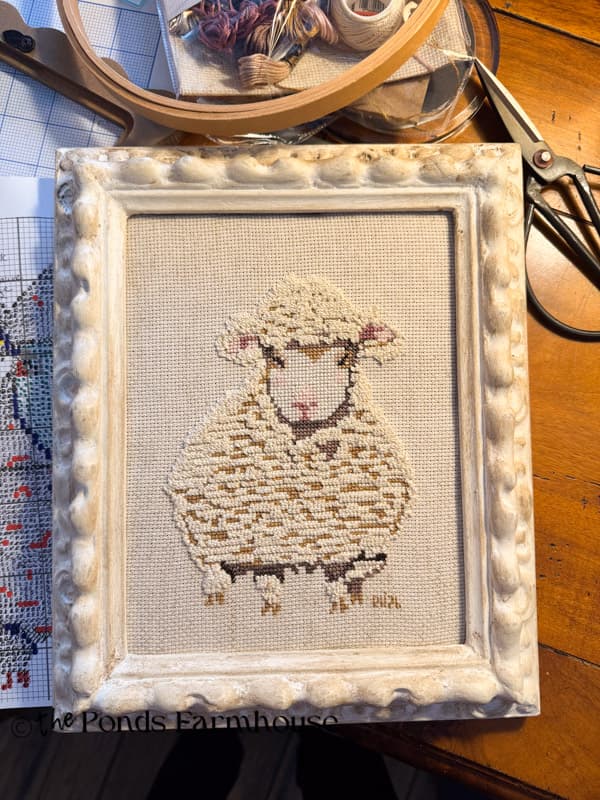
I’m loving the vintage feel of the cross stitch. It took a week to complete this project, but it was fun watching it come to life one stitch at a time.
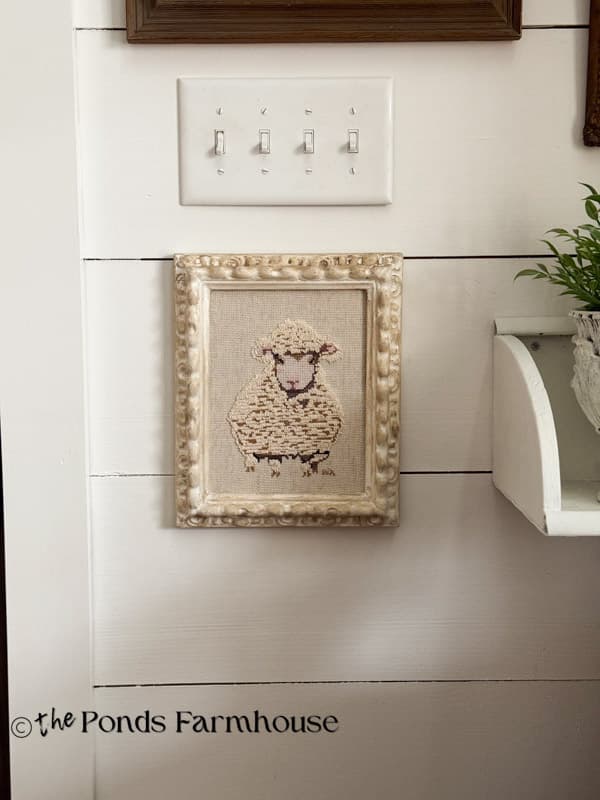
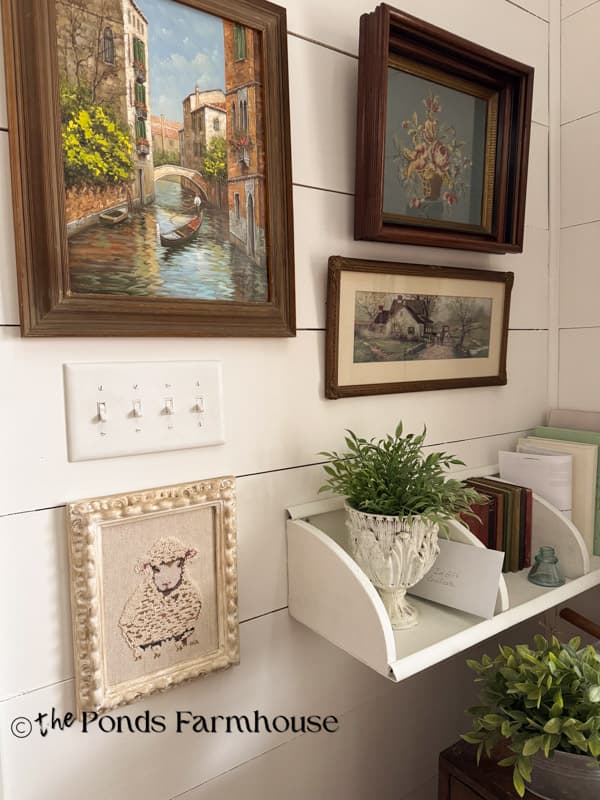
I’m currently working on my office area and recently added a small gallery wall of art. The fluffy lamb adds a touch of old-world nostalgic charm to the wall of thrifted art.
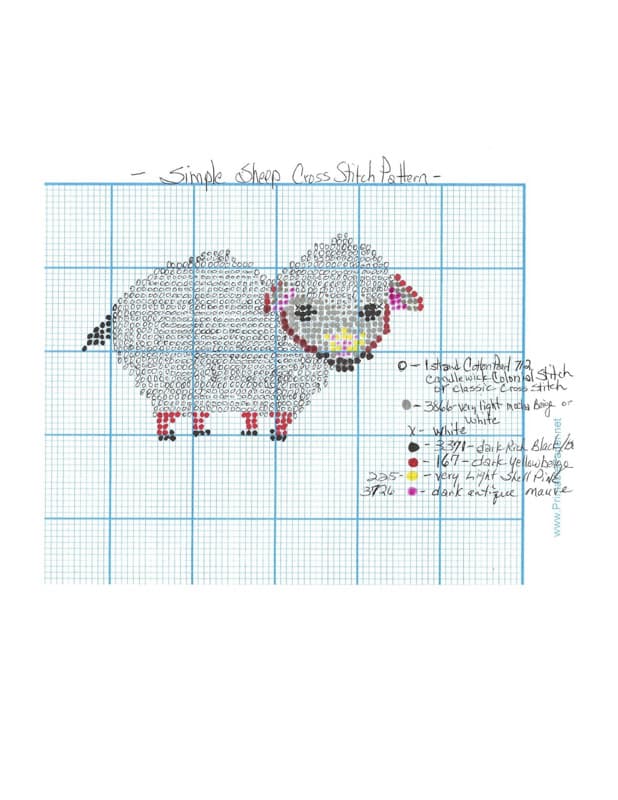
Bonus Simple Lamb Cross Stitch Pattern
I’m including a simple lamb pattern if you’d rather start out small in your cross-stitch journey. Click – Simple Lamb Cross Stitch Pattern to download. Here is a preview of the pattern.
Related Articles
Click to see full details…
- Learn to Crochet In Under An Hour With A Simple Dishcloth Pattern
- Old School Woven Pot Holders: A Nostalgic Craft for All Ages
- Candlewick 101: Colonial Style Pillow Cover tutorial.
- Quickly Crochet an Eyeglass Holder: Easy Free Sunglasses Case Pattern
- Crochet Placemats for Beginners: A Step-by-Step Stress-Free Guide
I hope you enjoyed today’s Old School Nostalgic craft idea. I’d love to hear your thoughts, and if you make this lamb, I’d love to see a photo. I share any crafts that you duplicate on my Sunday, Dirt Road Adventures.

I love these projects and your instructions. Thank you so much. Looking forward to more.
Misha,
Oh, I’m so glad you like it. It’s been almost 40 years since I cross stitched and now I’m hooked again! LOL. Have a blessed weekend.