Easy DIY 3D Paper Hearts: Budget Vintage Valentine’s Day Decoration
Looking for adorable and budget-friendly Valentine’s Day Decoration ideas with a vintage vibe? Whether you embrace the reds and pinks of traditional Valentine’s decor or prefer a more neutral approach, these hearts can be customized for any decor style. These vintage-inspired, DIY 3D paper hearts are a perfect solution for decor and gift wrap ideas. This simple tutorial will guide you through creating these charming vintage Valentine’s crafts using paper, scissors, and a little creativity. So grab your scissors, and let’s get started.
(Posts on The Ponds Farmhouse may contain affiliate links. As an Amazon Associate, I earn from qualifying purchases. See the full disclosure details here.)
Valentine’s Day Decoration – 3D Paper Hearts
If you want to add a little dimension to your Valentine’s Day Decoration Ideas, let’s start with these adorable 3D paper hearts. These paper decorations have had a resurgence in popularity along with other vintage decorations. They are inexpensive, easy to make, and can be used as ornaments on a mantel, in a garland, or on a Valentine’s tree. They also look stylish on gift packages and framed decor ideas. There are so many options, so let’s get started.
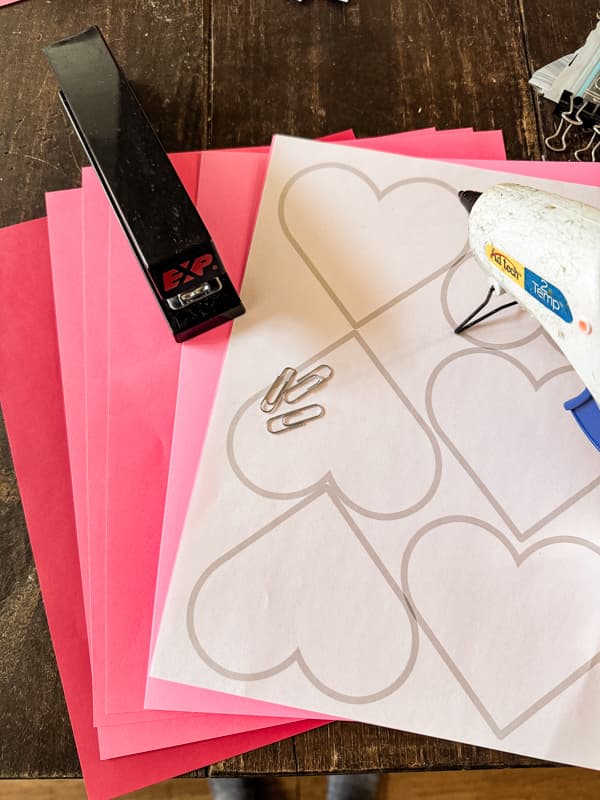
Supplies For 3D Paper Hearts
Here are the supplies I used to create these adorable hearts.
- Heart Template – Click here to download – approximately 12-18 hearts per honeycomb.
- Colored paper and old book pages
- Print or trace by hand
- Scissors ( or Silhouette / Cricut for cutting)
- Stapler (if cutting by hand)
- Hot Glue Gun
- Paper Clips
- Ribbon or Jute Twine
- Silicone Finger Protectors
- Gold Rub N Buff (optional)
- Gold Glitter (optional)
- Clear Command Hooks (for hanging garland), optional
Best Paper For 3D Hearts – Pros & Cons
The weight and texture of your paper can determine the shape and look of your 3D hearts. I used both cardstock and old book pages. Here are the pro’s and cons of each.
- Cardstock
- Pros:
- Available in many colors, so you can customize the hearts to your decor’s color palette.
- You can print from the template and create several hearts at once.
- Sturdy hearts that will hold up to storage.
- Cons:
- The paper is stiff and can be difficult to fold.
- Different weights of cardstock can make the heart harder to assemble. I recommend a lightweight paper.
- Pros:
- Old Book Pages
- Pros
- Unique rustic hearts.
- Upcycling old books into sustainable, eco-friendly decorations.
- Neutral colors that work with many decor aesthetics.
- Cons
- Paper is fragile and can tear easily.
- You have to trace the hearts rather than printing, so they are more time-consuming to create.
- Pros
Step 1 – How To Create Paper Hearts
Once you decide which paper you plan to use, you can begin creating the paper hearts. Here are the steps to make the hearts from cardstock and old book pages.
Paper Hearts From Cardstock
Begin by downloading the heart template. You can print and copy at a different ratio to increase or decrease the size. If you prefer, you can create your own heart template.
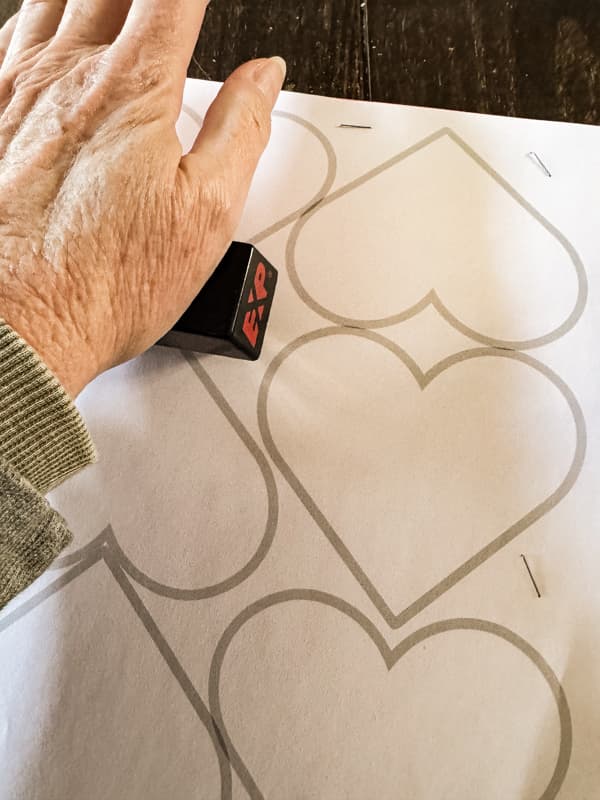
How To Use The 3D Heart Template
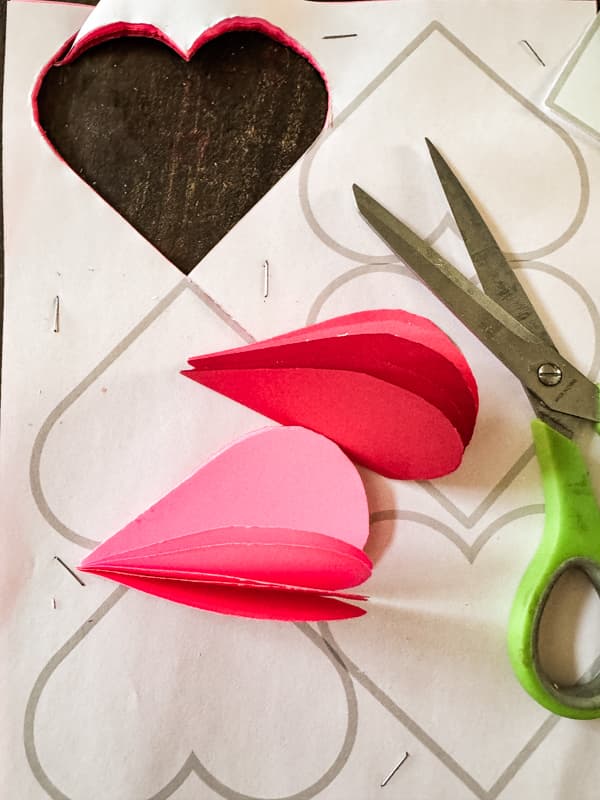
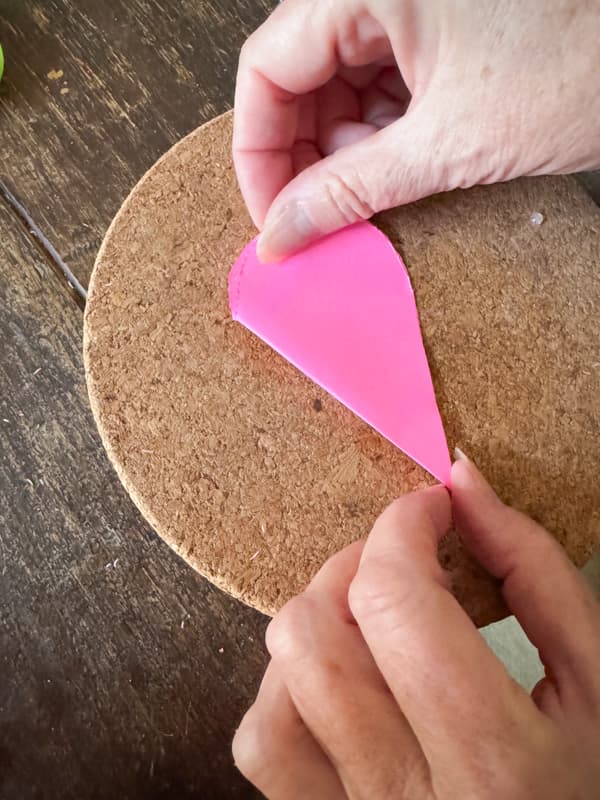
I recommend printing one copy of the template for each 3D heart you plan to make. You will need three sheets (if using this size template) to make 18 pieces or one heart. To cut several pieces at one time, stack several sheets of colored paper (3 of each color) and staple the template on top, avoiding the heart designs. Secure the pages in several locations so the paper will not slip while cutting the design. I cut three different colors at a time with sharp scissors.
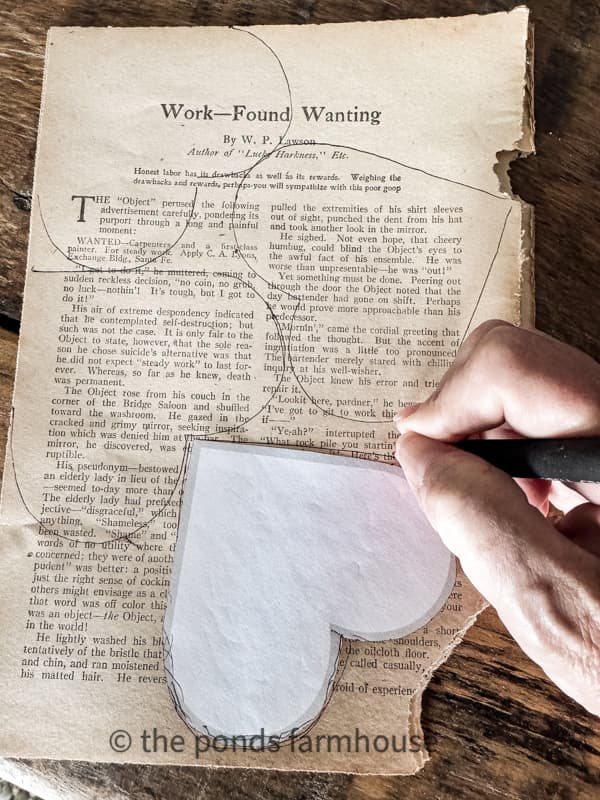
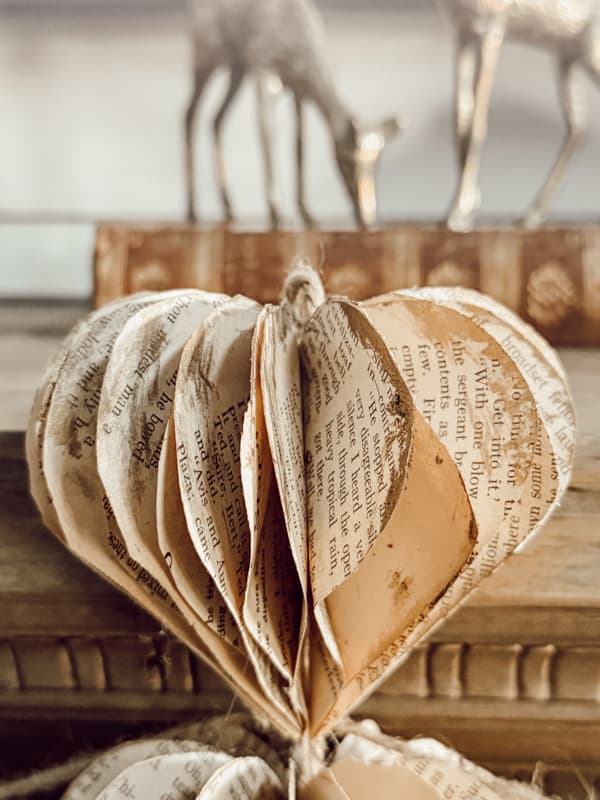
How To Create Old Book Page Hearts?
I also made several 3D hearts using old book pages. I used one of the hearts as a template and traced the design onto the pages. With this paper’s size, I could only get four per page. However, I stacked several pages and stapled them together just like the craft paper hearts. I also reduced the heart’s size and made some smaller versions using the old book pages.
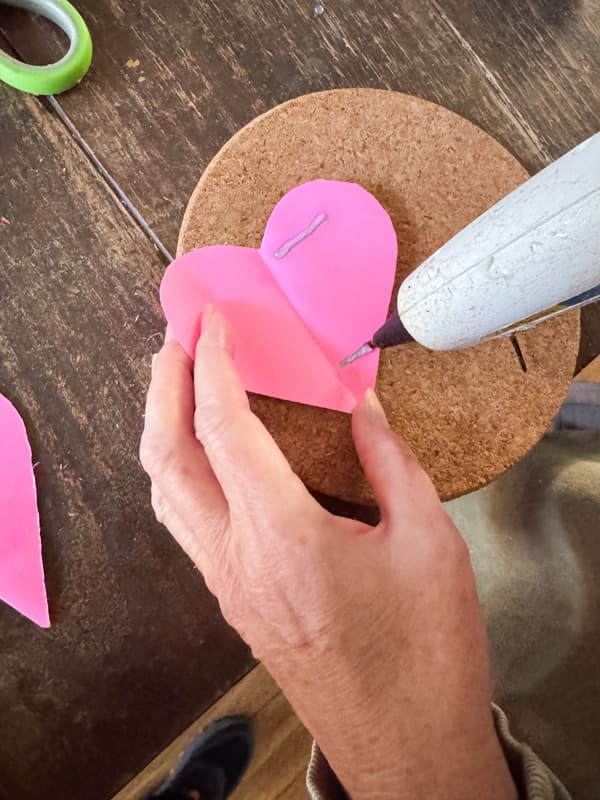
Step 2 – Fold and Glue Hearts
Next, fold the hearts in half with a good crease. Open the heart and add hot glue as shown below. One line is at the top, and one shorter line is near the bottom. Press the folded heart with your finger to smooth the glue flat. (Be cautious of hot glue squeezing out around the edges. Use Silicone Finger Protectors as a precaution.)
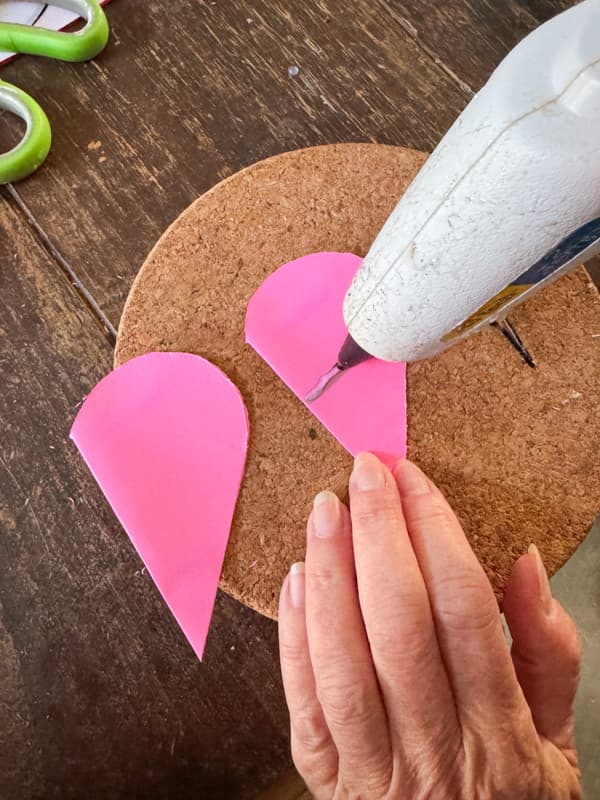
Step 3 – How To Attach The Hearts
Next, attach the hearts by applying a line of hot glue at the center of each heart. Allow the glue to begin at the fold line and extend halfway across the heart. Stack the hearts together, ensuring that they are even.
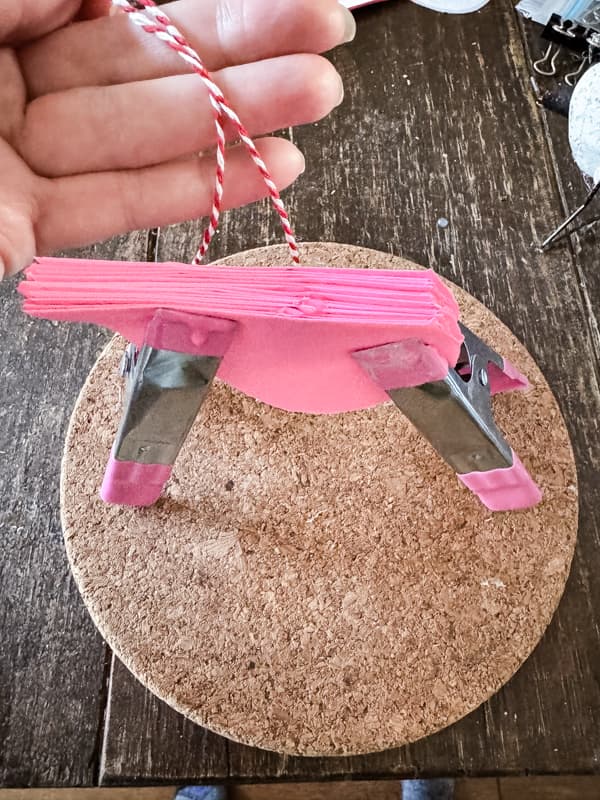
Step 4 – Add Ribbon Hanger
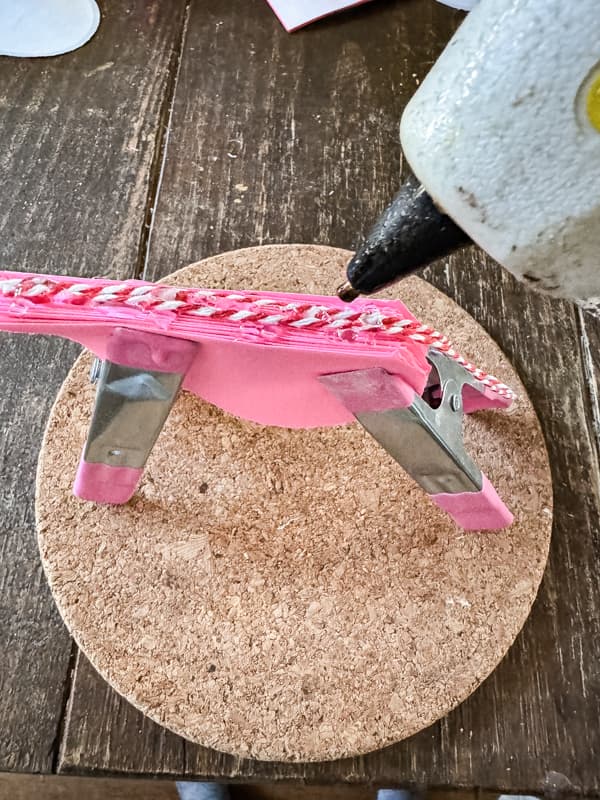
If you plan to hang your hearts, you will want to add a ribbon or twine as a hanger. Cut a piece that’s longer than the center of the heart. Use clamps to hold the edges together and cover with hot glue. Add the ribbon or twine and add more glue to the top. Finally, allow the glue to set up for less than a minute and open the heart.
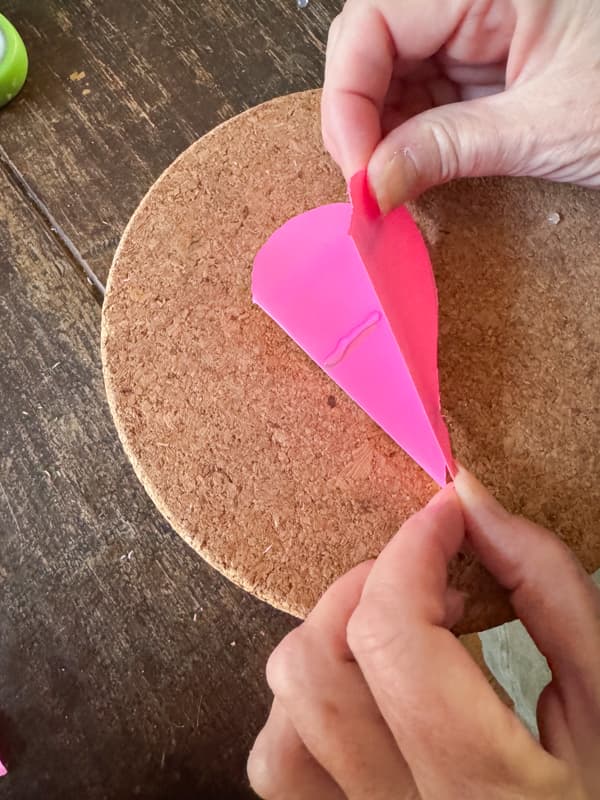
Step Five – Secure the Open Heart
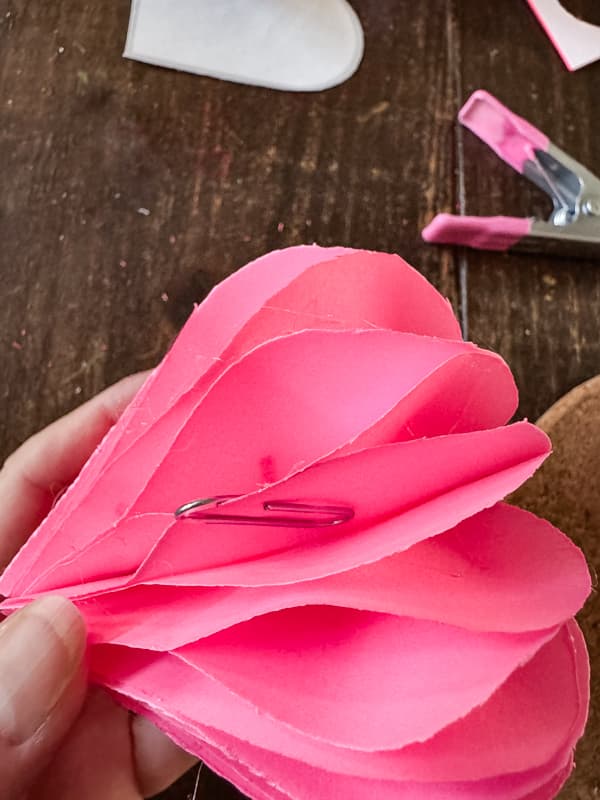
To complete your Valentine’s Day Decoration, open the heart and pull the two outside ends together. Add a bead of hot glue along the center of the hearts to attach the two ends for a permanent open heart. I added a paper clip to hold it in place until the glue dries. If you want to fold your hearts for storage, you can skip the glue and use a paper clip to secure it.
Insider Tip – Lesson Learned
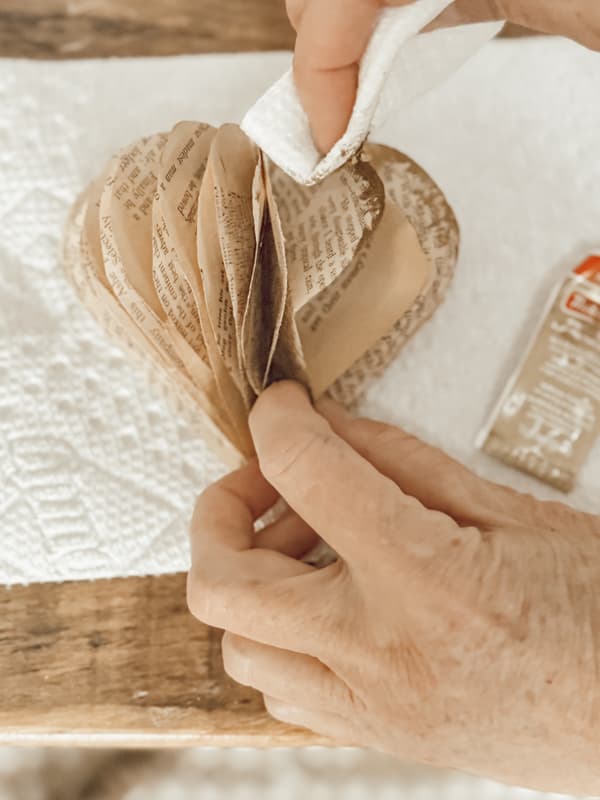
Do not let the glue dry to a hard finish when attaching the ribbon with hot glue. Once the ribbon seems to be set, open the heart and secure the two ends. I learned this lesson the hard way. Once the glue has dried thoroughly, the hearts aren’t flexible and don’t open easily. Therefore, while the glue is still soft, open your hearts and secure them with glue or a paper clip.
I also tried using craft glue instead of hot glue. I much prefer the hot glue option. The craft glue must dry before opening the hearts, and it is much harder to work with.
Optional Embellishment
You can also add embellishments to your Valentine’s Day decoration with beads, glitter, or decorative ribbons.
- Add beads or other small enhancements to the tip of the heart with hot glue.
- If you like a little sparkle, brush glue over the edges and sprinkle with glitter.
- I like to add a touch of gold by brushing Gold Rub N Buff along the edges of the paper hearts. This adds a touch of shine without the mess.
How To Use Valentine’s Day Heart Decorations
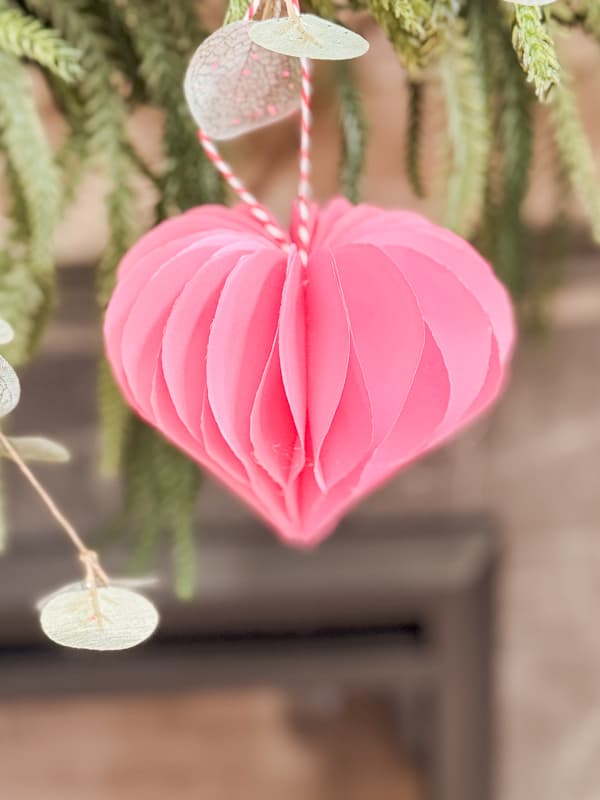
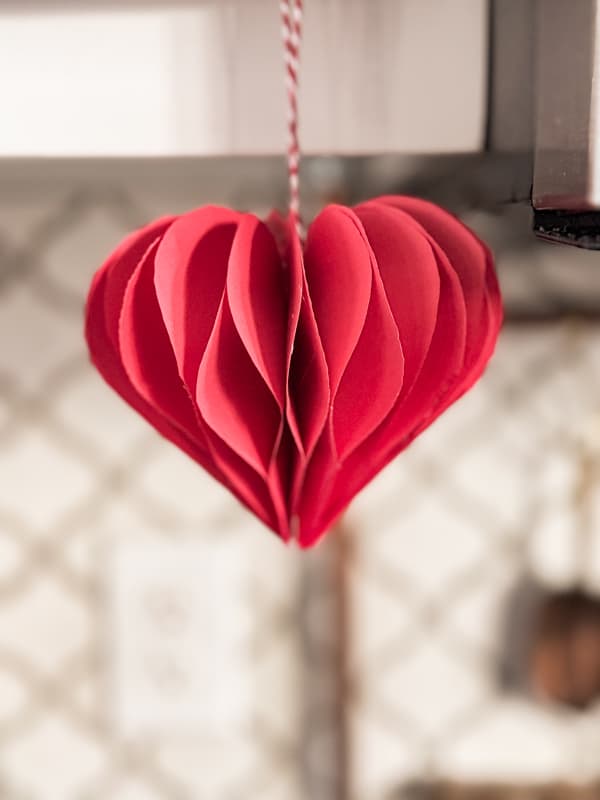
The 3D paper hearts can be used for numerous Valentine’s Day decoration ideas. I made several different-colored hearts, along with the old-book-page hearts, and they add a touch of romantic whimsy to the farmhouse for Valentine’s Day.
- Display grouped together or alone.
- Create a heart garland by attaching them to a ribbon or twine.
- Use as a bowl filler.
- Frame the open hearts.
- Use a gift package topper.
The hearts look lovely grouped together or displayed alone. I added several paper hearts to my winter mantel garland, then hung a single heart on my kitchen cabinet door. Another idea would be to hang them from the ceiling with fishing wire.
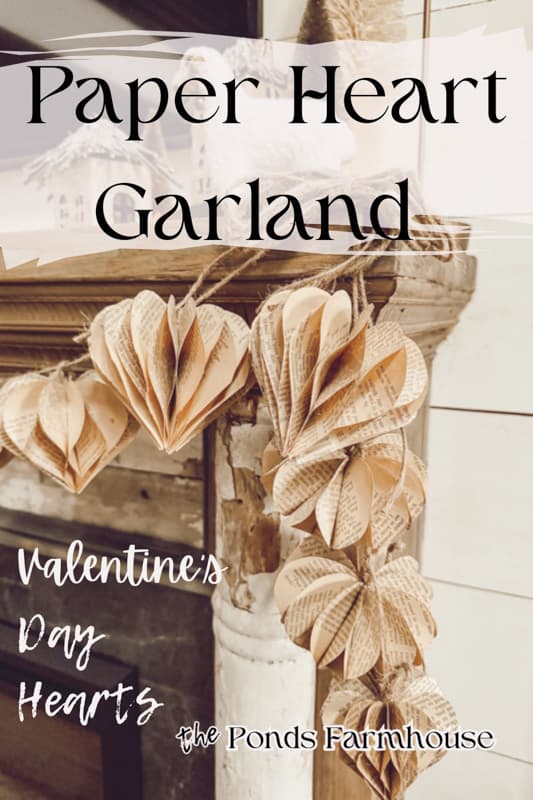
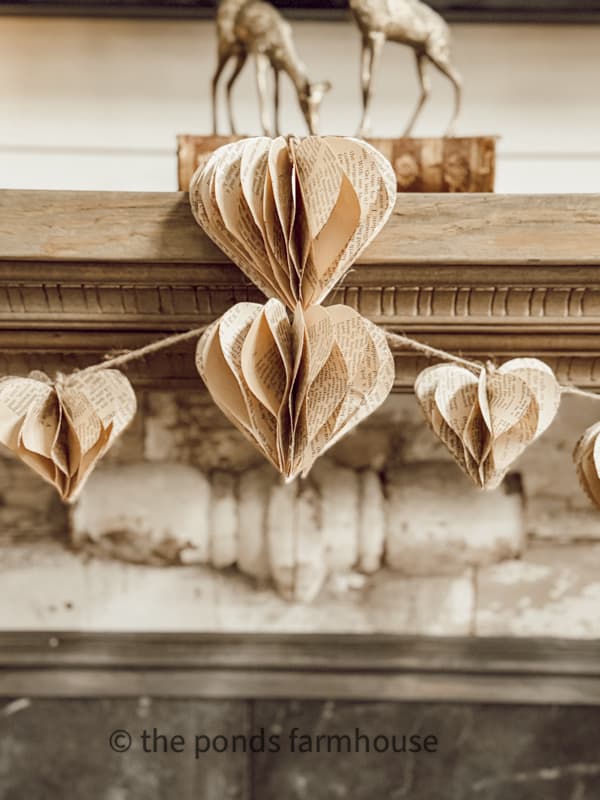
Old Book Page 3D Heart Garland
Decor made from old book pages is a favorite rustic decorating style that I embrace. To add a Valentine’s touch to our mantel without the bright colors, I made a 3D heart garland using old books and jute twine. Instead of the brightly colored ribbons, I used jute twine for the hanger and added two sizes of hearts to a simple twine rope draped on the mantel.
Note: I used clear command hooks to hold the garland in place, avoiding damage to the wooden mantel.

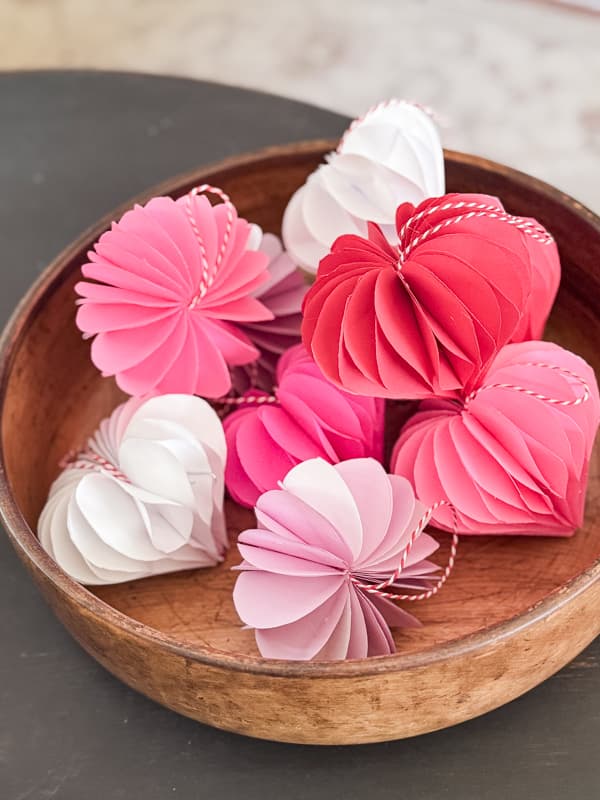
Use Paper Hearts as Bowl Fillers
For an interesting table display, fill a wooden or dough bowl with your vintage Valentine’s crafts.
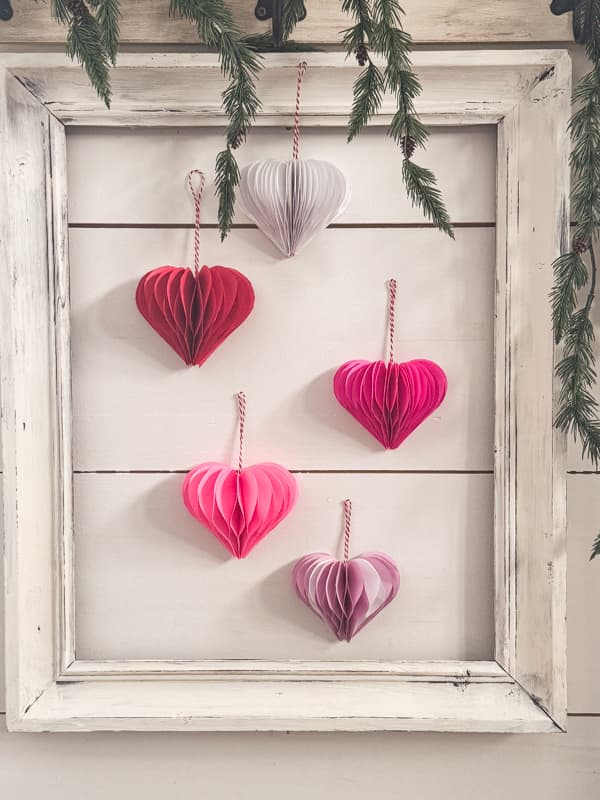
Frame 3 D Hearts
In addition, I like to open them halfway and add them to a frame for wall art. Don’t they look adorable in this thrift store frame? I used double-stick tape to attach them to the wall and then hung the frame around the display.

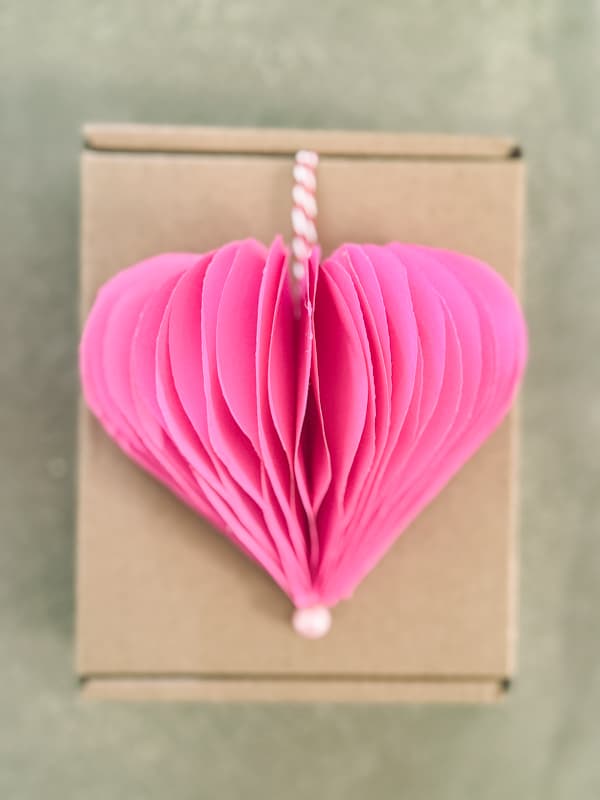
Use Paper Hearts as Gift Toppers
I also use them as gift package toppers, or you can add them to a gift bag. Use double-stick tape on the package topper or tie it to the handle of a gift bag.
Frequently Asked Questions
- How many pieces are needed to make one 3D Heart? Answer: I experimented with different numbers and found that the type of paper you use will determine the best number. Most of my craft paper hearts have 18 pieces. However, when I made the old-book-page hearts, I found that 12 were enough. I suggest you assemble one heart following the instructions and open it to see if you need to add more pieces. If more is needed, you can easily add a couple more pieces before you attach the ribbon.
- How can I get a template for the heart design? Answer: Click To Download
- Which glue is best for making the paper hearts? Answer: Hot Glue is what I recommend. I initially used a fast-drying craft glue and was unhappy with the results. You must wait until the glue has completely set before opening the hearts, and I found them very stiff and rigid to manipulate. The hot glue was much more flexible. However, don’t let the glue along the heart’s spine dry 100% before opening and securing the heart. I recommend adding twine or ribbon along the spine and letting it set for a few seconds. Just long enough for the ribbon to stay in place, less than one minute.
- What are the benefits of making DIY hearts? Answer: You can customize the size, shape, color, and materials to create unique decorations. Decorate your home in your unique style instead of the limited manufactured options.
- Should I secure the open hearts with glue or a paper clip? Answer: This will depend on your preference. Use the paper clips if you want to fold the hearts flat for storage. If you want a more permanent approach, use the glue. NOTE: If you use the paper clip, you will want to turn the hearts so they don’t show in your decor.
Related Articles
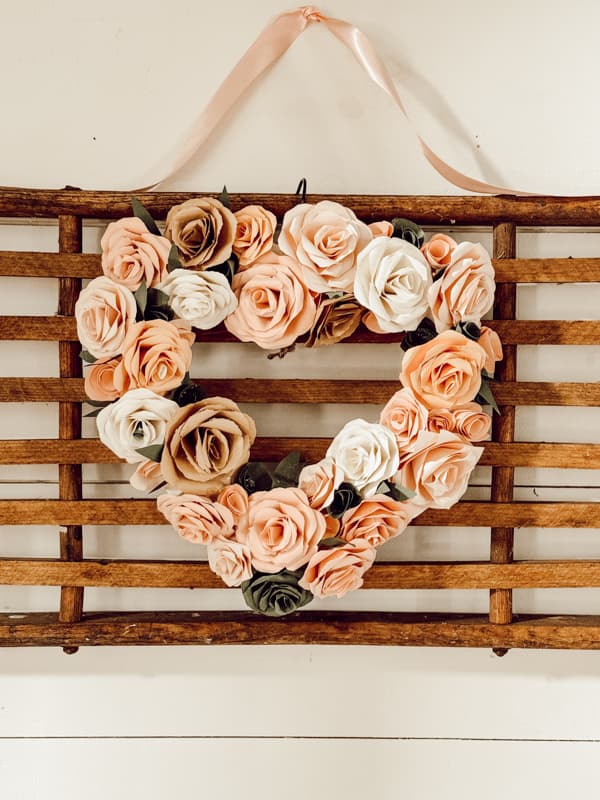
If you enjoyed today’s article, you will also enjoy 5 Easy Valentine’s Wreaths with DIY Paper Roses and Easy DIY Wooden Heart for Valentine’s Day!

Resources
Click the image below for my favorite craft supplies.
Thanks for stopping by, and I look forward to sharing my next adventure with you.

Ahhhh, they came out so cute! great project
Jennifer,
Thank you!
Another super cute decoration! Rachel, you are amazing.
Angie,
Thank you sweet friend! I appreciate your encouragement! I hope you are enjoying a happy new year.
Rachel, I love these and they look equally beautiful in colored paper or book pages. So sweet! I will share on Saturday Meanderings this weekend. You are so talented!
Mary,
Thank you sweet friend. I’m so glad you like them.
Excited to share these today, Rachel! I love all the color variations you did too. They’re adorable and will so fun and festive for Valentine’s Day. Hugs, CoCo
CoCo,
I really appreciate you for sharing.
Thank you for the feature.
Thank for sharing Diane.