Create Easy Dried Flower Rustic Hydrangea Centerpiece
Bring rustic charm to your home with everlasting beauty! This easy-to-follow tutorial will show you how to create a stunning dried flower arrangement perfect for any style home. Learn how to dry flowers to create an affordable rustic centerpiece. With proper care, dried hydrangeas can maintain their beauty for months or even years, making them a cost-effective and sustainable option for floral arrangements.
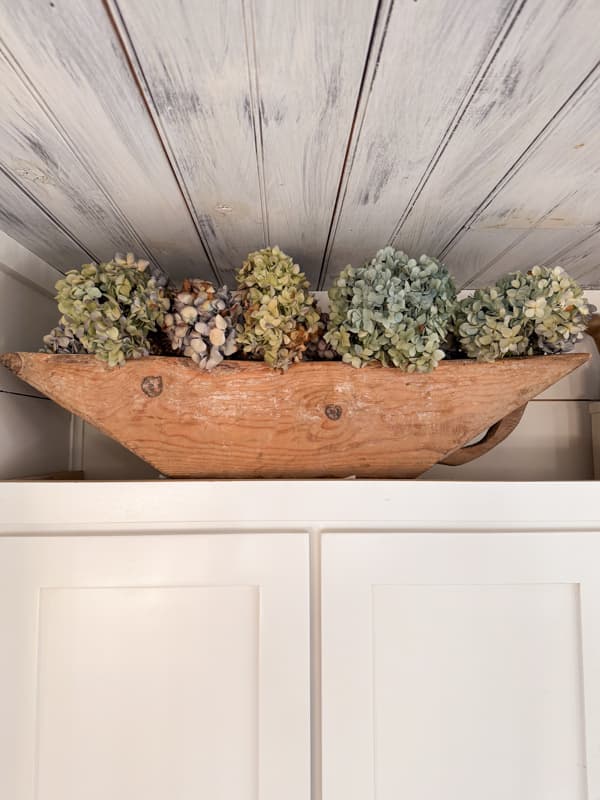
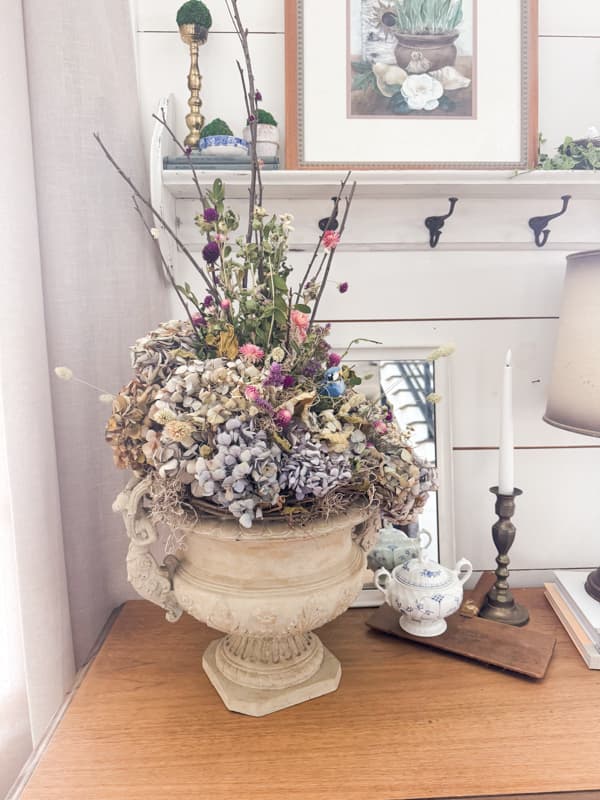
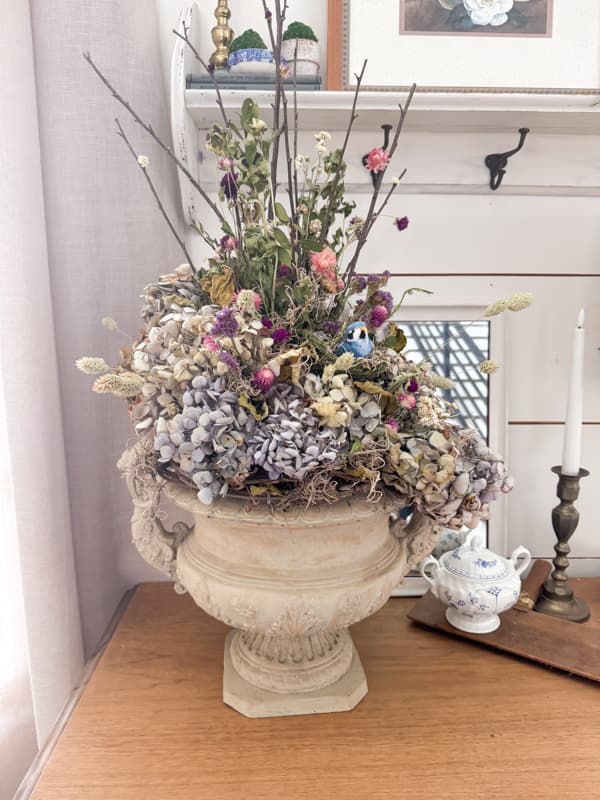
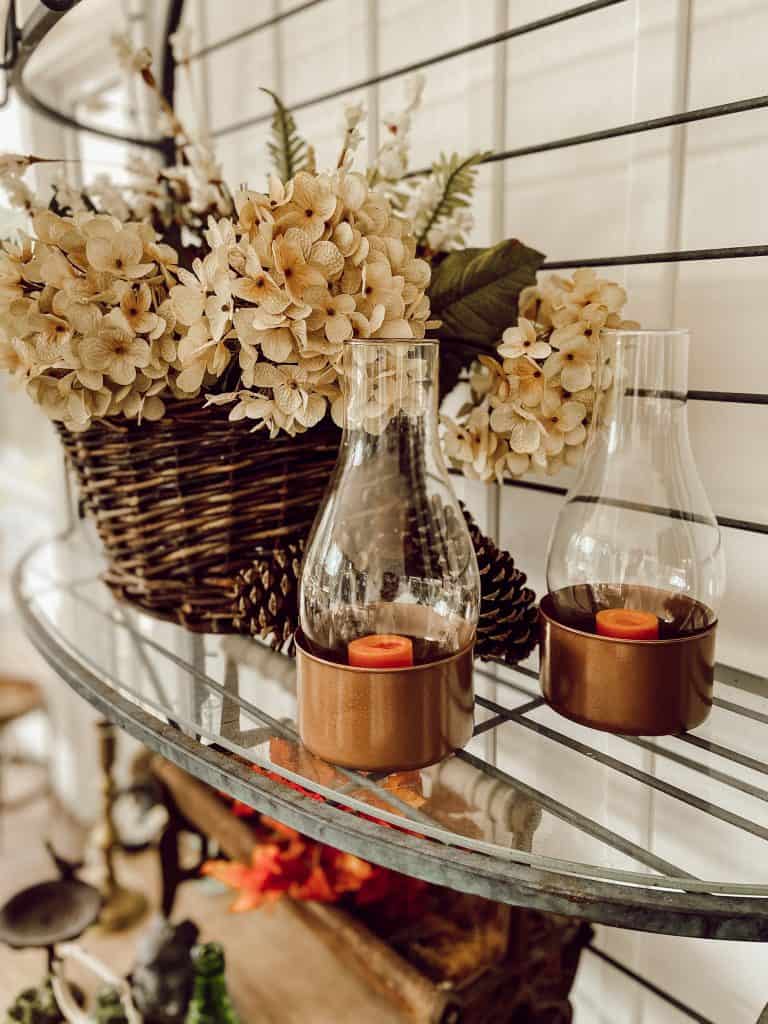
Today’s rustic centerpiece arrangement features dried hydrangeas mixed with other dried florals and natural elements to create a stunning display. You’ll not believe this, but the hydrangeas are from three seasons ago.
(Posts on The Ponds Farmhouse may contain affiliate links. As an Amazon Associate, I earn from qualifying purchases. See the full disclosure details here.)
Table of contents
How To Dry Flowers
Many flowers dry well. However, hydrangea blooms are certainly a favorite. When done properly, you can enjoy displaying your dried stems for years.
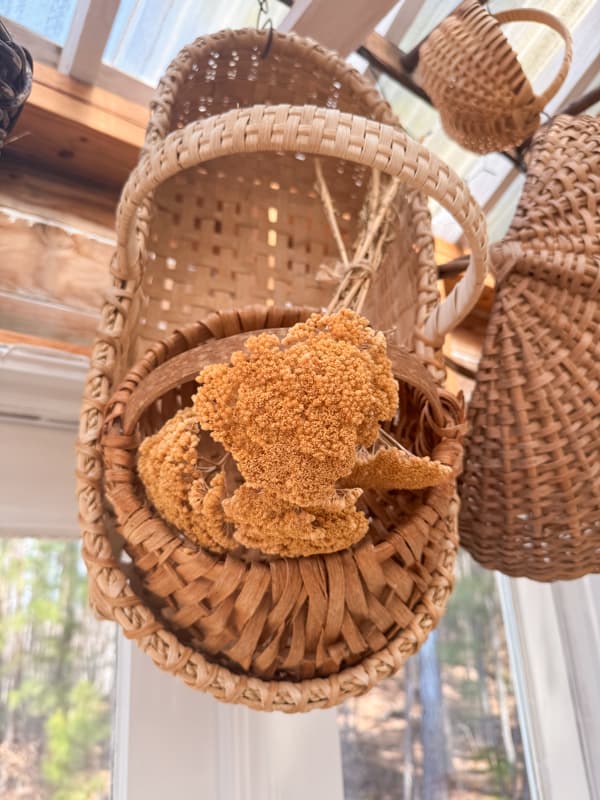
The hydrangea blooms I’m using for today’s project were dried three years ago. I’ve used them to decorate a Christmas tree, filled a dough bowl with them, and sprinkled them throughout the farmhouse to decorate.
There are options for drying flowers and I’ll share those with you.
- The first and most effective method for flower arrangements is air drying by hanging.
- You can also air dry in a vase. This method works most of the time; however, occasionally, the blooms will swivel.
- Silica Gel Drying is another option, but one that I’ve not tried. I’ve seen mixed reviews, and it can be expensive, so I’ll stick with the old-fashioned way.
- You can also press flowers for other craft projects and framing. You can learn more about pressed flowers on Easy Flower Press: Upcycle Scrap Wood To Preserve Botanicals, which has a link at the end of the article.
How To Easily Dry Hydrangea Blooms – The Best Way!
It’s so easy to save the blooms, and here’s what I did.
- First, cut the blooms while they are still full and well-hydrated.
- Cut your blooms on a sunny day after the dew has dried.
- Cut the stem approx. 5-7 inches long with pruning sheers.
- Remove excess leaves and tie the stems together with twine or string.
- Find a cool, dark space to hang the stems with the blooms hanging downward.
- Avoid direct sunlight, as the colors will fade.
Blooms will dry within a week or two. Store in a dark space until you are ready to decorate.
This method works well with many other flowers as well. See the full list later in the article.
Lifestyle of Love: Dried Flowers
Today’s article is part of the Lifestyle of Love vintage challenge hosted by Cindy at County Road 407. If you are joining me from Lora at Create and Ponder, I know you loved her creative Folk Art Sheep tutorial.
Be sure to check out all the other participants at the end of today’s article.
Easy Dried Flower Rustic Centerpiece
Today’s centerpiece dried flower arrangement combines dried hydrangeas, foraged materials, and small dried stems that I’ve had around the house for a while.
I also decided to add a faux bird and nest, which I’ve had in my spring and summer decor for several years. I used a small amount of Spanish moss, which I had left over from Christmas decorating.
Because I used a recycled urn to make the arrangement, the rustic centerpiece was basically free to make.
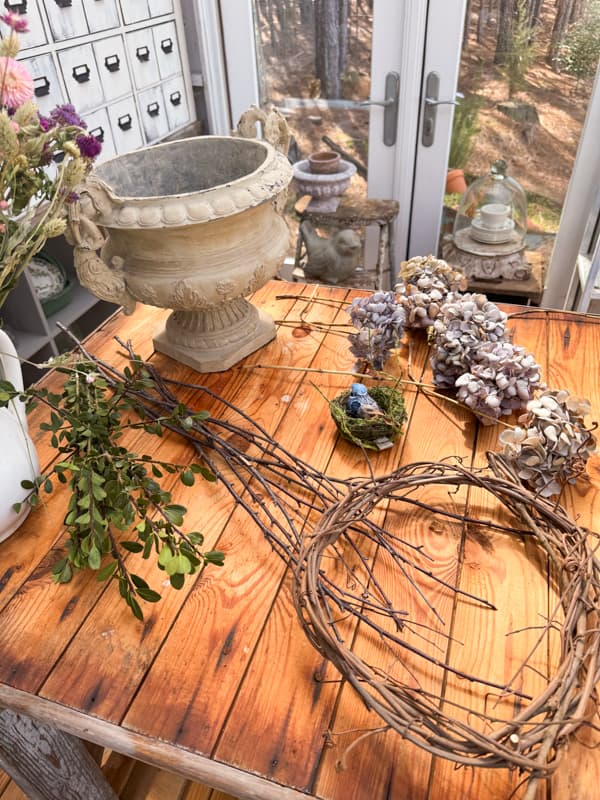
Supplies
Here are the supplies I gathered to create the hydrangea centerpiece. Your container size will determine the amount of blooms you will need.
- Approximately 12 Dried Hydrangea Blooms
- A gathered grapevine formed into a circle or wreath the size of the container opening. (optional)
- Several long twigs
- Several long boxwood stems
- Small dried Flower Stems
- A faux bird nest
- Faux Bird
- Spanish Moss
- Styrofoam
- Recycled Plastic Bags
- Pruning Shears
- Hot Glue Gun
- Container/Urn for arrangement
Foraging and Gathering Supplies
The first step is to gather any foraged supplies.
If you are planning a rustic design, the foraged grapevine will look good around the base of the arrangement. I twisted the vine into a round or wreath-like shape to sit on the top of the container.
Next, I gathered and trimmed several twigs from my yard. Using pruning shears, cut the twigs the length you want them.
In addition, gather a few boxwood stems and cut those to length.
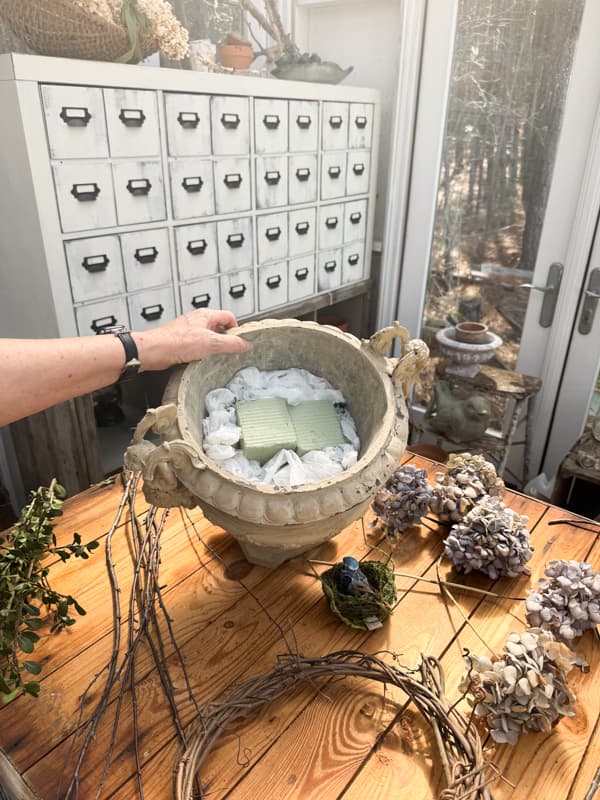
Prepare a Container or Urn
To prepare the container for the Dried Flower Arrangement, add a couple of pieces of styrofoam to the bottom. Add a bead of hot glue to the styrofoam, press the pieces to the bottom, and hold until the glue is dry.
Then, fill around the styrofoam with recycled grocery bags to help fill the container. You can completely fill it with styrofoam; however, this is more budget-friendly.
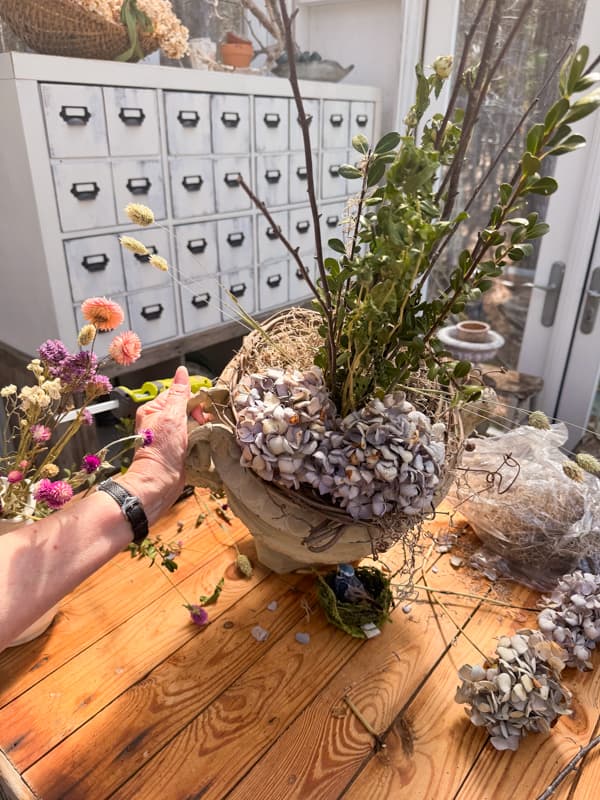
Begin Dried Flower Arrangement
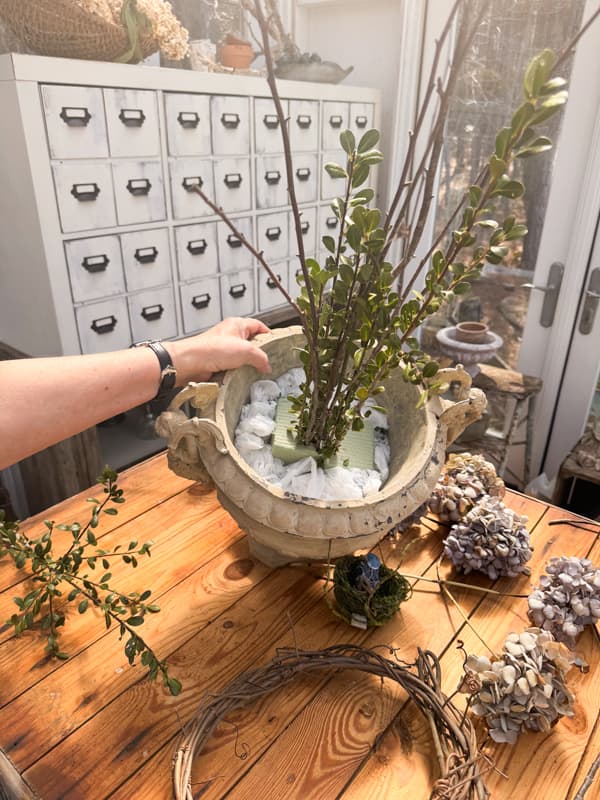
First, add the grapevine wreath to the top of the container.
Start at the center of the container and add the twigs first. Push them straight down into the styrofoam to secure them.
Next, add the boxwood and any tall pieces of dried foliage or flowers. Keep all pieces to the center of the arrangement.
Note: You may notice that I didn’t add the grapevine at the beginning. This was an oversight and I had to work it over the twigs and boxwood. It’s much easier to add it at the beginning. LOL
Now, add more plastic bags to help fill the container and cover it with Spanish moss.
Once the bottom is covered, cut the stems of your hydrangeas to approximately 4-5 inches long. Add hot glue to the stems and begin placing them around the twigs and edges of the container.
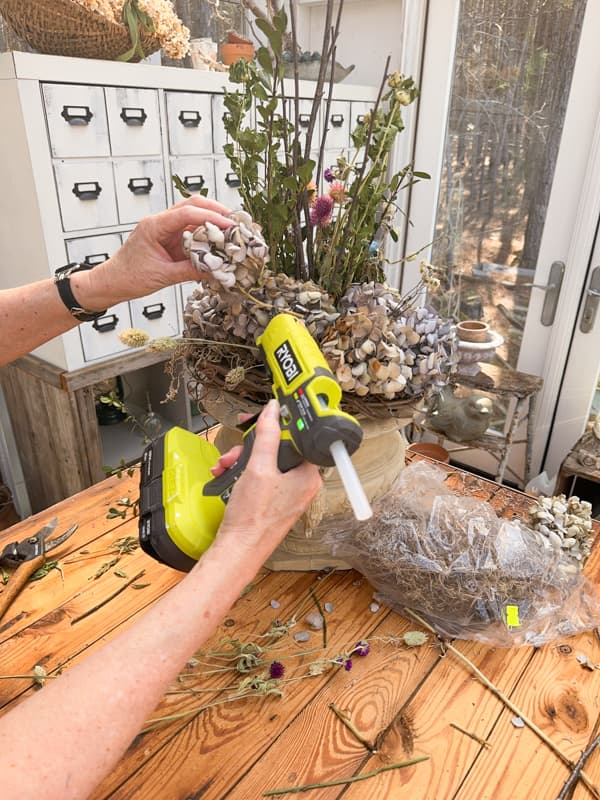
You will want to completely surround the base of the arrangement with dried hydrangeas.
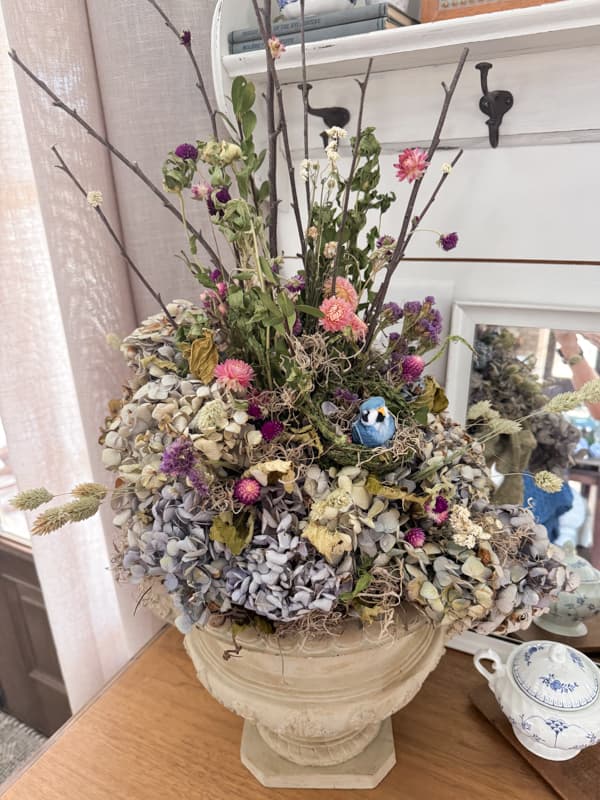
Once the top is covered, begin to add more dried flowers and embellishments.
Add smaller flowers at an angle so that they droop away from the hydrangeas. Secure them with hot glue.
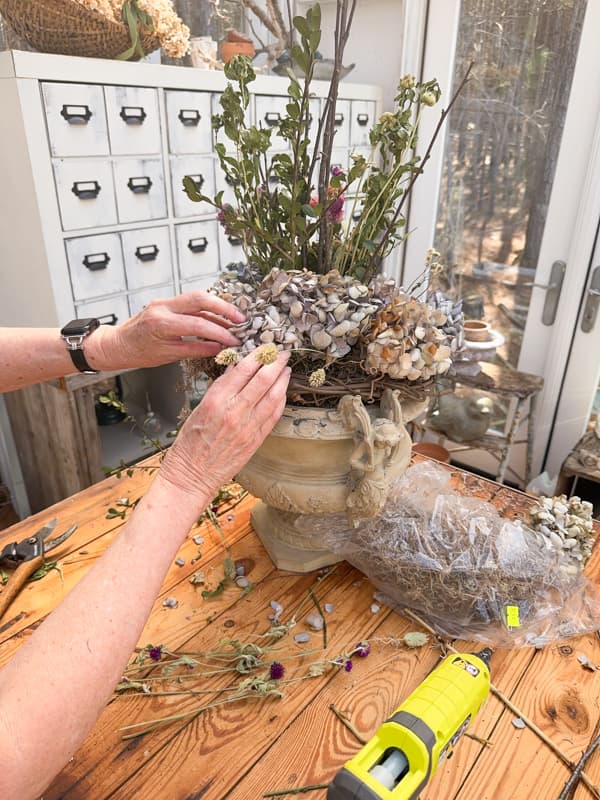
In addition, you can add a bird’s nest and bird if you choose. Nestle the bird into the dried hydrangeas for a cute embellishment. Use hot glue to secure.
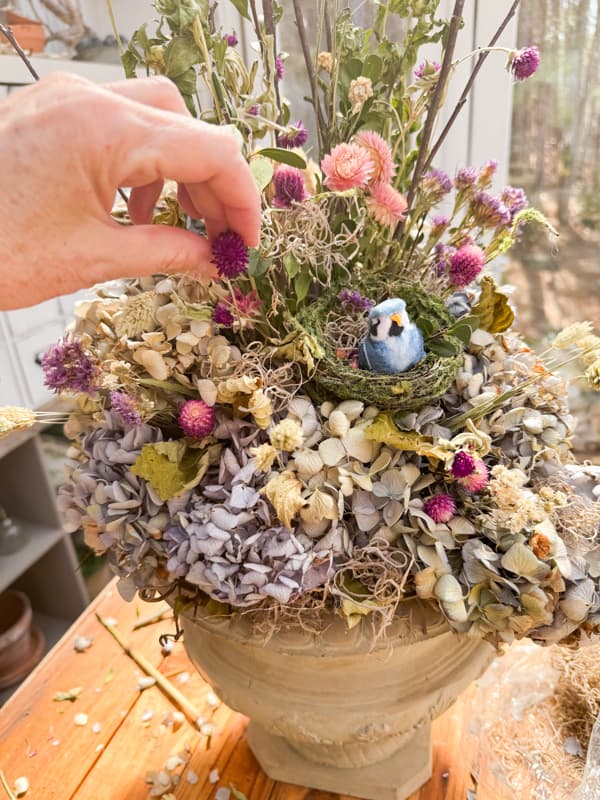
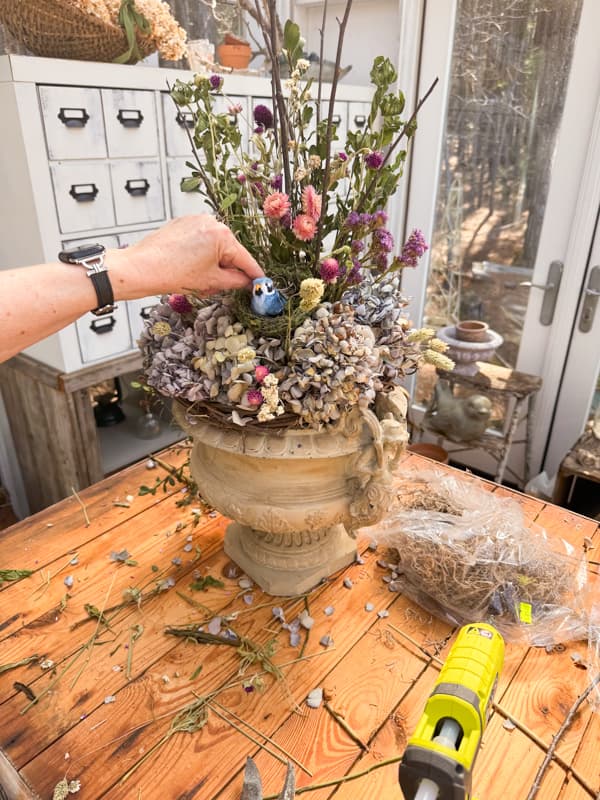
Continue to fill any open areas with additional dried flowers and Spanish moss.

Finally, add a couple of hydrangea blooms to the side of the grapevine at the bottom and then to the opposite side at the top. This will give the arrangement an asymmetrical design and make it more interesting.
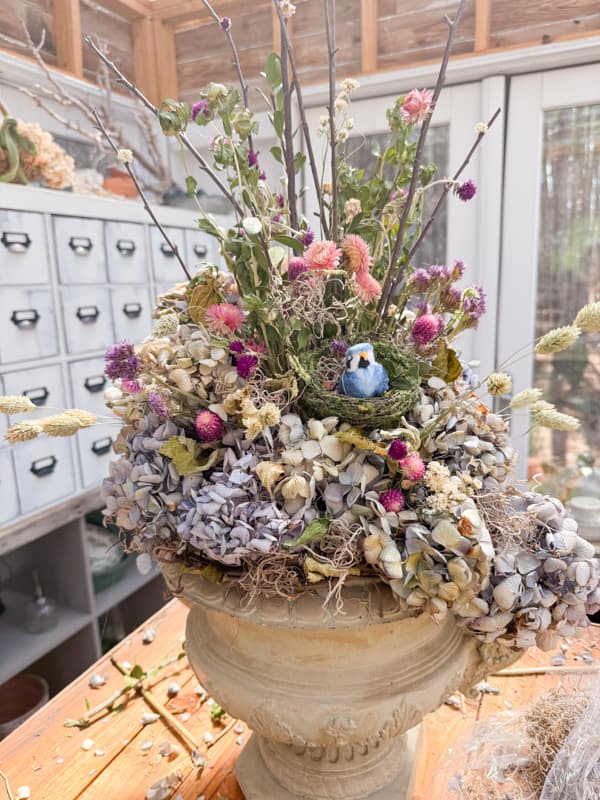
Dried Flower Arrangement: Hydrangea Centerpiece
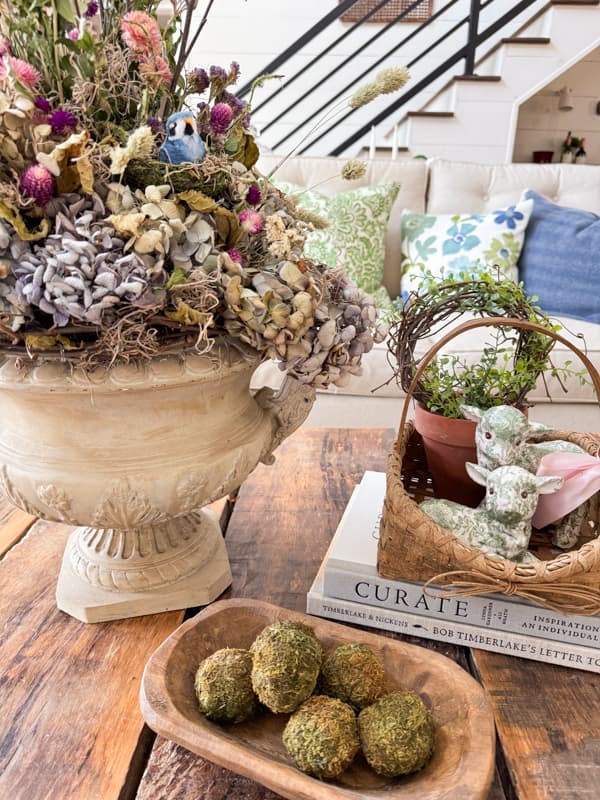
Now, you are ready to decorate with your dried flower arrangement. I first added the hydrangea centerpiece to the coffee table.
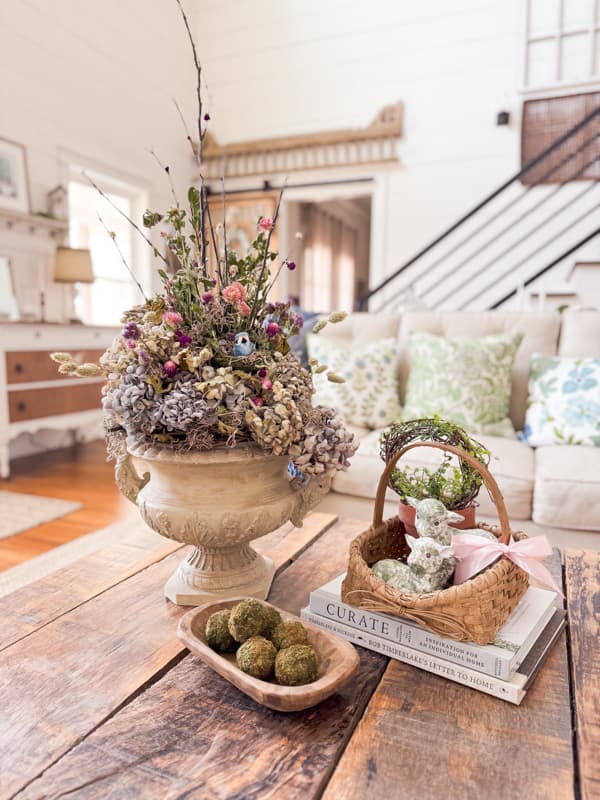
It would look great as a dining table centerpiece as well.

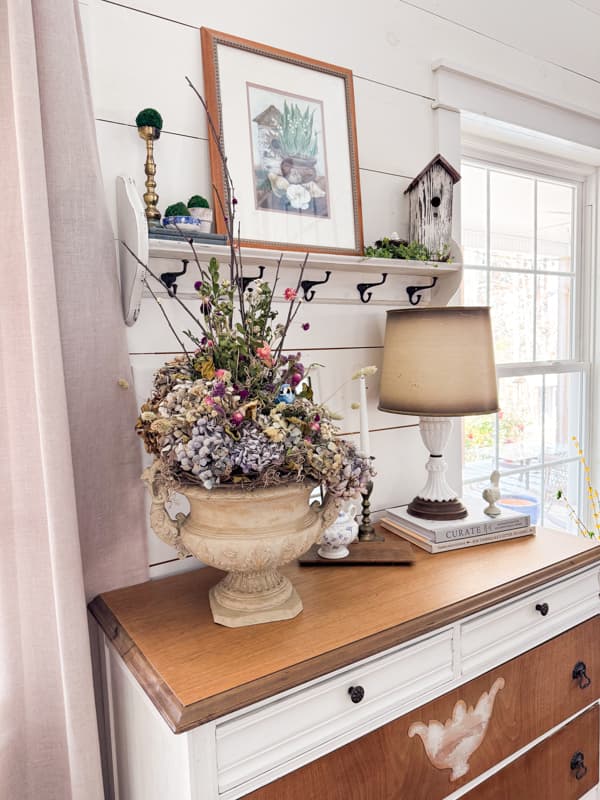
Next, I moved it to the entry table.
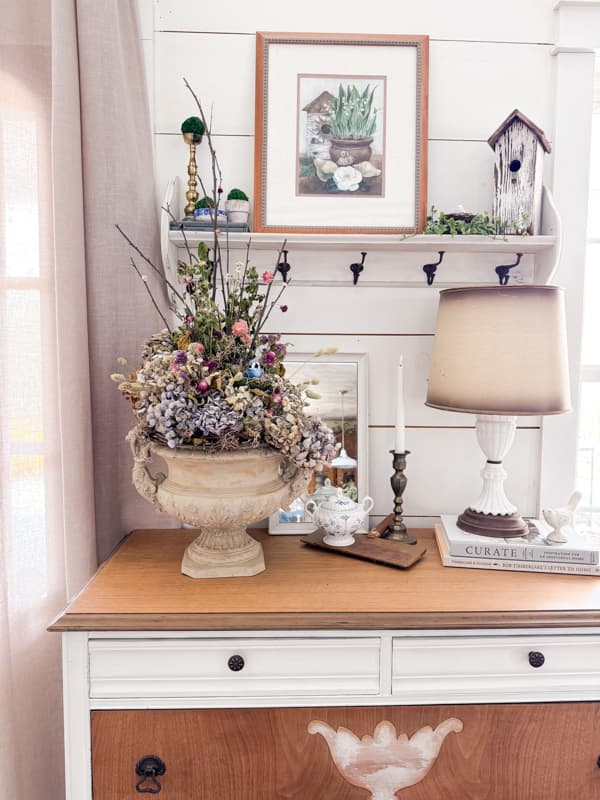
The natural elements work well with the rustic birdhouse and milk glass lamp.
I hope you like the arrangement as much as I do. This has really sparked my interest in drying flowers. It’s about time to start planting our spring and summer blooms. So, I’m sharing some more tips to help you plan and start drying your own flowers.
What Flowers Air-Dry Best?
Hydrangeas are always at the top of the list of best flowers to dry. However, many others are excellent choices. Here are my favorites.
- Hydrangeas
- Lavender
- Strawflowers
- Yarrow
- Baby’s Breath
- Zinnia
- Globe Amaranth
- Sea Holly
- Celosia (Cockscomb)
- Roses
- Aster
How To Make Dried Flowers Last Longer
Dried flowers can enhance your home and are budget-friendly. However, they can be fragile and precautions need to be observed to prolong the life of dried flowers.
- Don’t place dried flowers in direct sunlight. The flower colors will fade easily in sunlight.
- Handle with care. Style your arrangements in areas of the home with little traffic.
- If the flowers are extremely fragile, you can spray them with hair spray to prolong their beauty.
- When not in use, store in a dry, dark space. Loosely over to avoid dust build-up.
How To Clean Dried Flower Arrangements
Due to the fragile nature of dried flower arrangements, it’s important to be cautious when cleaning.
A light brush with a feather duster or a damp cloth can effectively remove most dust particles.
Related Articles
- DIY Rustic Reclaimed Wood Drying Rack
- Easy Flower Press: Upcycle Scrap Wood To Preserve Botanicals
- How to Press Herbs for Botanical Art
- Create A Rustic-Chic Greenery and Pheasant Feather Centerpiece
Resources

Video

Lifestyle of Love: Dried Flowers
Don’t miss all the other dried flower inspiration. Next, hop over to visit Debra at Common Ground and see her Vintage Botanical Book Ideas.

Pin It To Remember It
Did you find some great ideas you’d like to save for future reference? Hover over the images you’d like to save and pin to your favorite Pinterest Boards when you see the PIN button.

This is so beautiful, Rachel. I love all the different layers of texture. They’re fabulous! Thank you for the tips and tricks for drying flowers. Especially, hydrangeas. Our porch has the prettiest pink hydrangeas this year and I’ve been looking for a way to perserve them so this post is perfectly timed. I can’t wait to try your technique. Big hugs, CoCo PS: My Mom is STILL talking about your green and white lambs and I don’t blame her 🙂
CoCo
I saw those pink hydrangeas and they would be amazing preserved. I hope it works out.
Rachel, so many great tips for putting a dried hydrangea arrangement together. Using the Styrofoam and hot glue is something I need to start doing. Love your tall elements in the middle of the bouquet.!
Debra,
I’m so glad you found this helpful and I appreciate your comments.
Wowza, what a gorgeous arrangement. It looks great on your coffee table with the little lambs. I need to try this. Most of the time I just plop mine in a vase. Love the textures and colors you put together. Looks so professional! Thank you for joining us. pinned
Cindy,
You are so like. But it was easy to put together.
Rachel, I’m headed to Maine tomorrow, and my mother has a couple of those pots there; I’m totally going to try this. I’ve always kept it outside, but maybe I’ll try it indoors now. Thanks for the inspiration!
Ann,
Good luck with your arrangement.
What a pretty post Rachel! Love this one!
Stacy
I appreciate this.
What a fun way to use your dried hydrangeas for spring! I love this Rachel.
Kim
I was so happy with how they kept their color.
What a beautiful arrangement, Rachel! Love the subtle Spring colors and all the wonderful textures. I’m crushing on your work table; that wood top is a dream! Wish I could grow & dry those blue hydrangeas; too cold here:(
Lora,
Thank you for your kind words. I appreciate you for stopping by.
Hi Rachel! The arrangement is beautiful. I love the little colored flowers. Everything is just gorgeous. Thank you for sharing your tips.
Cheryl,
I’m so glad you like this arrangement. Thank you for your sweet comments.