Thrifted Ginger Jar Lamp Makeover Magic in 3 Easy Steps
You won’t believe what I found at the thrift store for only $3.00. I can’t wait for you to see how I turned a boring thrifted ginger jar lamp into a stunning statement piece. If you want to add a touch of personality to your home without breaking the bank, check out this makeover magic. In this tutorial, I’ll teach you how to create a one-of-a-kind lamp in three easy-to-follow steps. Let’s get started!

(Posts on The Ponds Farmhouse may contain affiliate links. As an Amazon Associate, I earn from qualifying purchases. See the full disclosure details here.)
Thrift Store Ginger Jar Lamp
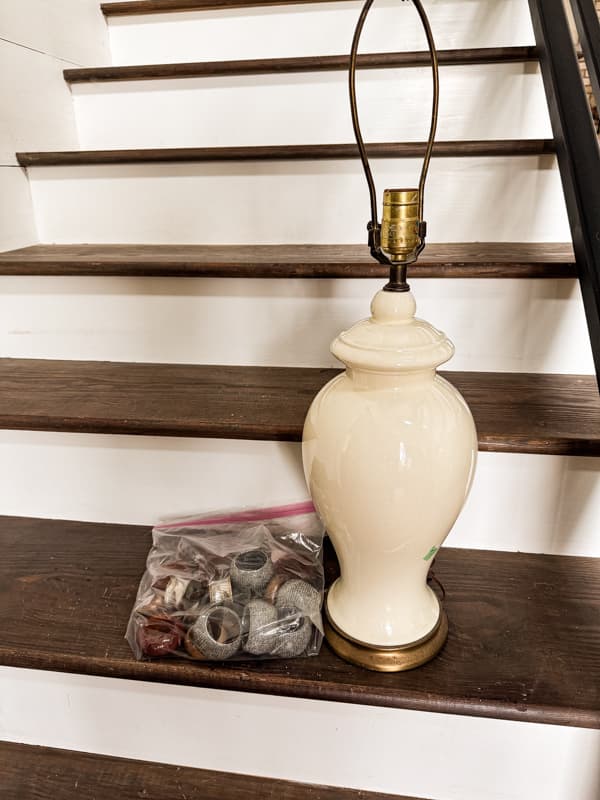
Have you noticed that ginger jars have been everywhere recently? I’m seeing them in all the high-end catalogs and magazines. So when I ran across this ginger jar lamp for only $3.00, I grabbed it. It’s been sitting in my shop for several months, and last week, I decided to give it a quick makeover.
The lamp is in great shape, but it wasn’t a color that worked in my decor. In addition, the metal base was tarnished. So here’s what I did.
Supply List
- Painters Tape
- Chalky White Spray Paint – Classic White – or color of your choice.
- Antique Gold Rub N Buff
If you are updating an old lampshade you will need the following…
- Fabric for Lampshade – I used a left over curtain panel
- Hot Glue Gun
- Iron
- Finger Protectors
- Scissors
3 Steps To Makeover Magic
Before transforming your thrift store ginger jar lamp, check the wiring to ensure the lamp is safe. Make any repairs needed before beginning the project. You also need to ensure that the lamp is clean. Use rubbing alcohol to clean the lamp. Clean thoroughly to ensure that all sticky or oily residue has been removed. Then, use the painter’s tape to cover areas that should not be painted. I covered over the metal base and the neck of the lamp. In addition, I covered the harp with paper secured with painter’s tape.


Step 1 – Spray Paint the Ginger Jar Lamp Base
Once all the areas are protected with the tape, place the ginger jar lamp base in a well-ventilated area to paint. Spray a light coat of chalky white paint over the entire lamp base surface. Wait a few minutes and repeat. Continue to repeat until the coverage is complete. You shouldn’t see any of the original color peaking through. Follow the paint label instructions to allow the paint to dry completely before moving the lamp.


Step 2 – Refresh Metal With Rub N Buff
After the paint is dry, remove all the paper and protective tape. I used Antique Gold Rub N Buff to refresh the metal areas on the lamp base. To apply, I used a paper towel with a small amount of the Rub N Buff and added the antique gold finish. Be cautious not to get it on the white lamp base. Now, the base looks brand new.
I also updated the lampshade metal with antique gold.


Step 3 – Update or Replace The Ginger Jar Lampshade
Step 3 is as simple as purchasing a new lampshade for your updated ginger jar lamp. However, you know that I’m into “waste not” if possible. I liked the style of the lampshade that came with the thrift store lamp, and I had some fabric that I could use, so I decided to update the existing shade instead of buying a new one.
I had a curtain panel I wasn’t planning to use, and it would make a great fabric lampshade cover. However, any fabric that works with your decor would be appropriate. You only need 1 to 1 1/2 yards of fabric for most lampshades. I recently shared this technique on How To Upcycle Your Old Lampshade, and here’s a quick review.
To begin, you should deconstruct the lampshade by removing the original cover. My lampshade liner had a cracked area, which I repaired with some packing tape on the side that will be covered with fabric. Otherwise, the shade was in good shape.


Cut the fabric into strips approximately 2 to 2 1/2 inches wide. Then, cut the strips the length of your lampshade with an additional one inch for overlap. My lampshade was 12 inches tall, so I cut each strip 13 inches long.
Next, fold one side under 1/2 inch and press with a hot iron.


How to Attach Fabric To Old Lampshade
Once you have all the fabric strips cut and pressed, use hot glue to attach to the top edge of the lampshade. Overlap each strip with the raw edge underneath for a pleated appearance.


Once you have all the fabric attached at the top, pull the pieces taut as you secure them with hot glue at the bottom rim of the shade. Ensure that you are keeping the fabric vertically straight on the shade. Once you have secured all the ends, trim off any excess fabric from the bottom.


Next, I trimmed the top and bottom of the lampshade to give the updated ginger jar lamp a high-end look. You will need to cut a length of fabric around the lampshade’s top and bottom rim. I cut mine 2 1/2 wide, just like the original strips of fabric. Fold the fabric so that the raw edges are concealed. Press the fabric to hold the shape. Use hot glue to adhere the trim along the top and bottom, covering all the fabric strip raw edges.

Lastly, I refreshed the final with the antique gold Rub N Buff. For more detailed instructions and video for updating an old lampshade, see How To Upcycle Your Old Lampshade.

Updated Ginger Jar Lamp
How do you like me now?

I am thrilled with the ginger jar lamp update. It looks so fresh and on-trend. What do you think?

The ginger jar lamp is part of my living room and entry table update, which I’ll reveal soon.

Resources


Beautiful!!!
Karyn,
Thank you! I”m so glad you like it.
Another solid winner!! I’m creative, but I would never have figured that lampshade out on my own. Looks great and I’m sure I will copy it. Thank you.
Win,
Oh, I’m so glad you like it. This is my second one and it’s really easy. Please let me know how yours turns out.
Hi Rachel… I have been reading your blog for about 4 years now. I love the way you style all your lovely thrifted items. You have given me so many great ideas so that I can decorate my home on a budget. I like the font of your blog..easy to read. I am glad you didnt change that. Some bloggers have their print so it is hard to read. I see that you made your blog easier to navigate. I love looking how you style your porch, your kitchen area, your fireplace mantle and especially your greenhouse. Oh that greenhouse…be still my heart!!!❤️❤️ The only thing I would change is your picture of the Pond farmhouse in the beginning.. it is a sepia look.. it doesnt show the lovliness of the house. I know you probably wanted it to look old but it doesnt show the colours of your beautiful home. Thank you for your creativity, you never disappoint.😘
Lorri,
Thank you for making my day with your sweet comments. I’m still working on my site and make adjustments. I appreciate your input. Keep the suggestions coming.
Rachel I recently purchased a lamp from Goodwill and the shade has discoloration on it. I can’t wait to try your idea to cover it.
Only paid 4.99 for it.So I’m excited to try this
Thank you for such a great idea..
Martha
Martha,
Oh that’s so exciting. I can’t wait to see how it turns out. Be sure to send me a picture. Also, let me know if you have any questions. Have the best week.
You have inspired me to do my living room lamps, I need a fresh new look and this is perfect. Thank you for sharing.
Kelly,
OH I’m so glad! Please let me know how they turn out! I’d love to see pictures of the before and after. Thank you for following along on my adventures.
Thank you for sharing.