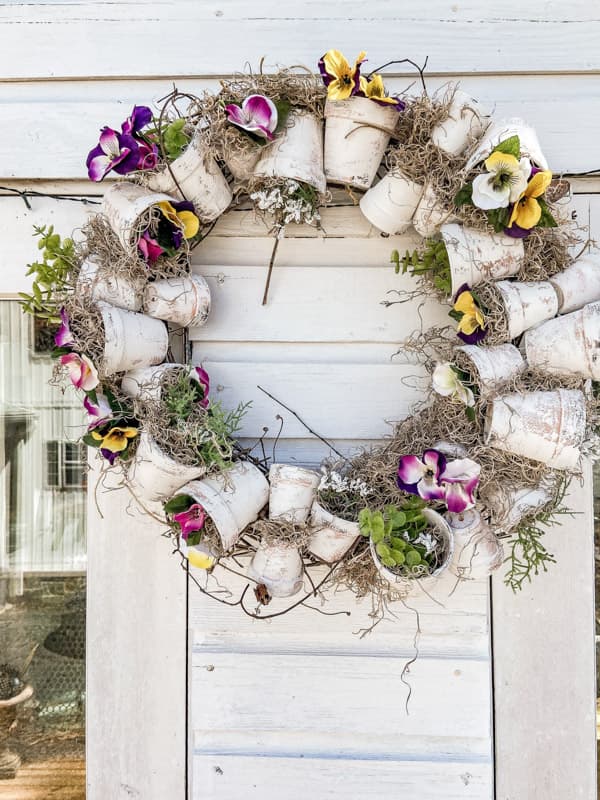
Terra Cotta Pot Spring Wreath-Easy DIY
Today I’m sharing how to make a Terra Cotta Pot Spring Wreath using a simple technique using new pots that are aged. This is an easy, step-by-step DIY tutorial for Spring Wreath Ideas.
I love Aged Terra Cotta Pots, and I recently saw a wreath made from old terra cotta pots at a garden shop on the beach. Although I have a large collection of terra cotta pots, I didn’t have enough to make a wreath. So here’s what I did.
(Posts on The Ponds Farmhouse may contain affiliate links. As an Amazon Associate, I earn from qualifying purchases. See the full disclosure details here.)
Terra Cotta Pot Spring Wreath Ideas – Supplies
First let’s gather our supplies.
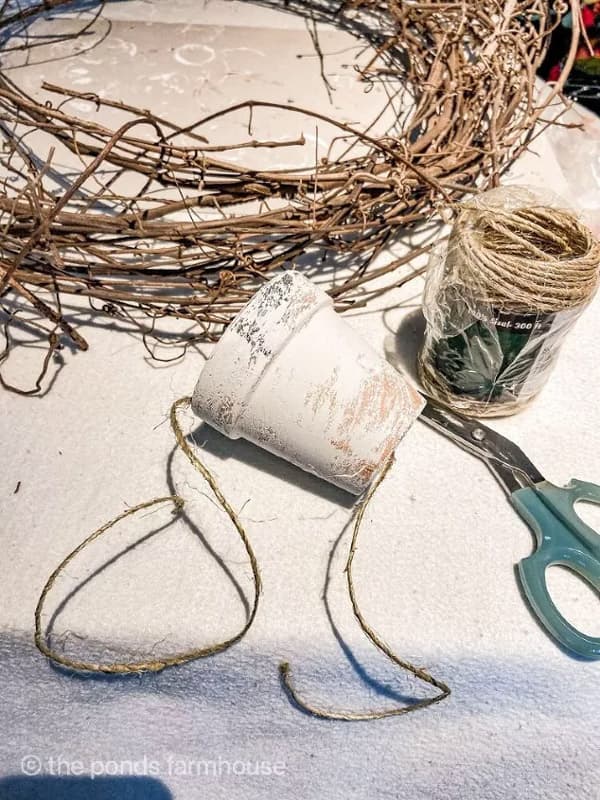
- Grapevine Wreath – Size will depend on where you plan to use it. My wreath is 24″ in diameter.
- Terra Cotta Pots – Small and Medium-sized
- White Chalk Paint
- Black Chalk Paint
- Jute Twine
- Faux Flowers & Greenery of your choice
- Spanish Moss
- Hot Glue Gun
I found my pots at the Dollar Tree. The smallest size came three to a package, and purchased nine packages. I used 17 small pots, so I estimated close to the correct amount. The medium size came in two per package, and I used 12 pots, or six packages. The number you need to complete the project depends on the size of your grapevine wreath.
For more ideas, see Resources.
How to Age the Terra Cotta Pots
You only need white and black paint to age the terra cotta pots. I used chalk paint because it leaves a matte finish that appears more naturally aged.
Begin with the black paint and randomly swipe the paint onto the pots.
Once the black paint has dried, apply the white paint using slightly more coverage. You still want to see touches of black paint and terra cotta coming through.
This process should go very quickly. Chalk Paint dries fast; therefore, you will be ready to begin the next step soon.
Last year, I shared How to Age Clay Pots, and although I love that technique, you want to do something other than what is involved for this project. That tutorial is more suited for your larger pots.
How to Make a Spring Wreath
Now that you have your aged pots, you will begin to attach the terra cotta pots to the grapevine wreath.
First, cut lengths of the jute string approx. three ft. long. This allows you plenty of string to work with.
You can just run the jute string through the hole in the bottom of the pots. I chose to add two small pots to one length of jute string in some areas.
How To Add The Terra Cotta Pots to the Wreath
Next, attach the terra cotta pots to the wreath by securing them tightly with jute string.
To fill the wreath tightly with the pots, I alternated between medium and small pots. In addition, be sure to randomly place the pots facing inward and outward around the wreath. You can see how closely each pot is placed in the photo below.
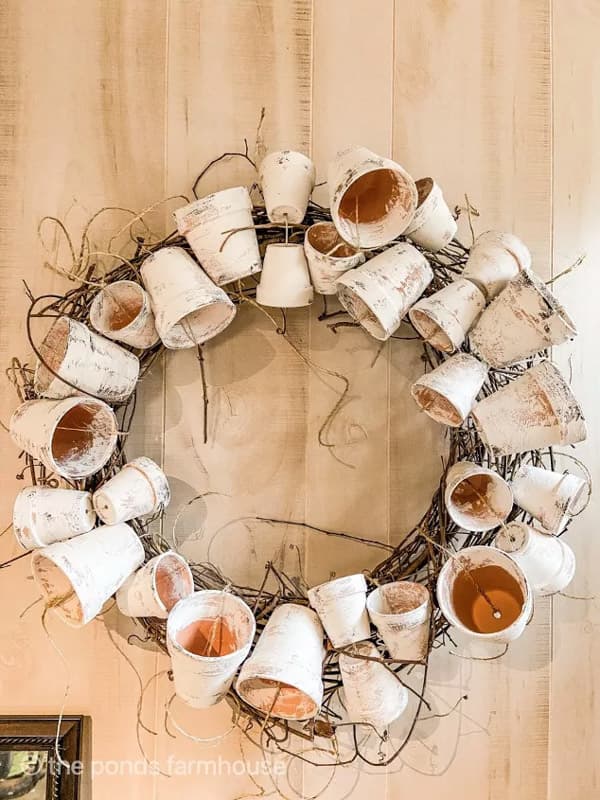
After all the pots are secure, hang your wreath to make sure it looks balanced and that all the pots are securely tied.
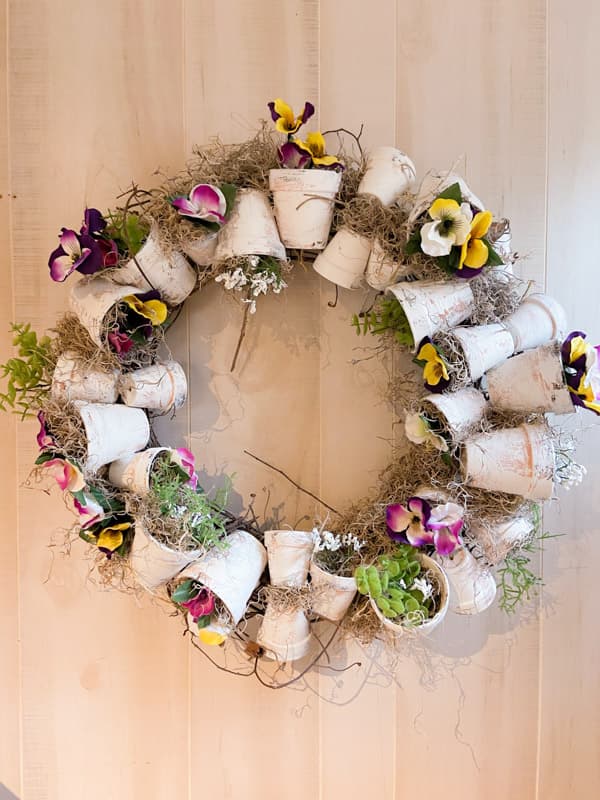
Add Flowers and Greenery
Finally, you are ready to start adding some color. Begin by securing styrofoam into random pots with hot glue.
Next, add Spanish moss to some pots and cover the styrofoam with hot glue. In addition, begin adding flowers and greenery randomly.
Cut the flower stem close to the actual flower bud using wire snips. You want a short stem. Then push the wire stems into the styrofoam, or hot-glue to the Spanish moss.

Use Your Creative Eye to Finish the Spring Wreath Idea
Finally, hang your wreath again and see how it looks to you. I ensure it seems balanced and that any excess jute strings have been cut away. You can add more Spanish moss or flowers to any bare or exposed area.
You might also like to see this version from my friend Chloe at Celebrate and Decorate. She uses succulents in her Spring wreath ideas.
How To Display the Terra Cotta Pot Spring Wreath
I had a vision for the terra cotta pot spring wreath as I was making it. I wanted to add it to my greenhouse. However, it would be amazing on a front door, inside a screened porch, or sunroom.
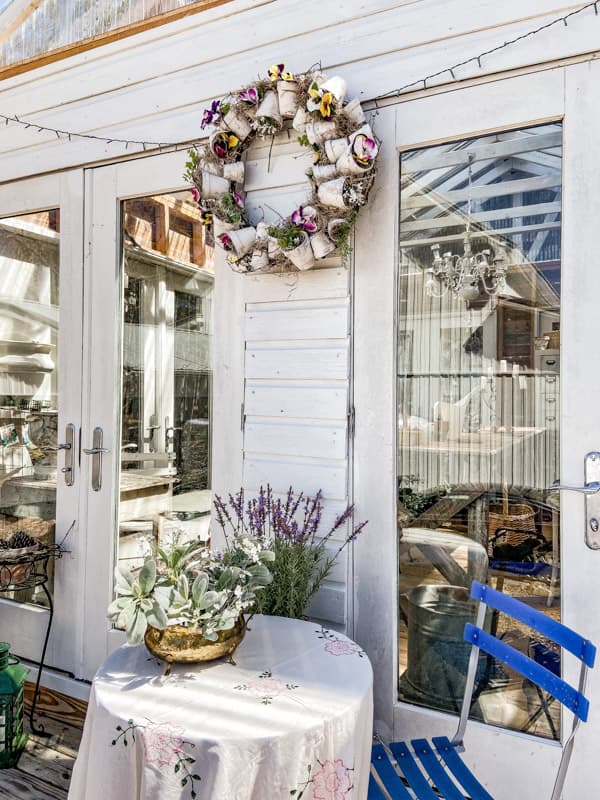
The colors really pop against the shiplap walls, and I’m loving the look in this outdoor setting.
Watch Video

Resources
The perfect spot for this wreath will be on my DIY Greenhouse. Although it was a cold day, I had to snap a photo.
The terra cotta wreath, bistro table and spring flowers create the perfect entertaining area on the Greenhouse porch.
Resources – Shop This Post – You will find similar items on my storefront.
I hope you enjoyed today’s tutorial – Terra Cotta Pot Spring Wreath Ideas.
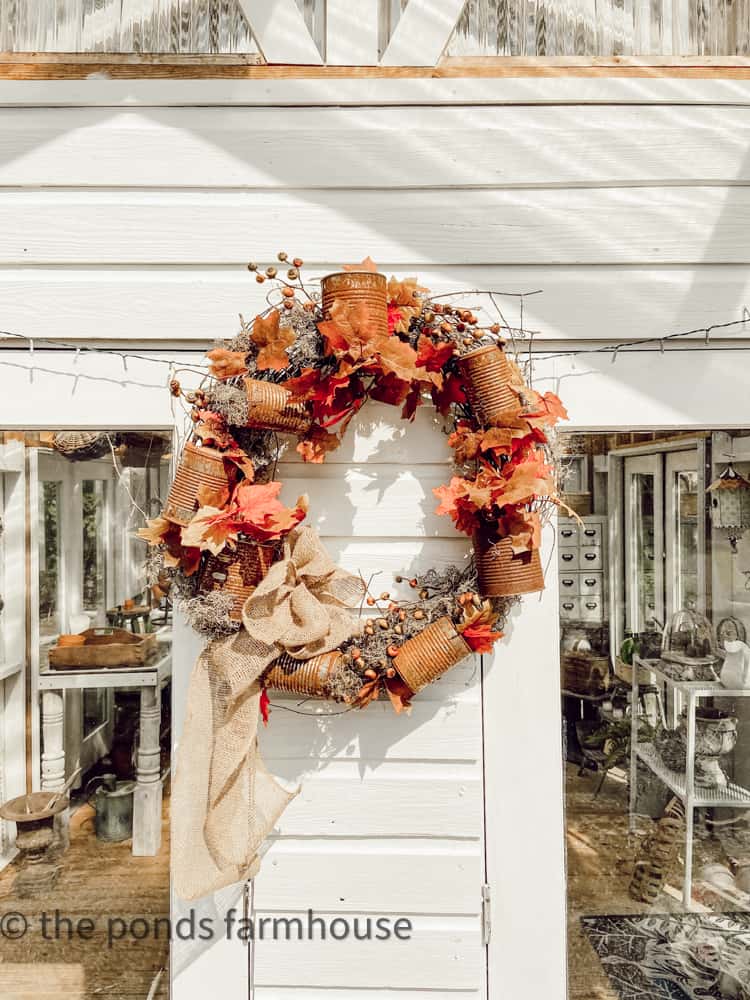
Fall Version
I loved this wreath so much all summer and wanted a replacement for the Fall. Here is the tutorial for DIY Fall Wreath with Rusted Tin Cans.
I hope you enjoyed today’s tutorial, and thanks for stopping by! I look forward to sharing my next adventure with you.


This is adorable 🥰 love it!
Lydia,
Thanks so much. I’m so glad you like it.
Very cute! Perfect for the Green House.
Lynda,
I really appreciate this.
What a cute Idea and so perfect for your greenhouse! I love how it turned out! xoxo
Stacy,
Thanks so much,
So darling. Be careful, some people may call you the pot lady. Funny!!!!
Dollar Tree is my favorite for turning inexpensive to wonderful.
Diana,
Thanks so much and I agree Dollar Tree is the best. However, I spend to much money because I find to many things I don’t really need. LOL
Yet another Rachel project I must do! How great that the Dollar Tree has the pots! I love the look! Thanks for sharing…Sandra
Sandra,
I’m so glad you liked this and thanks for your encouragement and support.
This is so pretty. I love your decorating ideas.
Thank you for sharing everything with us.
Brenda,
I really appreciate this.
Rachel, that is ADORABLE! I love it and I pinned it. Thank you.
Miche,
Thanks so much for always making my day.
This is a fun wreath. Thanks for the DIY! Pinned
Cindy,
I really appreciate this.
Simply beautiful. Thank you for sharing.
Thanks so much Rebecca!
This is perfect for your garden shed, so cute, pinned it, I would love to make one for mine.
Marlene,
You should, its easy and so fun.
It is so pretty – great job! I love your home and your potting shed. I always look forward to your posts.
Traci,
Thanks so much for your support and for following along.
Oh my! I have only found the “paper” pots so far at my closest “Tree” … but happily there are a number of these stores close enough to me to search stock at others! (Or maybe they have them online?) The managers say they never know what they will get, so they are as surprised as we are when the truck is unloaded!
I do LOVE your version of this pot wreath! Its fullness is one of its best features … !
kathleen,
I’m so glad you like it and I hope you can find the pots. Best of luck.
Oh my goodness! That I love! Love that you distressed the pots! Maybe one day I will do one! 🤗 As always,. Thanks for sharing!
PS
This would be a cute craft project
For me and 4 others to do together!
Just maybe a smaller grapevine wreath!
We meeting 2 times a month. Each person share a project and make together and we have lunch after!
Just friendship time together!
What you think Rachel?
Margie,
I love that idea. So fun.
I made one of these last year with terra cotta pots and succulents, but this is such a lovely take on the same idea! Bravo!!
Chole,
I am going to check it out. They are so fun to do.
Oh wow, Rachel! I love how your wreath turned out. I’ve always wanted one. Thank you for sharing. Pinned so I can try to make my own!
Jen,
I’m so glad you like it.
This is an amazing wreath Rachel! I have to make this for my Mother in Law, I know she would go crazy for it.
Shawna,
I’m so glad you like it. Thanks so much for stopping by.
This is the prettiest Spring wreath I’ve seen so far. I absolutely love the vintage charm of the painted pots. My front door needs one of these! Pinned
Marie,
I really appreciate this. I hope you make one. It’s really not hard.
This is just the prettiest wreath Rachel. I would love to share it in my weekly blog post tomorrow. It’s so creative!
Kim,
Thanks so much.
Adorable. It would be a great way to use up bits and bobs of flowers, too!
Kathy,
Yes, thats a great tip.
How darling is that, Rachel!?! Thanks for the great DIY – this is so perfect for spring! Hope you have a lovely Easter!
Barbara,
Thanks so much and I really appreciate you for stopping by.
Love your terra cotta pot wreath Rachel and I want to make one for summer! Look for your post to be featured this week at the Tuesday Turn About Link Party! Hugs!
Michelle,
You are so sweet. I can’t wait to see what you make,.
Just popping in again to let you know we are featuring this fabulous wreath on the Farmhouse Friday Link Party. We always love what you do. 🙂
Cindy,
You are so sweet to do this. Thanks so much.
Your wreath is breath-taking, my friend! It’s the perfect addition to an outdoor space, a spring front door or even a sunroom! I bet it’s heavy!!! 😉 Pinned!
Yes Julie,
It would look great in so many places.
Wow what a gorgeous wreath you have created! I love how it looks on your greenhouse. Thank you for the wonderful tutorial and video too!
Kelly,
I really appreciate this.
I am a big fan of terracotta pot wreaths, but I haven’t seen any quite like this! It’s beautiful!
Alexandra,
I really appreciate this.
I appreciate the mention.
Beautiful very nice …….
Eva,
Thanks so much.
This is the perfect spring wreath. Thanks so much for the tutorial.
Debbie,
Thanks so much for your kinds words. So glad you like it.
This is amazing! I’m definitely going to make one. I love it. Hugs to you
Renae,
I’m so glad you like this. Thanks for stopping by.
I love this wreath….I definitely need one for my Shed….may be my next project! Thanks for sharing!!!!
Robyn,
Thanks so much for stopping by.
Thanks so much for sharing.
Making this for my mom!!! Very unique and easy instructions, ty!
Oh, I’m so glad you like this project.
I love love love this wreath!!!!!!!!!
Thanks so much for sharing. I’ve got to give this a try;)
Maria,
I hope you do. It’s really an easy DIY>
Love both spring and fall wreaths!
Pinned♥️
Shirley,
I’m so glad you like them.
I love this wreath! It’s gorgeous. Happy Spring to you.
Renae,
I appreciate this.