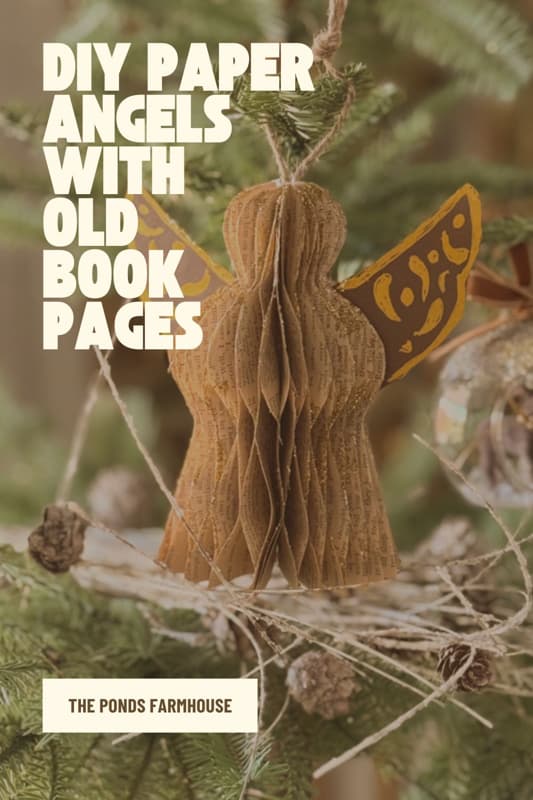
How to Make a Vintage Christmas Angel from Old Book Pages
Are you loving the vintage-inspired Christmas decor this year? I’m particularly loving the beautiful paper Christmas angels, but they are a bit pricey! I decided to get the look for less by crafting this beautiful Vintage Christmas Angel from Old Book Pages for free. It’s a perfect DIY project to add a subtle, vintage farmhouse touch to your holiday decor. Gather some old thrifted books, and let me show you the easy step-by-step tutorial!
(Posts on The Ponds Farmhouse may contain affiliate links. As an Amazon Associate, I earn from qualifying purchases. See the full disclosure details here.)
Vintage Angel Inspiration
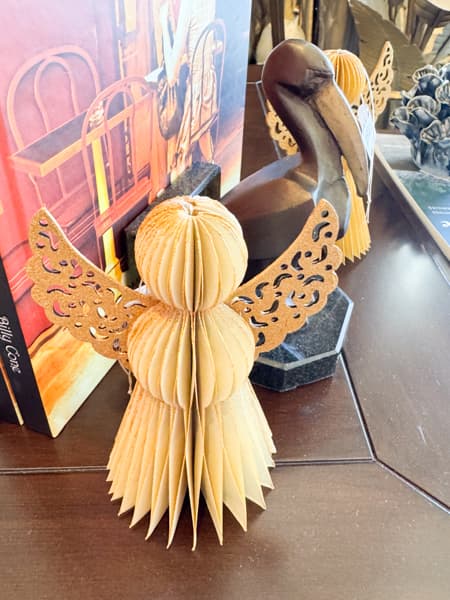
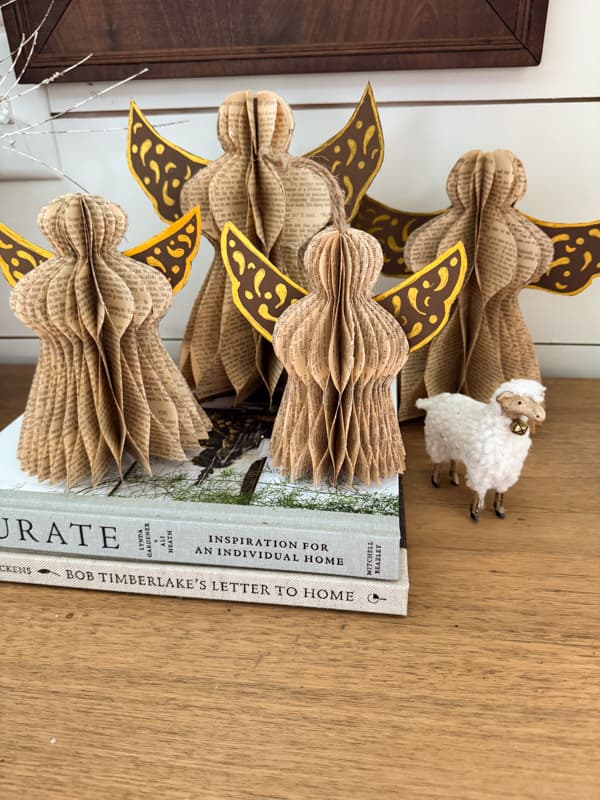
While shopping at one of my favorite home decor boutiques, I spied these sweet 3-D paper angels. Instead of spending $35.00 on one small angel, I snapped a photo and decided to make one myself. Here’s what I did.
Essential Supplies and Tools
- Old Book Pages – Depending on the size of your angel, you will need several pages per angel.
- Scissors
- Glue – Glue Stick or Hot Glue
- Jute Twine
- Glitter – Fine Gold or you can use Silver Glitter if you prefer.
- Brown Card Stock
- Gold Glitter Pens – these are the ones I used.
Old Book Pages
When I’m thrifting, if I find old books or magazines that have seen better days, I’ll pick them up to use for old-book-page crafts. The pages I’m using today are from an old magazine and are perfectly aged. If you don’t have old book pages, you can print sheet music or book pages and age them with a coffee or tea stain. Just print your pages and add the stain to a baking pan. Soak the pages in the stain for a few minutes and then lay them out to dry. They may crinkle, but you can smooth them by pressing under a stack of books.
Step-By-Step Tutorial – Honeycomb Angel
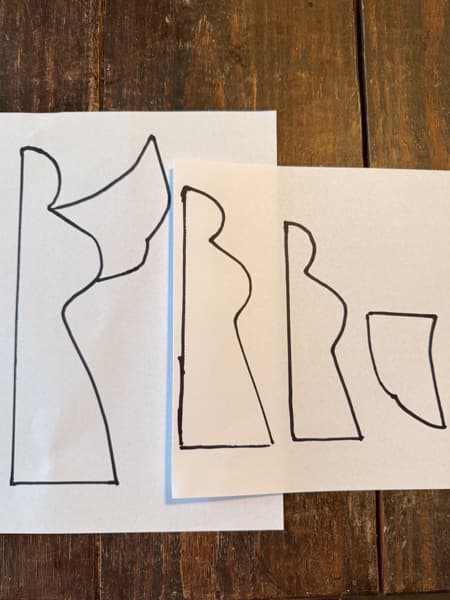
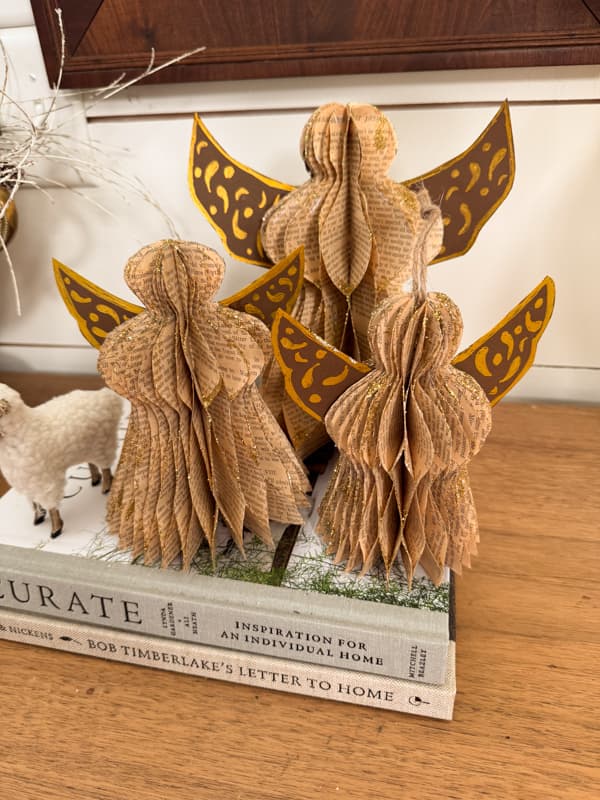
I decided to make a few different-sized angels, so I drew templates you can use. My large angel requires a full-size page for each piece. However, the smaller one, I was able to get two angels from each sheet. I used 22 pieces for my large angel and wish I’d used more, so I then used 26 pieces for the smaller one. The more pages you use, the fuller your angel will be.

Template & Preparing Old Book Pages
You can download all the angel templates by clicking on this link – Paper Angel Template.
I cut the angel wings separate from the angel. In the larger template, it appears to be one piece. I recommend cutting the wing extra long, leaving enough to tuck into the angel’s body when finished.
You can cut the templates using cardstock to make tracing easier.
After you cut out your templates, fold several old book pages in half so the angel fits on each page. Then trace around the template. I folded 4-5 pages at a time to speed up the process.

Be sure to hold the pages together as you cut the angel out. Once you have your desired number, separate each piece.

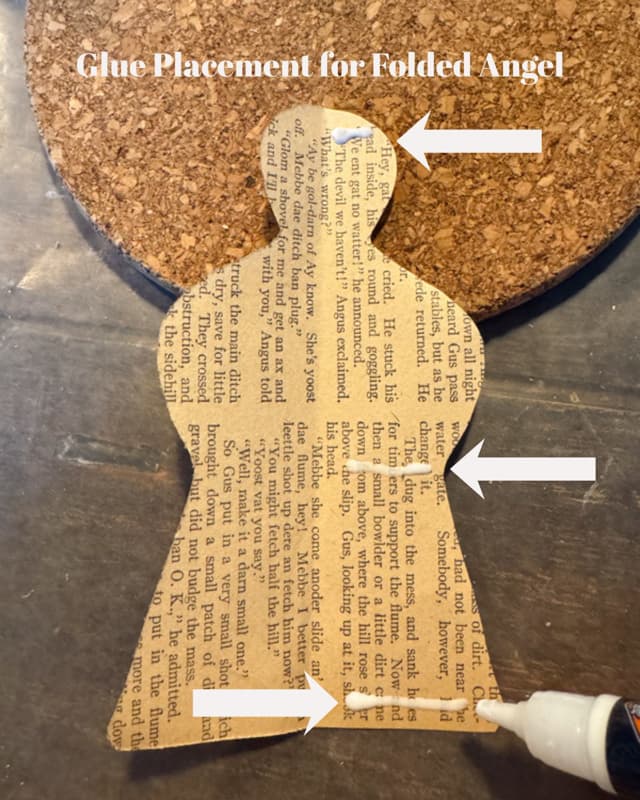
Glue Old Book Page Angel
Now you are ready to start gluing the old book pages to create your 3-D honeycomb angels.
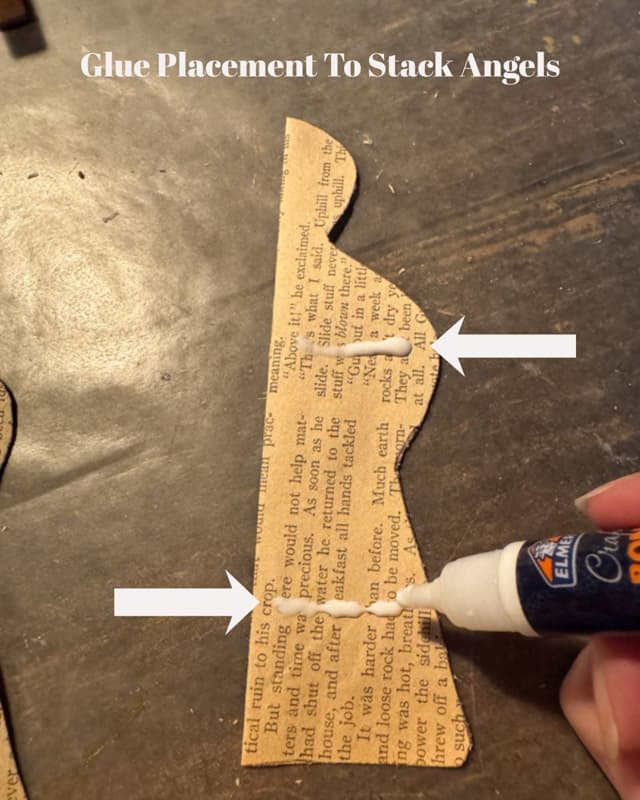
First, add glue and fold each piece. See image below for glue placement. You can use a glue stick or hot glue. If you use a glue stick, I recommend placing the pieces under a book and letting them dry for a few minutes. This will ensure that all the areas are secure.
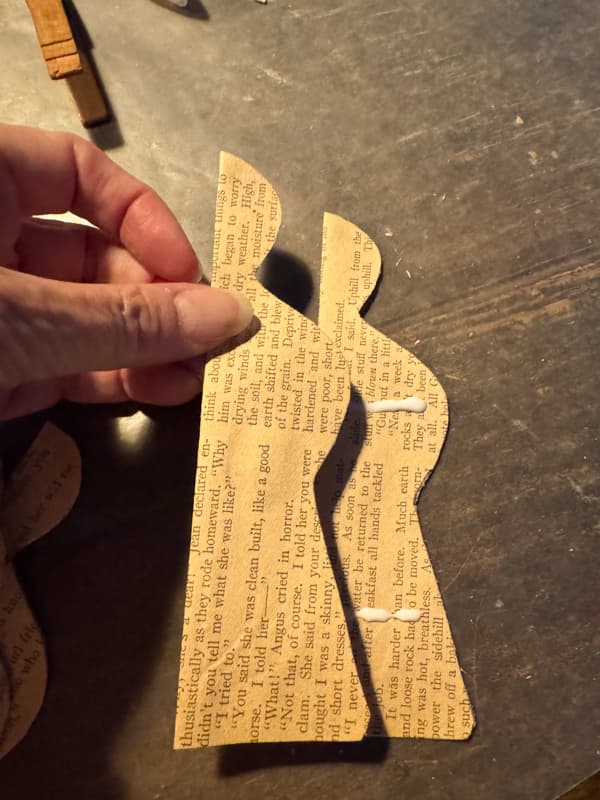
Once you have all your folded pieces glued, begin stacking them, and use the image below for glue placement.
Be sure to align each piece evenly as you go. You will have a large stack by the time you finish. Once again, if you use a glue stick, allow it to dry before proceeding.
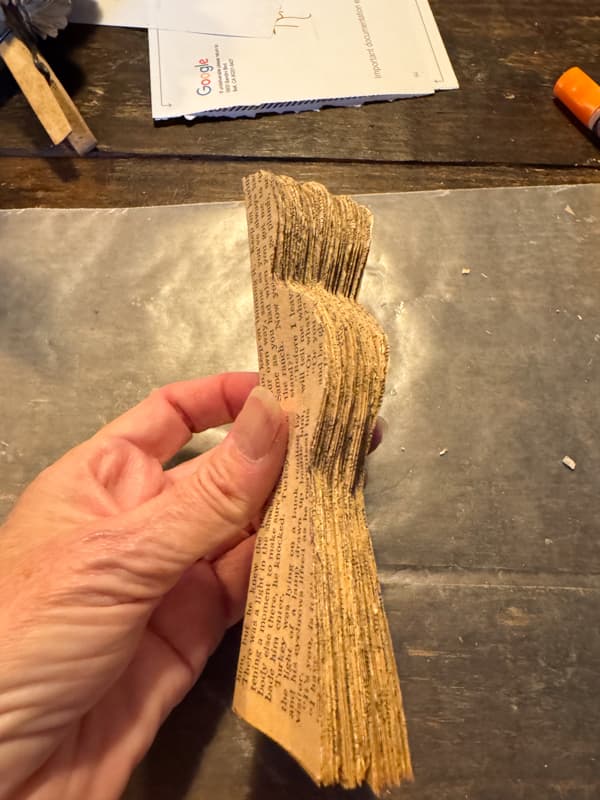
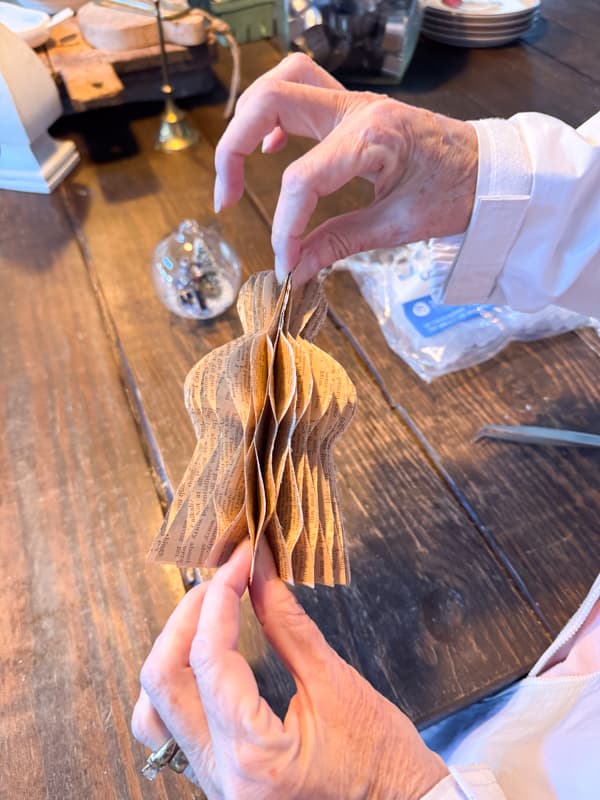
Once your glue is dry, you are ready to attach the outer sides and form your angel. Apply glue to one side of the stack, going around all edges. Open the angles and press the outer sides together. You can use paper clips or clothespins to hold until the glue dries.
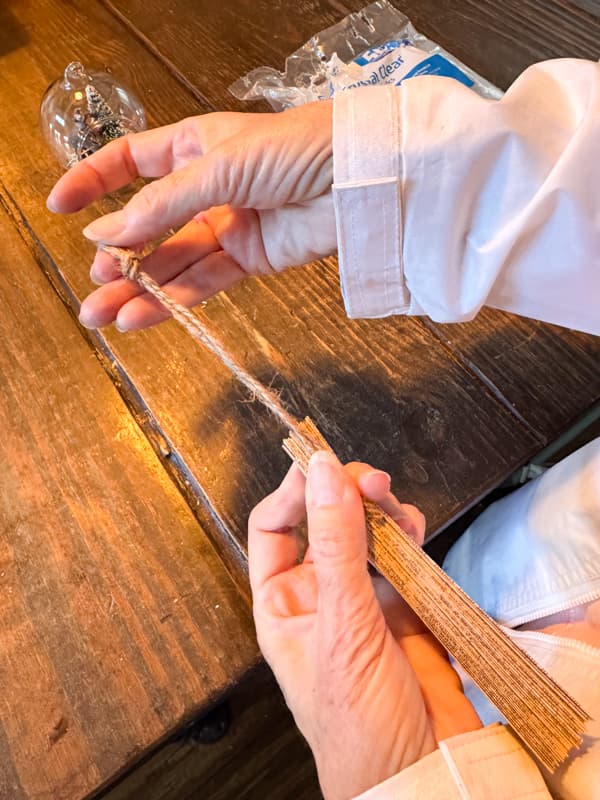
Adding Optional Hanger
The old book page angels can stand alone or you can hang them on your tree. If you want to use them as tree ornaments or hang them from a peg rack, you will need to add a hanger. This can be done in a couple of ways. I used a piece of jute twine and added mine before I opened the angel.
Fold the twine in half and tie a knot at the closed end. Then add the open ends to the spine of the angel with some hot glue. Once you open your angel, the hanger will be in place.
Insider Tip
I have used both hot glue and glue sticks for this type of project. The glue stick works fine for the assembly but I found that the hot glue works best when you attach the open ends of the angel. It dries quickly and you can hold until it adheres.
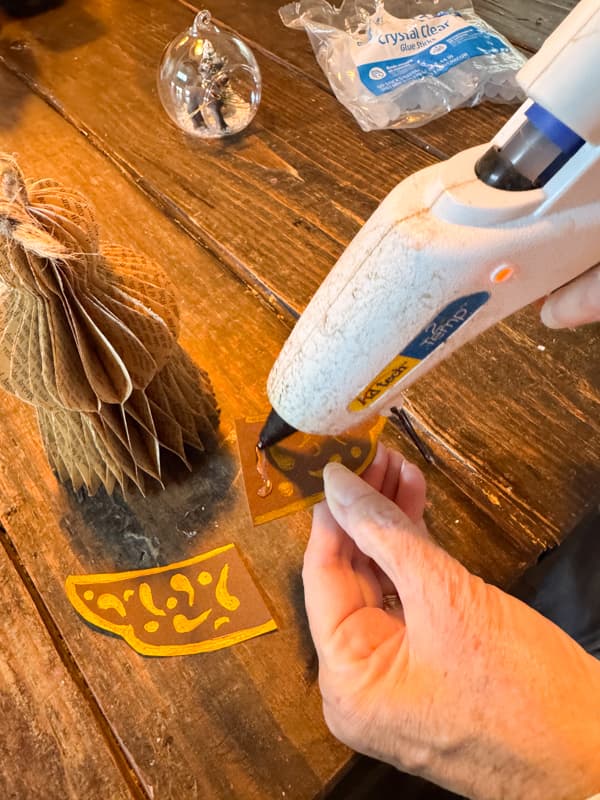
Adding Angel Wings
Next, you will want to add angel wings. For this step, I used brown cardstock. Begin by cutting two of the wings from the template provided, and then you can add a design if you choose.
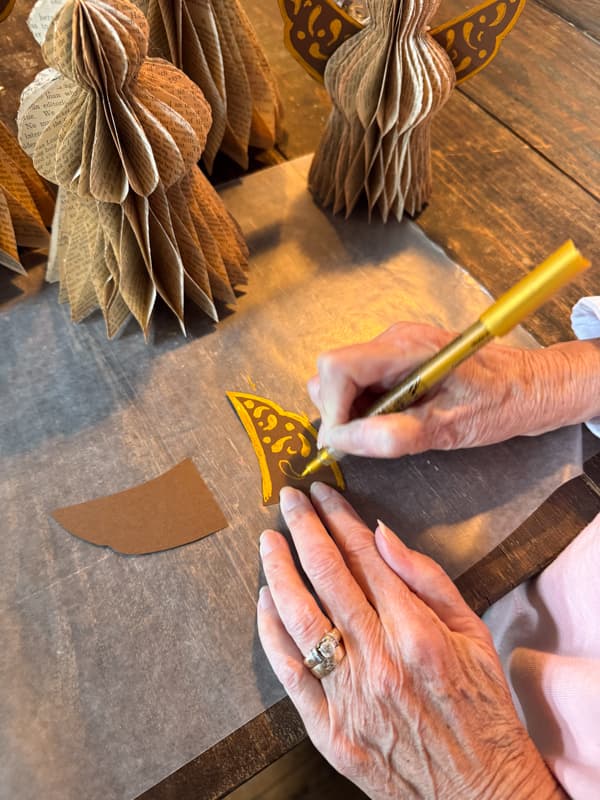
Add Gold Design to Wings
For this step, I used a gold glitter pen and drew teardrops and circles on the wings. I also outlined the edges, as shown in the image below. I painted both sides of the wings with the design.
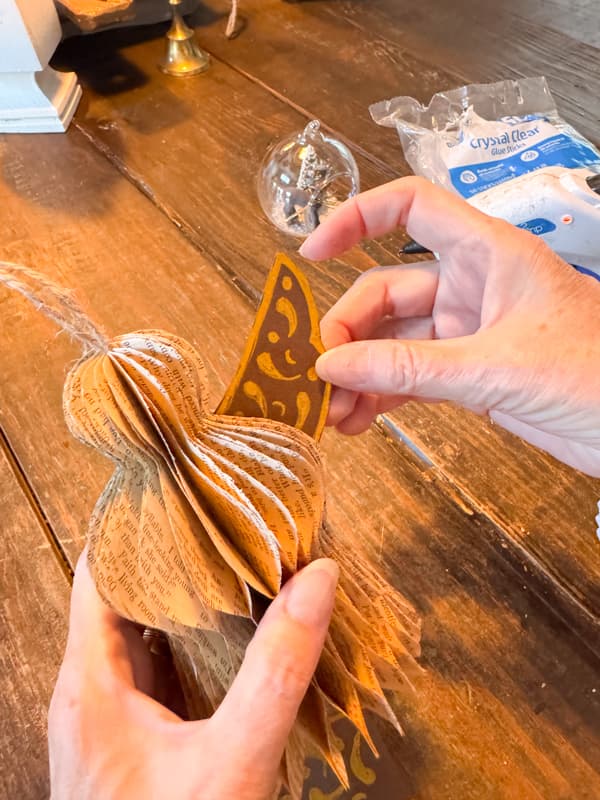
How To Add The Angel Wings
To attach the angel wings, apply hot glue to the section that will be tucked inside the paper angel. Hold your angel facing forward and insert the wings into the folds. Ensure that they are evenly spaced.
Optional Embellishments
At first, I was now finished with my old book page angels. They look adorable.
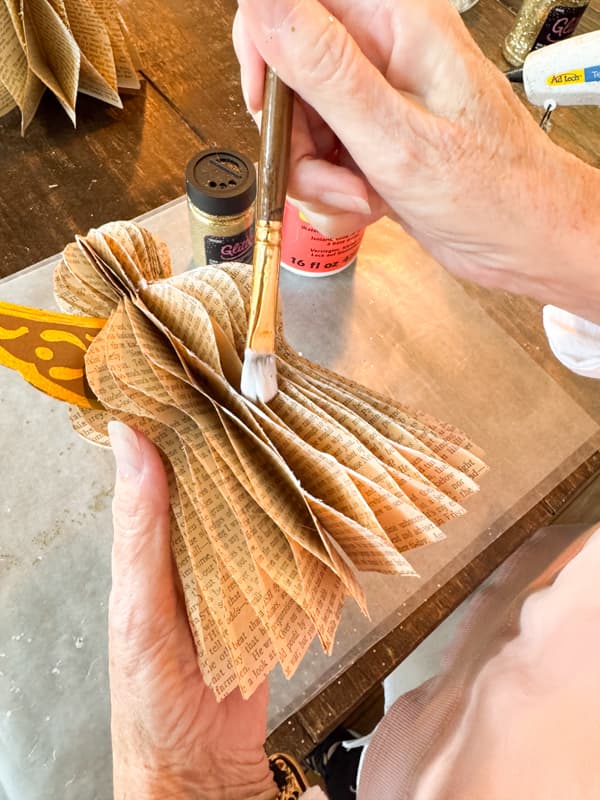
But then I thought I’d try adding a little glitter to make them sparkle. So added a small amount of glue to the edges of the angel.
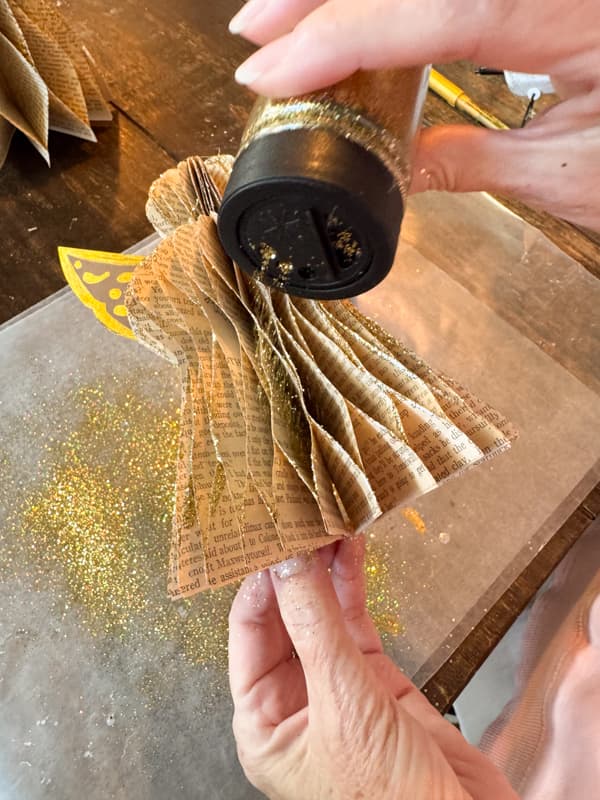
I used a small paintbrush and lightly brushed along the folds. Then I sprinkled over the glue with fine gold glitter. Shake and tap to remove excess glitter.
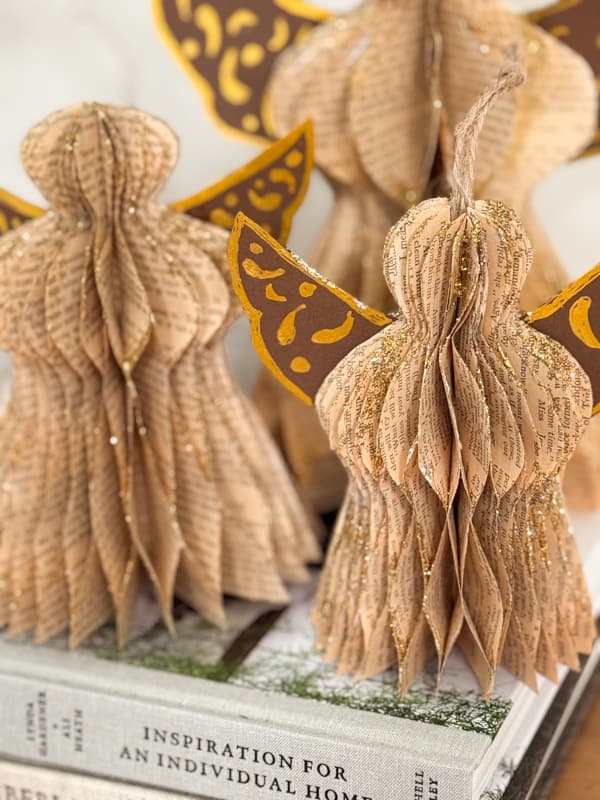
After I experimented with one, I decided I like the shimmer and shine, especially for Christmas. So I decided to add glitter to all my creations.
Other Options
There are so many options when making these adorable angels. Here are a few to get your creative juices flowing!
- Use other types of paper such as wrapping paper, kraft paper or colorful card stock.
- Add beads to your hangers or along the angel wings.
- Make the wings from the old book pages by folding them for a ruffled appearance.
- Make the wings from glue-stiffened lace or other delicate fabrics.
- Use wooden cut-outs for the wings.
- Stand your angels on pedestals.
- Make any size angle you choose for a more dramatic decoration.
Insider Tip
Save that excess glitter. For any project that you are adding glitter, theres no need to waste all the excess glitter. Be sure to apply the glitter over a sheet of wax paper. Once you shaken the excess glitter from your project, open your glitter bottle to refill. Gently roll up the wax paper trapping the glitter into a funnel and use the funnel to pour the unused glitter back into the bottle. Tap or shake to remove all the glitter from the wax paper.
How To Decorate With Your Upcycled Book Page Angels
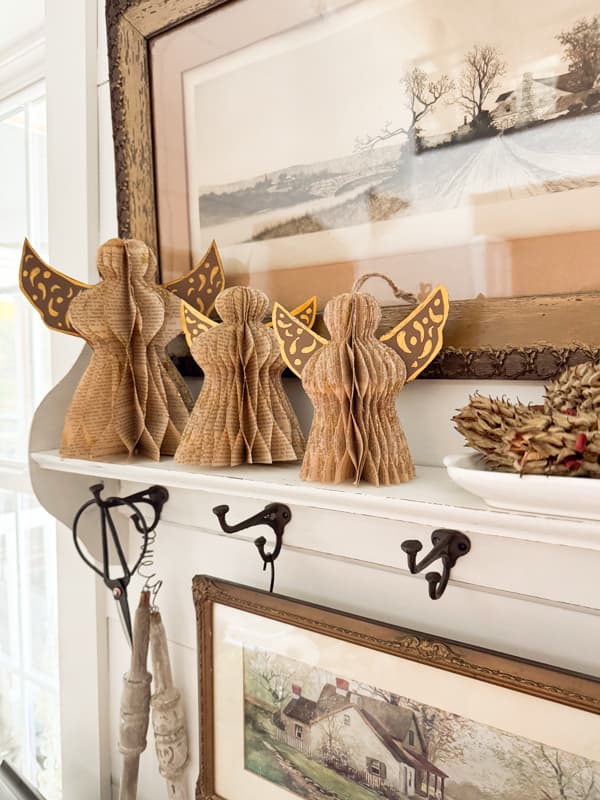
As I mentioned earlier, you can use your angels to decorate your tabletops, mantel, and shelves. They also make adorable tree decorations.
I used the smaller angels for tree decorations.

You can group the different sizes to make a sweet angel vignette on an entry table or mantel.
In Conclusion
So was this DIY project worth it? Absolutely! Once you get the hang of it, these are so easy to make, and there are endless options to make the craft your own. I made four angels in an afternoon. The most time-consuming part is cutting out the many layers and drawing the designs on the angel wings. However, these would be fun activities to do with your kids or other family members to make a lasting holiday memory. Enjoy the process and amaze your friends with your creativity. And don’t they look adorable?
Shop


Very cute. Adding that glitter made all the difference. Thanks!
Teddee,
Thank you! I’m so glad you like this one. Let me know if you make these. Have a blessed week.
This retired reading specialist who only has only angels on the Christmas tree is looking forward to making these! I was wondering why the template was only half and folding the pages before cutting seemed like it would slow down the cutting process. Does it slip more and create less accurate cutouts? I will try a full template and a half one to see which works better if no one responds. My old hands prefer to cut as little as possible and fold afterwards.
Suzie,
It takes less time if you fold the paper and only cut half. I folded 4-5 sheets for each cut. Your angel is already folded so you don’t have to individually fold them. It speeds up the glue time as well. Hope this helps.