Create Upcycled Magic: DIY Scrap Fabric Floral Spring Pillow
Do you remember the scrap fabric heart pillow cover I recently shared? Well that got me in a creative mood to explore more recycle options. So today, I’m sharing How To Make A DIY Spring Pillow using scrap fabrics with an easy no-sew method. This fun and creative craft project is addictive, and you may be ripping up your clothes to make one. LOL! In addition, this fun craft would make great Mother’s Day Gifts, Graduation Gifts, Bridal Gifts, and more.
Y’all, pillows are the easiest and cheapest way to update your spaces for Spring. You can completely change your color scheme with fun, creative pillows.
Supplies for DIY Spring Pillow
- Pillow Cover 20×20
- Permanent Fabric Glue
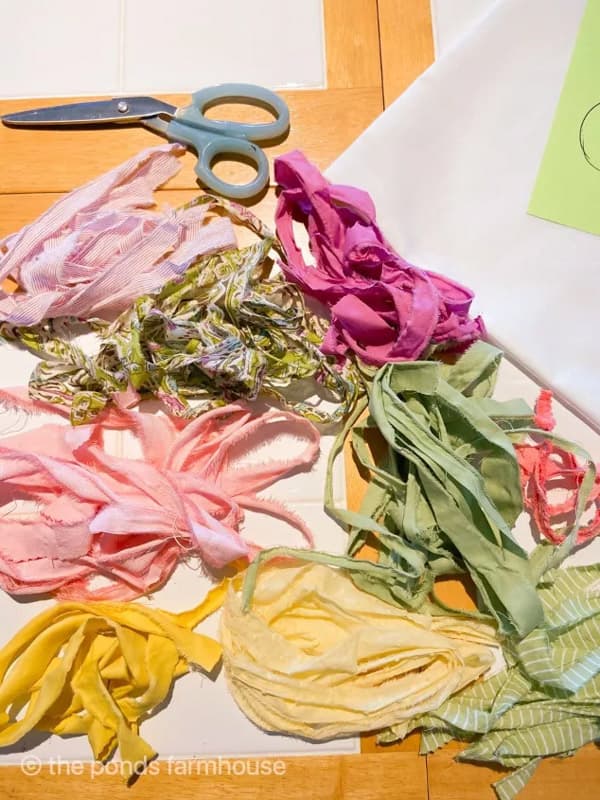
- Fabric Scraps – Torn strips approx. 1/4-1/2 inch wide. Lengths can vary.
- Card Board or Card Stock to draw template
- Green Sharpie Pen
- Scissors
(Posts on The Ponds Farmhouse may contain affiliate links. As an Amazon Associate, I earn from qualifying purchases. See the full disclosure details here.)
Inspiration For The DIY Pillow Cover – Great Mother’s Day Gift
Seriously, I can think of many fun and creative ways to use this idea. It only takes a small amount of fabric to create each flower, and you control how large the flowers and leaves are.
- Use baby clothes to create a pillow for a keepsake.
- Use fabrics from your wedding to create a pillow keepsake
- Create a Pillow for your mother using fabrics from each of her children or grandchildren.
- Use fabrics or other memorabilia from a favorite vacation or holiday.
- A graduation gift with sports fabrics representing sports played over the years.
I’d love to hear any additional ideas you might have for this project.
Draw A Template of Your Design – Let’s Get Creative
You can start by purchasing or making a 20 x 20 Pillow cover. I used inexpensive linen blend pillow covers, and they look great.
Then use a piece of cardboard or card stock to make a template that will fit inside the pillow cover. I just tapped two pieces of card stock together.
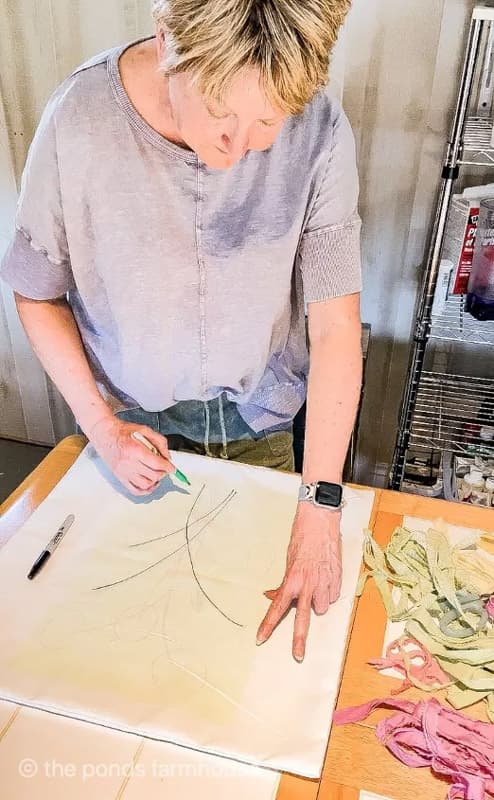
Draw a simple sketch of your design onto the card stock using a sharpie pen. Then, slide the card stock inside the pillow cover and center the drawing to your desired location.
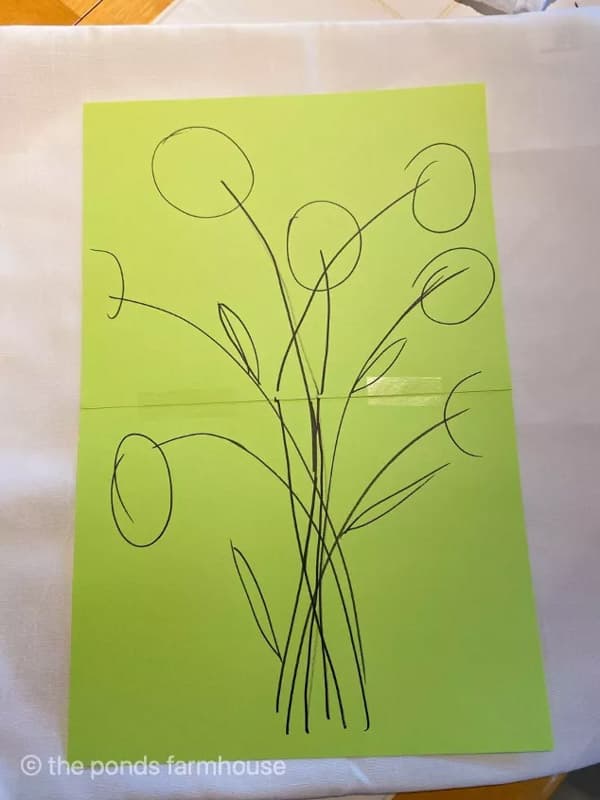
How To Sketch Your Design & Create Flowers
Once everything is aligned to your satisfaction, you can trace your design onto the pillow cover using the green sharpie pen. The only part of the design that will show after the pillow is complete is the stems.
Ensure the card stock or card board remains under the design as a protective layer between the two fabrics until the project is complete.
How To Apply Scrap Fabric To Make Flowers
You can begin at the outside of each circle or flower and apply a bead of fabric glue. Working from the outside, add fabric by twisting the strips and pressing them into the glue. It will usually hold the fabric in place immediately; however, if it does not, you can use straight pins until the glue sets.
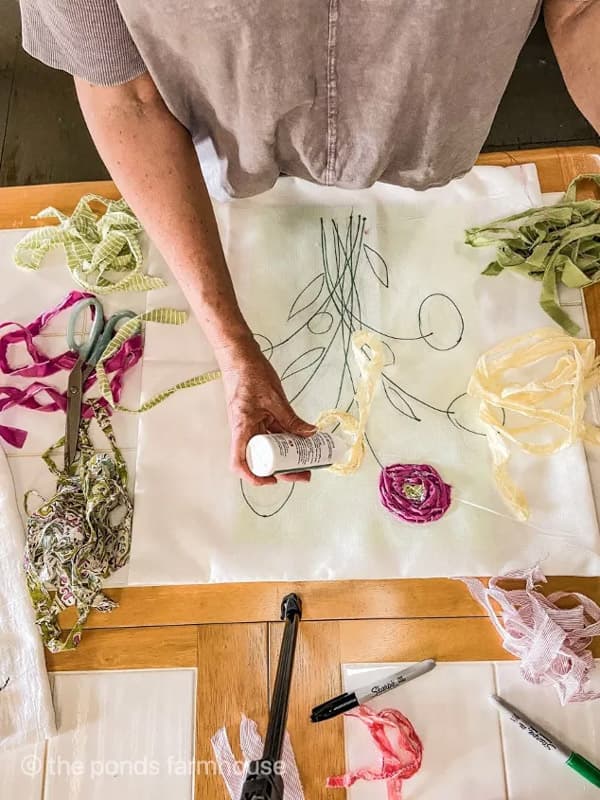
Continue working the fabric strips inward, adding glue as you go. This is where you can use different color combinations, etc.
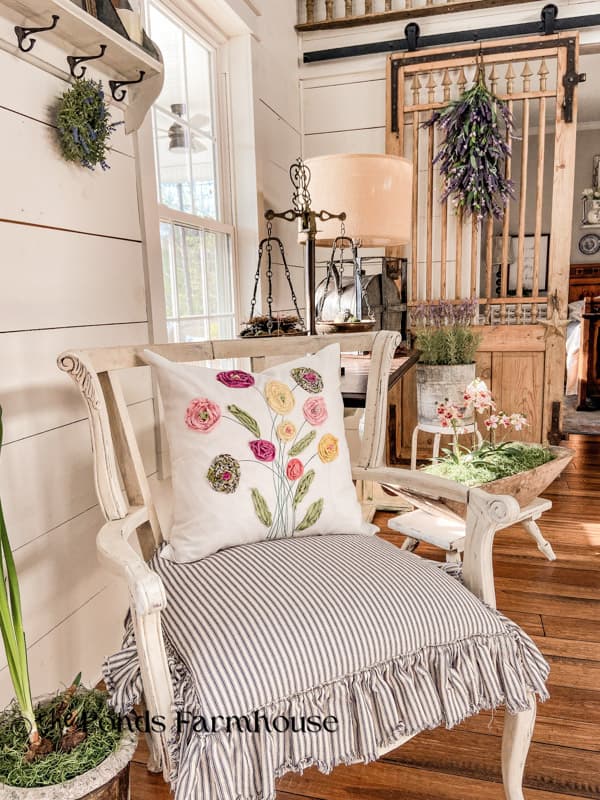
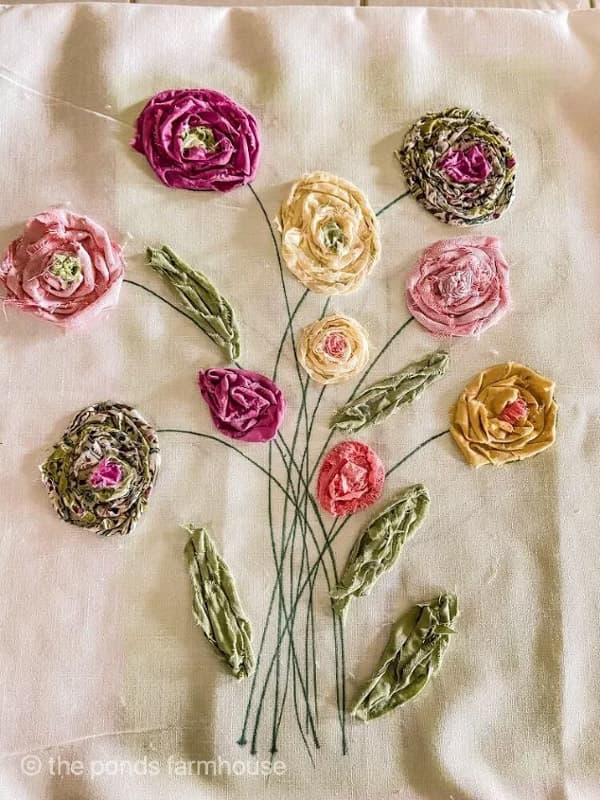
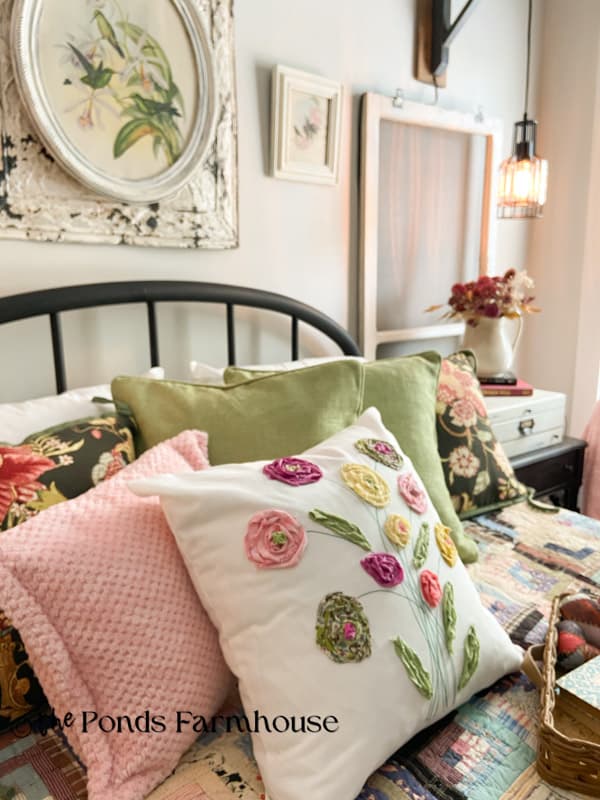
DIY Spring Flower Pillow Cover
See how easy that was! This photo is from just after I was finished, and the glue is still wet. You will want to give your glue time to dry. Check for any loose areas and apply more glue if necessary.
Let’s get that glue off your fingers and let this dry.
Then fill the pillow cover with a 20 x 20 Pillow form and TA-DA! A gorgeous spring pillow.
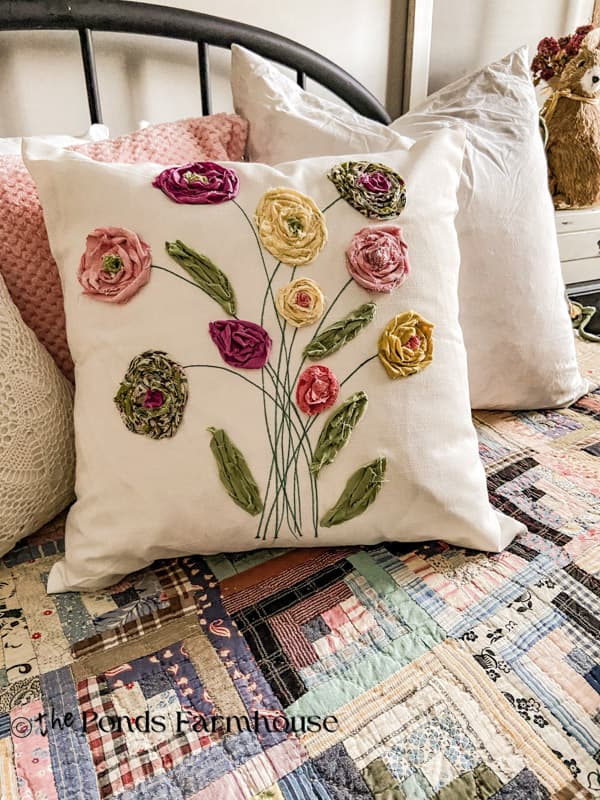
I’m using this pillow on our guest bed. This spring, I’ve pulled out a family heirloom quilt for this bedroom, and I’ll share all the Spring updates for this room in a later post.
I can’t wait to hear all the inspiring Mother’s Day Gift ideas. A flower for each grandchild is my favorite.
The pillow colors are perfect with the vintage quilt.
You can see similar projects:
- Like this Heart Pillow
- 4th of July Star Flag Pillow
- Fall Pillow
- A Christmas Tree Pillow
- Sunflower Pillow Cover
The pillow can be embellished with tassels or pom poms. See how to make an easy Jute Tassel. Go crazy, and let me see what you make.
I hope this inspires you to get creative and think outside the box this Spring.
Thanks so much for stopping by.


That turned out beautiful! You have so many great ideas!
Debbie,
I really appreciate this.
I love this project Rachel! So very pretty! Your creativity continues to amaze me!
Best!
Sherri
Sherry,
Thanks so much.
Rachel – This pillow is charming beyond charming.
Love hearing your voice, wonderful accent and it fits you perfectly.
Blessings to you
I have ordered the quilt bedspread in a king size. My bed is queen but is quite high or tall.
I will let you know how it all turns out in my boho glam bedroom. .
Diana,
I appreciate this so much
It is absolutely beautiful. What a fun idea! Love it!
Darlene,
Thanks so much for taking the time to comment.
That pillow is beautiful Rachel! I want one!!!
awww you are so sweet.
Beautiful and Pinned! Thanks, Rachel.
Thanks so much Miche
I love your pretty pillow and looks fun to make. Thanks, you are very creative.
This pillow is pretty. Love the colors of the ribbon you chose to create your flowers.
Cindy
Cindy,
Thanks so much for stopping by. I appreciate your comments.
I really appreciate this so much.
You are so creative Rachel, I love seeing your blog posts. This is a beautiful pillow.
Thanks so much Shawna
So cute and creative.
Rebecca,
I’m so glad you like this. Thanks so much.
What a fun idea. It turned out so cute, Rachel. A perfect way to add a little touch of spring to your home.
Jen,
I’m so glad you like it.
Love all the colors you chose for the flowers in this pillow, Rachel, and the texture it adds too. It’s really beautiful and perfect for this time of year! Hugs, CoCo
Coco,
I really appreciate your encouragement.
What is such a wonderful pillow! I love the bright colors, the texture and the use of the scraps! Such an inspiration! Thank you so much for your kind messages on my blog. I am so happy that I found your site! I have just subscribed.
Alexandra,
Thank you for these sweet compliments. I appreciate you for following along on my adventures.
I love watching all your wonderful home ideas and decorating Rachael.
I love flowers and this pillow with flowers on it is so pretty.
Handmade is so awesome.
Thank you for sharing everything you share with us.
Brenda,
I really appreciate this so much. So glad you like it.
This is beautiful and even has a romantic feel to it. I am definitely going to try to make one of these.
When my father in law passed away I used his favorite shirts and made pillows for the grandchildren. I also added some personal things like the
name or embroidered something that identified with things they like.
For instance on one I embroidered a guitar with angel wings and the name
of the grandson. They have kept these displayed in their room for several years.
Kayestes,
That is so sweet. This would be another way to make something special out of treasured fabrics.
Rachel this pillow turned out just beautiful! I love the colors you chose and the tutorial. Pinned!
Kelly,
Thanks so much.
What a fabulous idea Rachel! It is spring perfection!
Ana,
Thanks so much. I appreciate you for stopping by.
I can honestly say this is my favorite DIY pillow I’ve seen. I’d love to feature it on my weekly blog post this coming Saturday.
Kim,
You are so sweet. I appreciate you so much.
This is so lovely, Rachel! Thanks for sharing at Vintage Charm!
You are welcome.
Jennifer,
Thanks so much for sharing my diy.
I love this Rachel!! The pillow turned out gorgeous!! May need to make one for my Mom this Mother’s day! Thank you!
Heather,
I’m so glad you found this helpful. Let me know how your pillow turns out.
Oh my goodness! This is so beautiful. You continue to amaze me.
Renae,
I really appreciate your encouragement.
This is just amazing! Love it!
Trudy,
I’m so glad you like it.
Thanks for sharing.
Rachel, you always have amazing Projects. The pillow is so beautiful💖
Roberta,
I really appreciate this.
I love this idea! I haven’t worked with fabric glue before, but this looks so fun I want to get some! Could you share your tips for washing the finished pillow cover? Thanks!
Jenny,
I hand wash the pillow covers with gentle soap. I’m glad you like this idea. Thanks for stopping by.
What size canvas did you use for the Heron, and where did you purchase it from.
Carol,
The heron was a screen print that my friend found at a thrift store and I just painted over it. I’m not sure of the size because it’s at her beach house.
Hi Rachel! You make everything look so easy but i guarantee if i try to twist the fabric into the glue as i attempt this, mine will not look like flowers. Haha. Thank you for sharing. I do love this pillow.
Cheryl,
You are so sweet. I bet you’d do better than you think. Let me know if you try.
I love your ideas. How do I subscribe to emails? I clicked on the subscribe button and it took me to a blank page, no place to sign up.
Hi Rachel, Just a quick question about your beautiful pillow? Did you embroider the stems that you outlined with a the green Sharpie? Thank you!
Lee Anne,
No I didn’t, however that’s a great idea. Thank you for stopping by.
This is just beautiful! I love it and am now thinking of making one…..just need to figure out colors.
Thanks for sharing.
Blessings, Candy
Candy,
I’m so glad you like this project. It’s also one of my favorites. Let me know if you make it. I’d love to see a photo.
Very pretty!
Ashley,
Thank you. I’m glad you like it.