How to Crochet A Nostalgic Granny Square Pillow Cover: Free Pattern
Hey friends! Are you looking for the perfect way to add a little cozy, vintage charm to your home? You’ve probably noticed that nostalgic granny squares are popping up everywhere lately—from high-end home decor to cozy fashion. I’ve been adding more of that ‘Modern Heritage’ feel to my own home, so I decided to whip up a unique decorative pillow cover, and I am in love with how it turned out!
As part of my Old School craft series, I’m showing you exactly how to crochet your own granny squares and transform them into a timeless, handmade pillow. Whether you’re an experienced crocheter or just starting out, I’ve included all the step-by-step instructions and a free pattern to help you create something special. You’ll be amazed at how easy and satisfying this project is—so let’s get started!
(Posts on The Ponds Farmhouse may contain affiliate links. As an Amazon Associate, I earn from qualifying purchases. See the full disclosure details here.)
The Timeless Appeal of the Granny Square
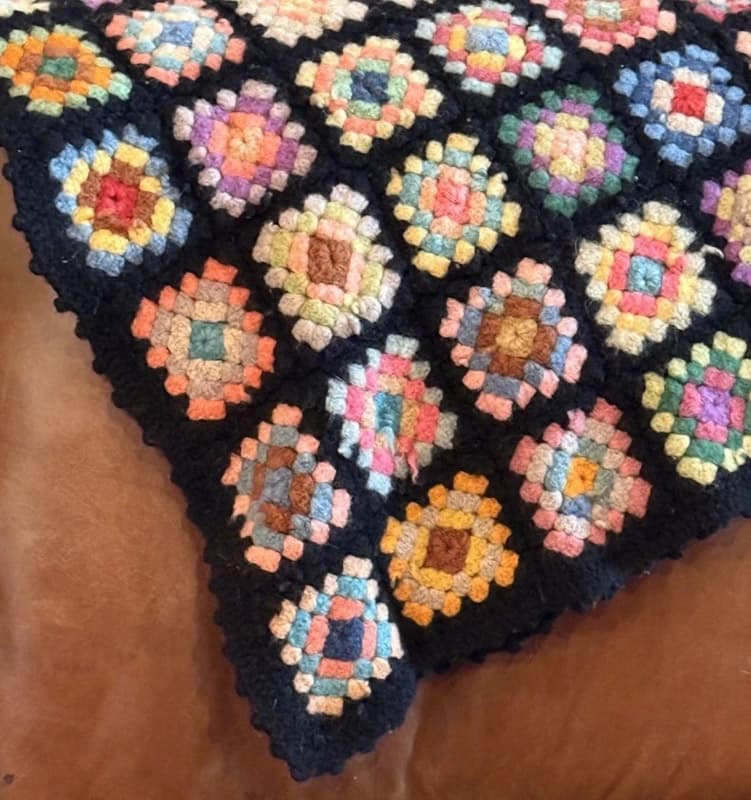
There is something so timeless about the granny square. Did you know that the first printed pattern for a ‘granny square’ appeared in the early 1900s? It quickly became the ultimate way for crafters to use up leftover yarn scraps, turning humble, colorful bits into beautiful, practical household items. I love that by picking up my hook today, I’m participating in a tradition of thrifty, creative, and cozy crafting passed down for generations. It’s the very definition of ‘Modern Heritage’—taking that old-school charm and making it feel right at home in a modern space.
Stitch Guide – American version
- Ch-chain
- dc- double crochet
- Sl st – slip stitch
- hdc – half double crochet
- Sc – single crochet
- tr – treble or triple crochet
- YO- yarn over
- Puff st – Puff stitch
- CLS- Cluster Stitch
Supply List
- Download Granny Square Step-by-Step directions.
- Caron- Azure
- Jubilee Yarn – Sand Cliff Brown
- Love This cotton – Parchment
- Caron – All Day cotton – Creme
- Size 5.mm crochet hook
- Beige Pillow Covers
- Upholstery Natural Colored Thread
- Large Hand Sewing Needles
- Yarn Needles
DIY Granny Squares
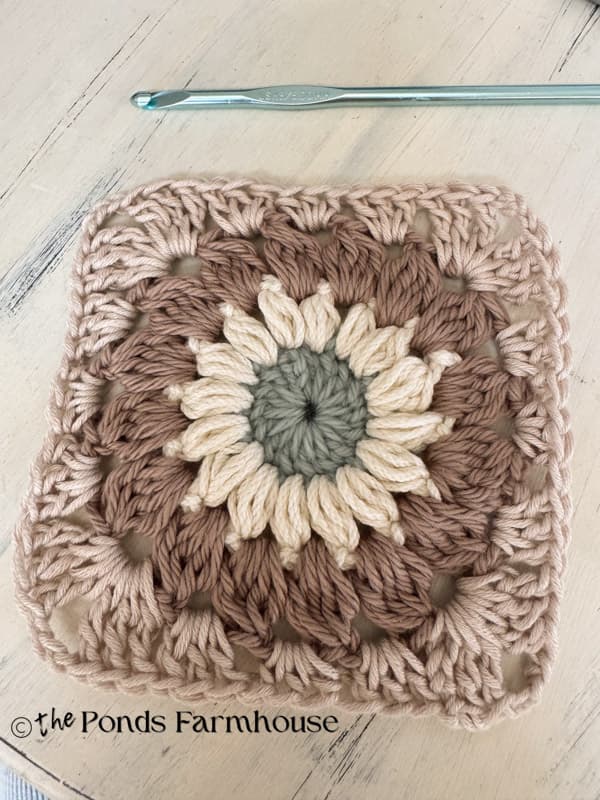
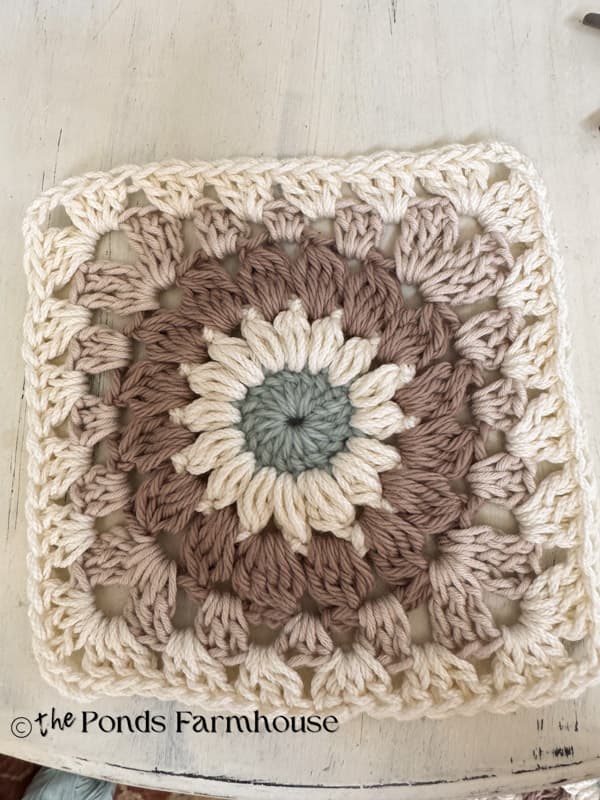
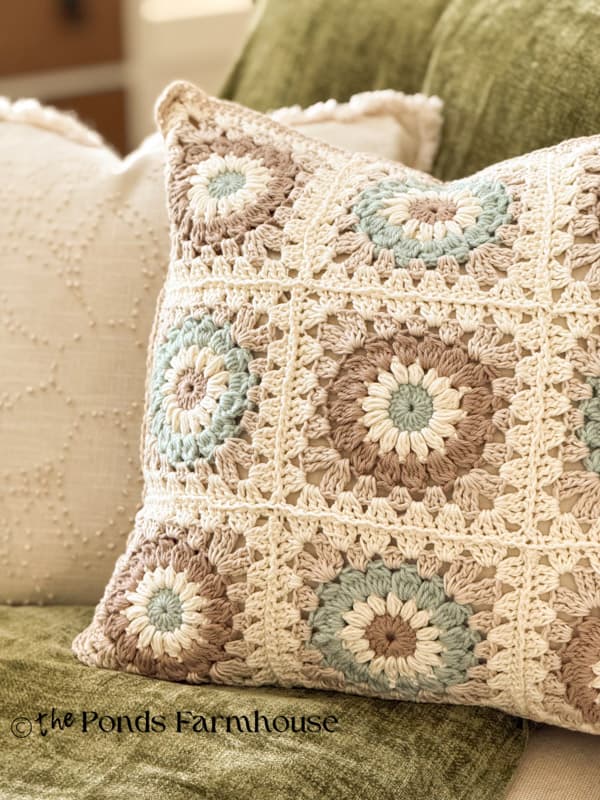
There are many options for making a Granny Square, from color combinations to different stitch combinations. Today’s pattern includes a puff stitch and a cluster stitch. Both give extra texture to the granny square, creating a starburst effect.
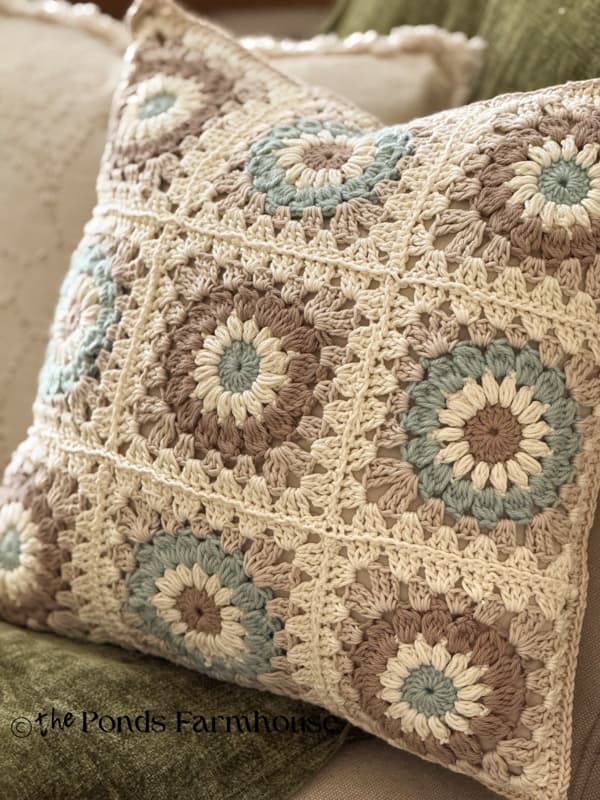
I experimented with a few color combinations but finally settled on creams, taupes, and blues that pick up the colors of my vintage handknotted rug. Instead of making all the squares the same color, I swapped two colors for added interest. I hope you like it.
Round 1 – Granny Square Center
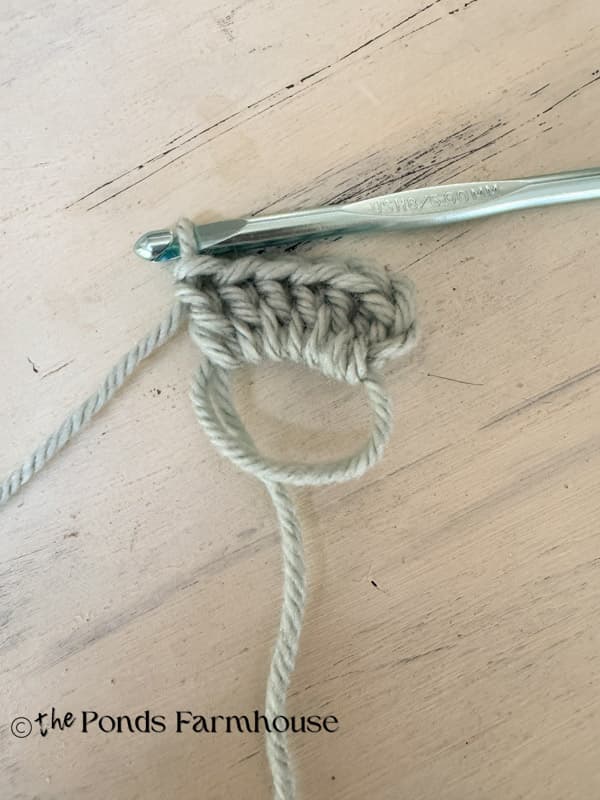
- Begin by forming a Magic Loop or slip loop: wrap the yarn around your fingers to create a loose loop. Insert the crochet hook under the loop and wrap the yarn over the hook. Pull the yarn back through the loop and chain to secure.
- Chain 2, which counts as your first double crochet.
- 15 dc in loop
- Pull the loop tight and sl st to join. Ensure that you have 16 stitches in the round. Tie off and secure the yarn ends by weaving them back through the stitches.
Round 2 – Puff Stitch
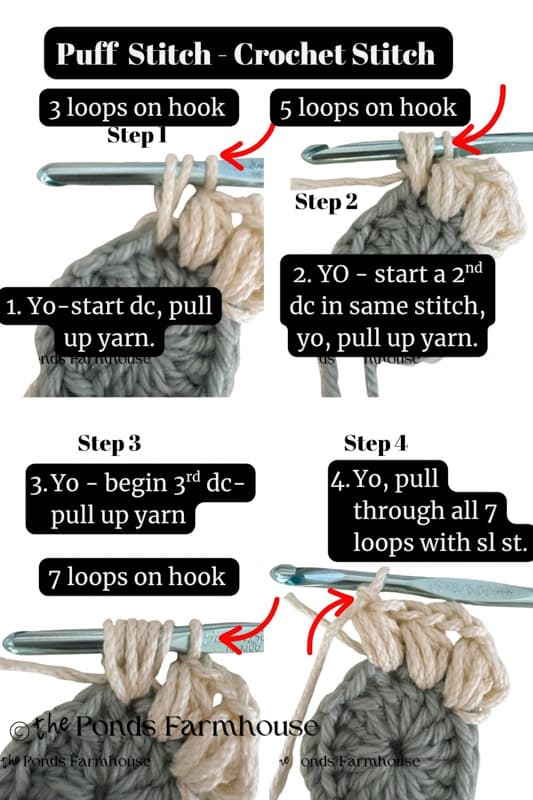
Round 2 –
- Secure a new color of yarn to the dc stitches. Begin at any stitch. Ch 1.
- Puff stitch in the first stitch and then chain 1.
- Repeat until you have 16 puff stitches.
- Sl st to join and tie off yarn. Secure the yarn end by weaving it back through the same color stitches.
Round 3 – Cluster Stitch
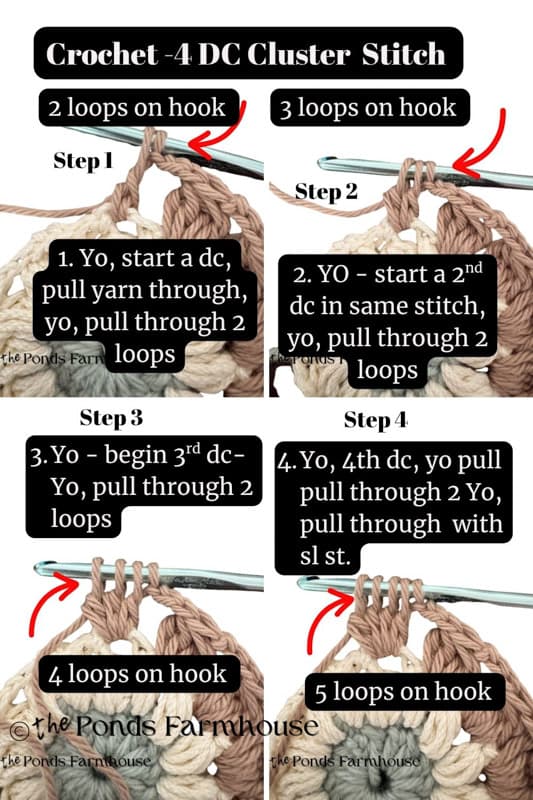
- Join a new color of yarn in any of the ch. 1 spaces.
- Chain 2
- Then work a 4-double crochet cluster stitch in the same space.
- Ch 2
- Repeat working a 4 dc cluster -chain 2 in each space for 16 clusters.
- Sl st to join and tie off yarn. Secure yarn end.
Round 4 – Make the Granny Square – Square
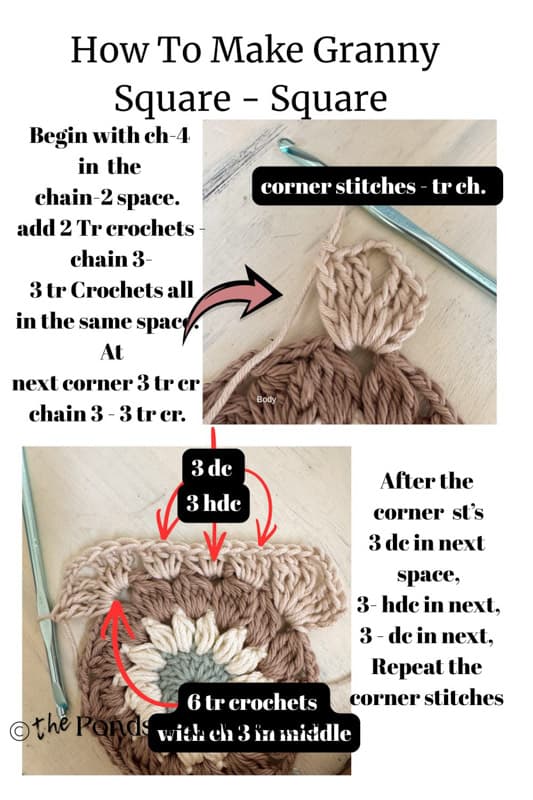
- Creating the square. Join the new color into any of the chain-2 spaces.
- Chain 4 to count as the first Treble crochet.
- Add 2 tr in the same space,
- ch 3, add three more tr in the same space (first corner made).
- *In the next space, add 3 dc
- Next, add 3 hdc
- Next, add 3 dc
- Next, add 3 tr, ch 3, 3 tr in the same space (second corner made)
- Repeat from * – 3 dc, 3 hdc, 3 dc, then (3 tr, ch 3, 3 tr in same space)
- At the last 3 dc, join to the top stitch of the original ch 4 with a sl st.
- Tie off & secure ends.
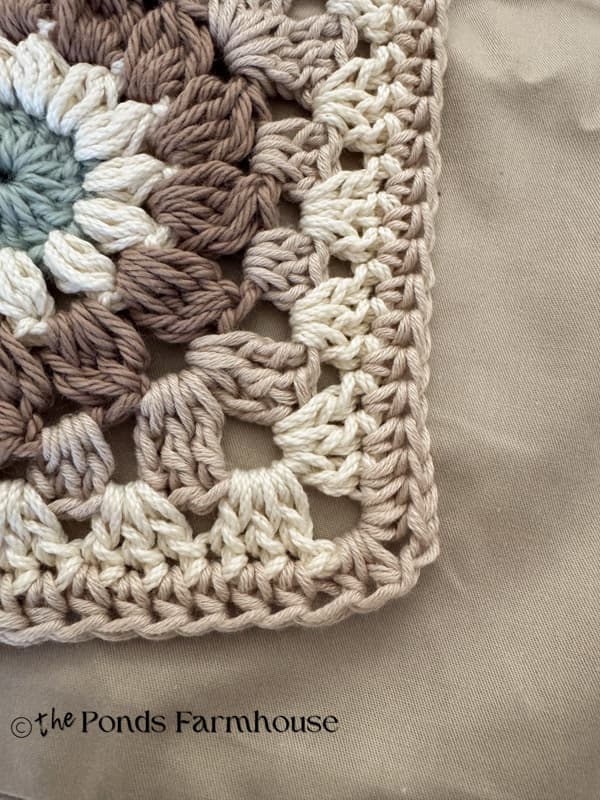
Round 5 – Last Round
- Add new color yarn. Begin at the corner in the ch 3 space. Ch. 3.
- Add 2 dc – ch 2 – 3 dc all the the first space.
- *Add 3 dc in each of the next spaces across.
- When you reach the corner, add 3 dc, chain 2, 3 dc.
- Repeat from * around.
- To join sl st in the top of the first chain 3, tie off. Granny Square is Complete.
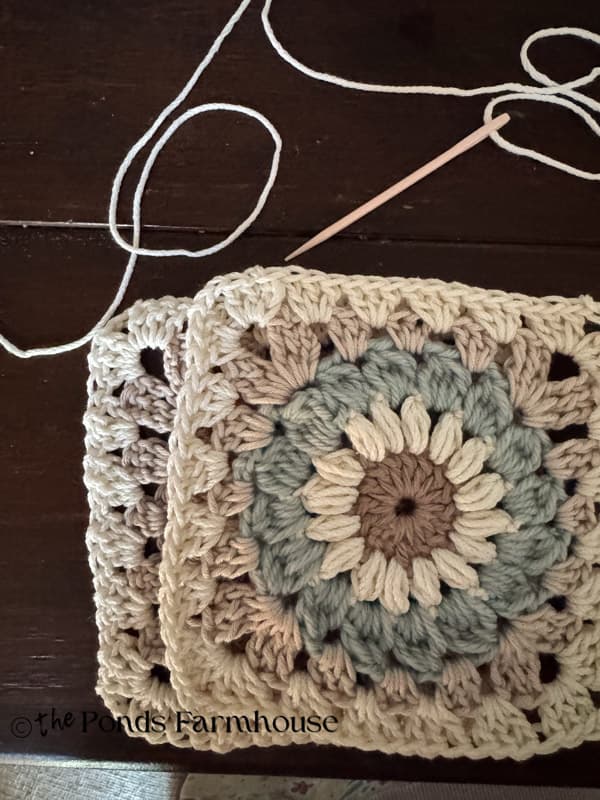
How To Join The Granny Squares To Make A Pillow
First, decide on the pattern you want for your pillow. I recommend laying the squares out on the pillow cover first. Be sure that the right sides are facing up.
I had two different squares, so with 5 of one and 4 of the other, I put the color combination with 5 at the center of my pillow. I then alternated the colors so that no two identical combinations were adjacent. Once you have the pattern arranged, leave it there so you don’t make a mistake when joining.
Prepare to Stitch Squares Together
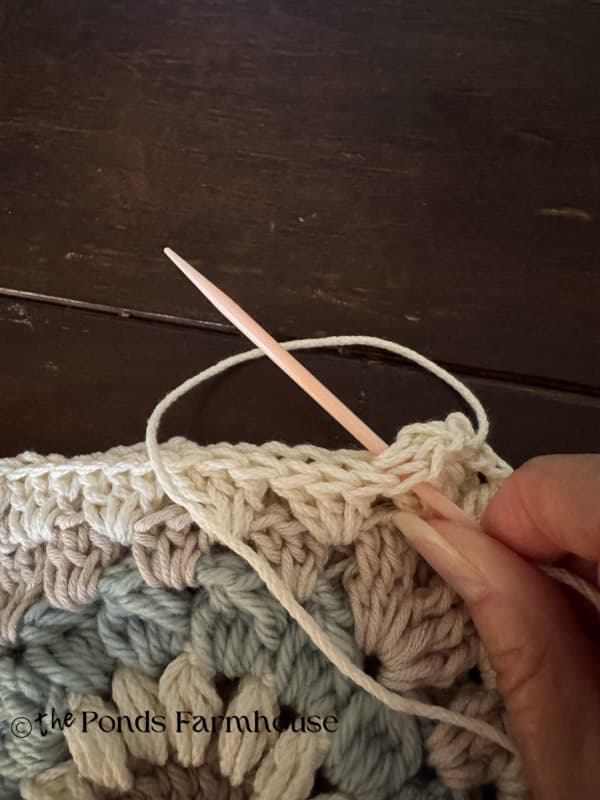
Now you are ready to stitch the squares together. There are many ways to do so. You can use a crochet hook and stitch together with a sl st or sc. I prefer to use a yarn needle and stitch them together with a chain stitch.
Joining Individual Squares
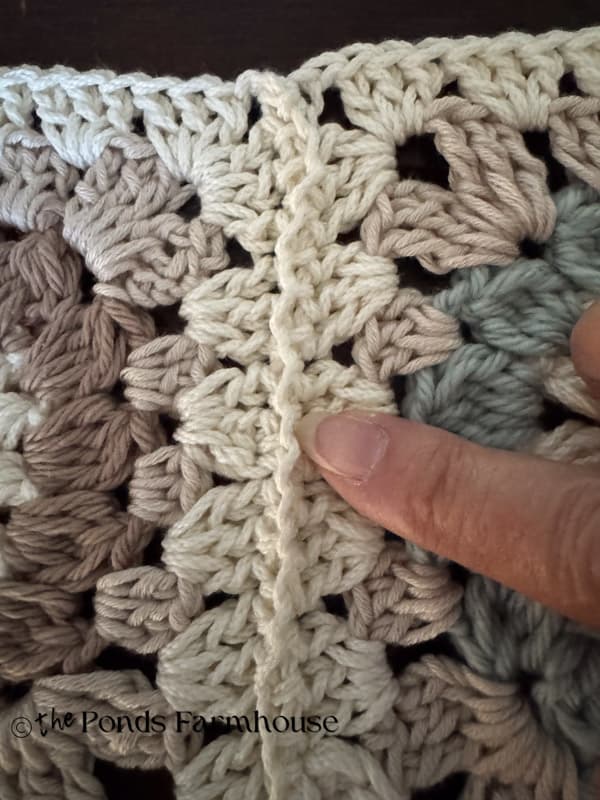
We will begin with one row of squares and stitch them together. Each square is approximately 6 inches long, so load your needle with approximately 18 inches of yarn. You need about triple the length you will be stitching.
Another option you have is whether you want the chain stitch to be visible or hidden. I wanted the stitch exposed, so here’s how I did it.
- Pick up the first two squares in a row. Stack them with the back sides facing together.
- Locate the middle chain of the corner of each of the two squares.
- With your loaded needle, insert it into those two stitches and pull the yarn through to almost the end. Tie the yarn off to secure the two squares together.
- Run another stitch in the same place to begin your chain stitch.
- Pull the yarn over the top of the square to form a circle around the next stitch. Place the needle in both the front and back ajoining stitches, making sure the needle is positioned over the yarn loop.
- Pull the yarn through to tighten and form the first chain stitch.
- Continue to join each stitch across, and finish in the middle of the chain-3 stitch at the next corner.
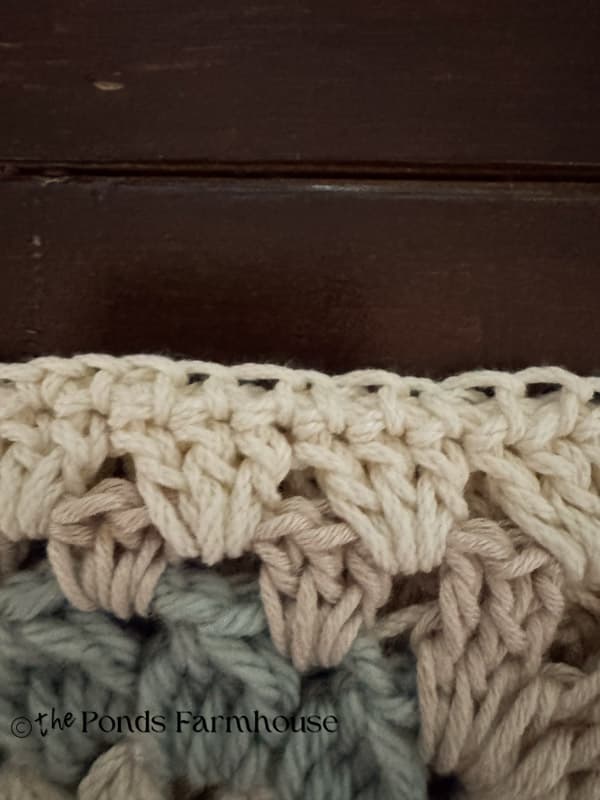
Below is a close-up of the chain stitch, and you can see in the second photo that the stitch is exposed on the top of the squares. It forms a slight zig-zag pattern on the pillow cover. If you prefer the stitch to be hidden, you can place the squares with their top sides facing each other.
Complete by adding the final square to the row. Ensure that you keep your pattern as you attach. Repeat on all three rows.
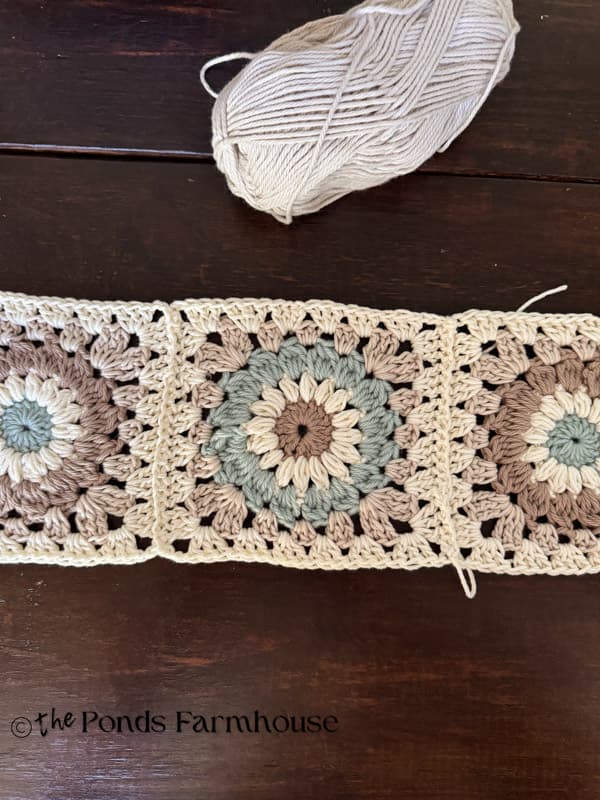
How To Join the Rows of Granny Squares
Next, begin attaching the rows using the same technique. You will need to load your needle with approximately 24 inches of yarn if you don’t want to have to join the yarn on the row.
How To Add A Finish Stitch To The Pillow Cover
Once all the squares are attached, I added one row of half-double crochets around all edges of the pillow cover. This is optional, but I wanted to have an edge so the backside of the cloth pillow cover wouldn’t be visible.
To add the edging.
- Begin a decorative edge by adding a slip stitch in any stitch around the squares, in the yarn color of your choice.
- Chain 2, and add one hdc in each stitch around.
- At the corners, add two hdc, chain 1, two hdc.
- In addition, when you reach the areas where the two squares join, add 2 hdc in each side of the ch spaces.
- Join with a sl st and tie off. Secure the yarn end.
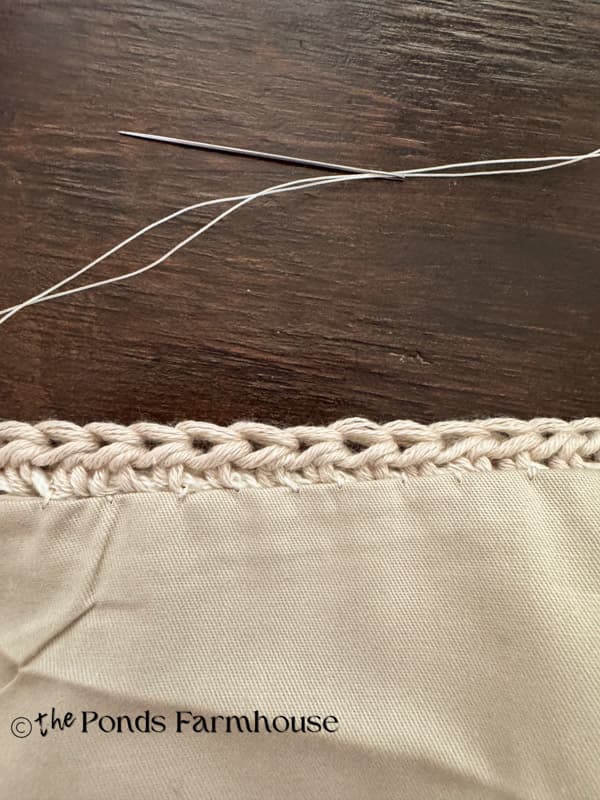
How To Attach Granny Square Pillow Cover To Fabric Pillow Cover.
I chose to use a premade pillow cover as a base for my Granny Square Pillow Cover. Therefore, I just stitched the square to the fabric cover using a heavy-duty upholstery thread and a hand-sewing needle.
I stitched the square over the front of the fabric pillow cover with the decorative edge, hdc exposed, and the zipper still accessible.
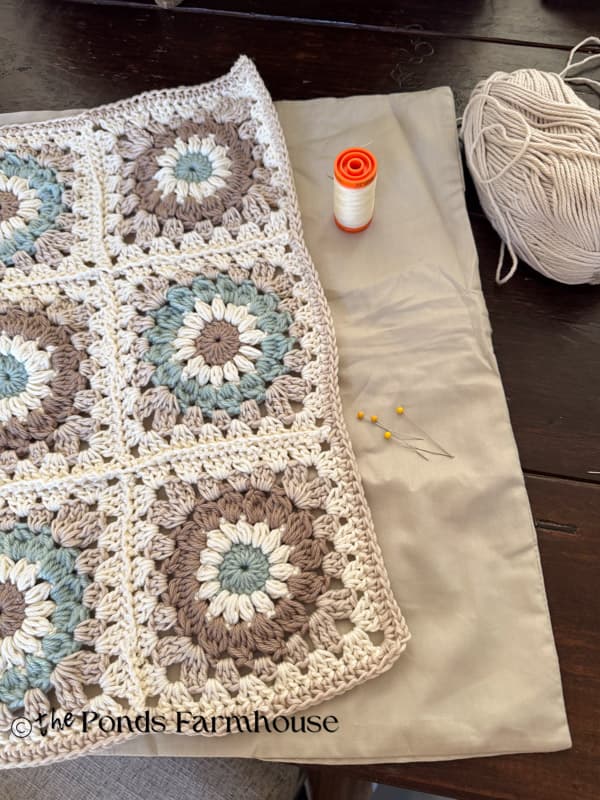
Insider Tip
Be sre to purchase a pillow cover in the correct size (18×18) and in a color that will work with your yarn color choice.
When stitching the fabric pillow cover to the granny squares, use a small stitch that is hardly visible for a more professional and cleaner appearance.
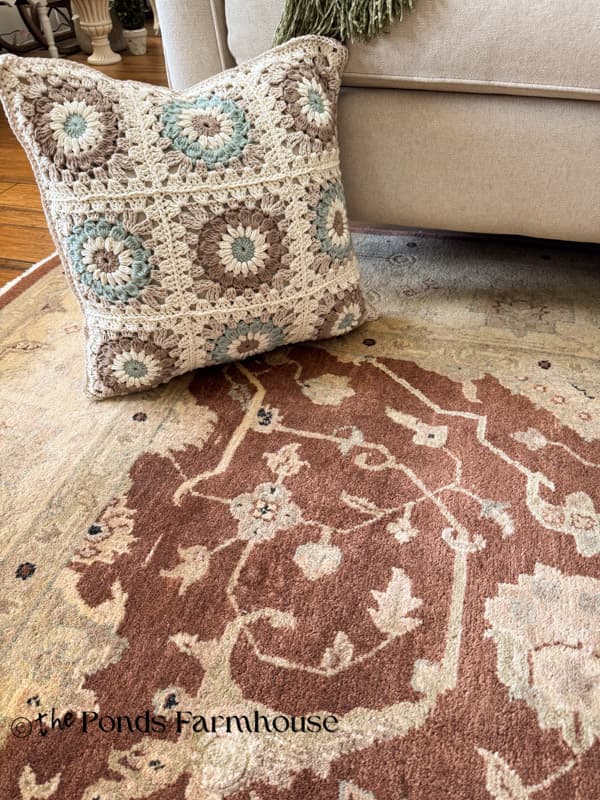
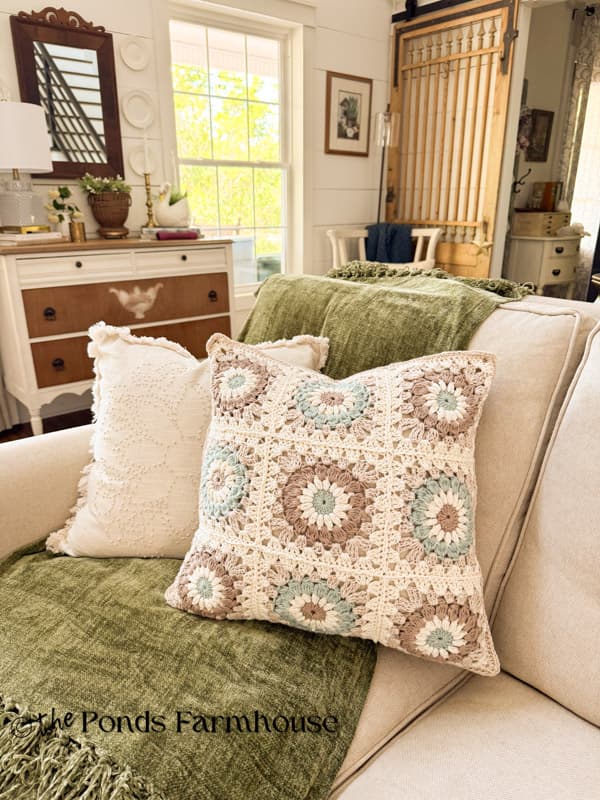
Vintage-Inspired DIY Granny Square Pillow Cover
Now you are ready to add a pillow filler and decorate with your new, vintage-inspired granny-square pillow cover.
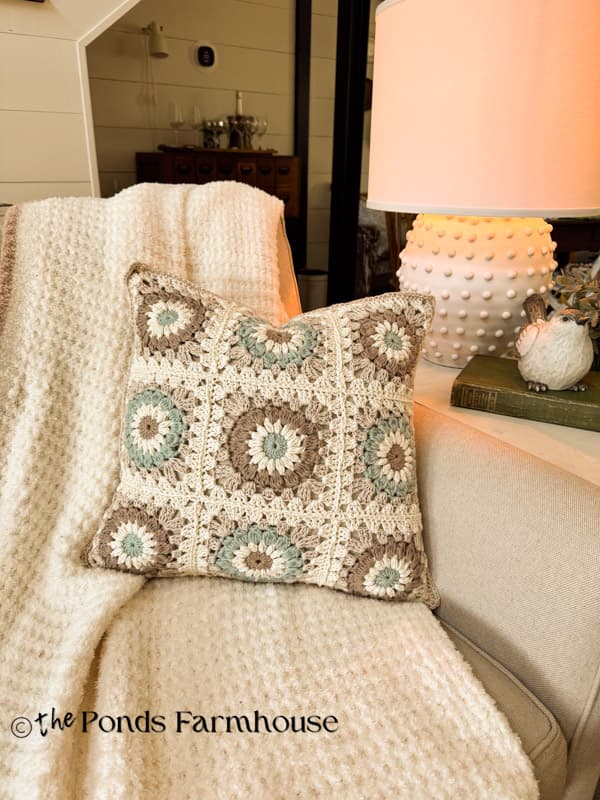
They warm up the sofa with all the cozy, modern heritage feels. The colors and textures really make a statement with a nod to the nostalgic feeling of our “Granny Chic” aesthetic.
The granny square pillow cover complements the DIY candlewick pillow cover we made earlier this year. It feels like we’ve stepped back in time but with a modern twist.
FAQ
Recommended Article
If you are new to crochet, you may want to start with a simple project, read Learn to Crochet In Under An Hour With A Simple Dishcloth Pattern
I hope you enjoyed today’s edition of my “Old School” nostalgic craft series. Please let me know if you have any questions. What colors will you use? I’d love to share your creations. Just send me a message with a photo, and I’ll share your design on my weekly Dirt Road Adventures. Have a blessed day, and I look forward to sharing my next adventure with you.


Looks nice Rachel , I like the colors that you chose.
Teresa,
I’m so glad you like it. Thank you for taking the time to comment and have a blessed week.
This is absolutely beautiful!! Question: I didn’t see it, but do you have how many skeins of each color we need, or is it in the Amazon links we click on? Thank you.
Cheryl,
Thank you for your comment. I’m sorry I didn’t make it clear but I only used one skein of each color to make one pillow. You may need more of the cream color if you make two pillows, but it doesn’t take much of the other colors. I hope you will share your creation with me. Have a blessed week.