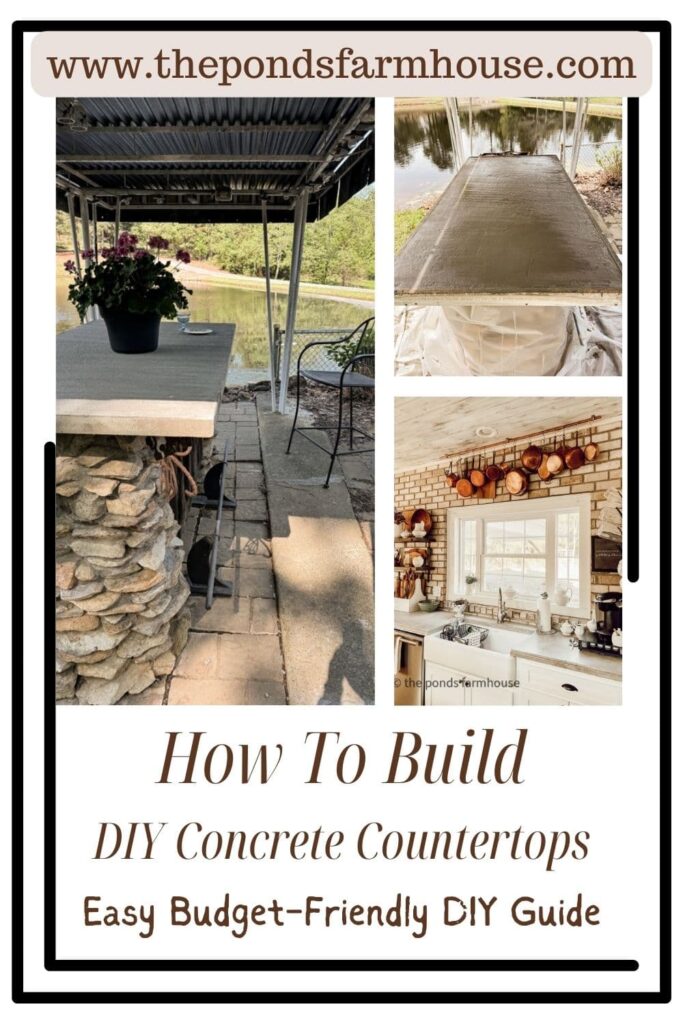
Easy DIY Concrete Countertop Guide: Transform Outdoor Spaces and More
Are you craving a low-maintenance but stylish solution for your outdoor spaces? Have you considered DIY concrete countertops? We love our outdoor spaces, but keeping them clean and in good repair can be a challenge. We have been gradually transforming our outdoor kitchen and bar area with easy and affordable concrete countertops. This easy guide will help you to transform your spaces with a creative solution. Plus, as a bonus, I’ll share the DIY tutorial for the farmhouse countertops.
Our first experience with DIY concrete countertops was while we were building our farmhouse. Brad made several samples for me to choose from. Once I decided to go with the natural color of the concrete, he went to work building the molds and pouring our lovely countertops. Today, we will share two options for pouring your own countertops.
(Posts on The Ponds Farmhouse may contain affiliate links. As an Amazon Associate, I earn from qualifying purchases. See the full disclosure details here.)
Table of contents
What Are The Options For Concrete Countertops?
There are several options for building DIY concrete countertops. Here are a few that you can consider.
- You can build a frame and pour the countertops in place on your cabinets (like today’s guide)
- Build a frame, pour countertops upside down and flip to install. (like our farmhouse countertops)
- Add decorative trim to the inside of frames to add a beveled edge.
- Add stains or paints to the concrete for color options.
- You can add LED lights to the concrete to illuminate it.
- Add stones, crystals, broken bottles, etc., into the mix for a creative countertop.
- Press images into the concrete as it sets up to decorate.
What Are The Benefits of Concrete Countertops for Outdoors.
- Concrete countertops are low-maintenance and can withstand all types of weather.
- Easy to clean. If outdoors, you can hose them off with water.
- Easily customized for your space with a wide range of design styles.
DIY Concrete Countertops: Indoor Kitchen
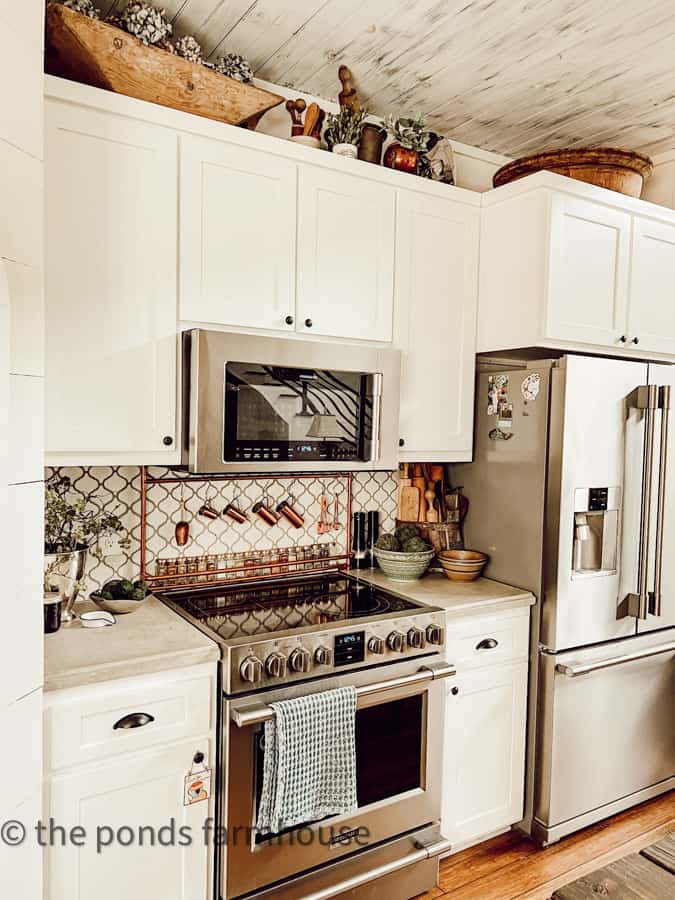
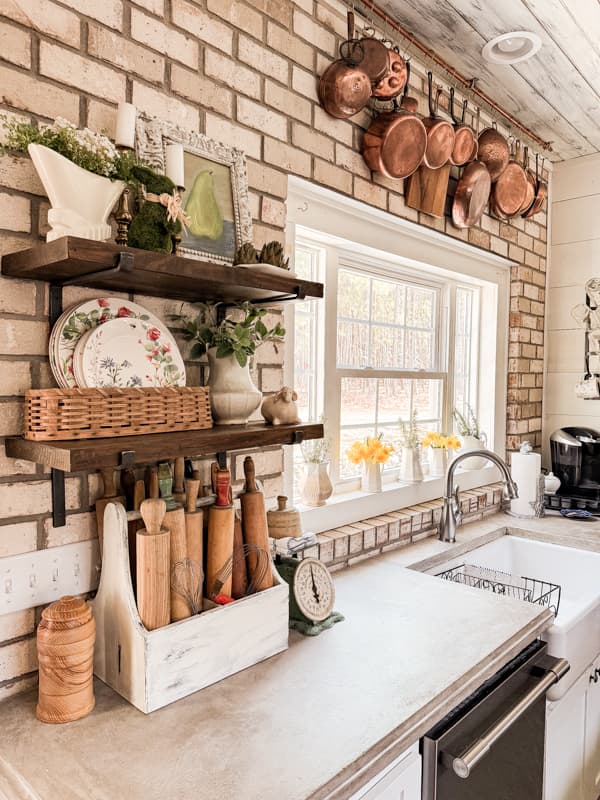
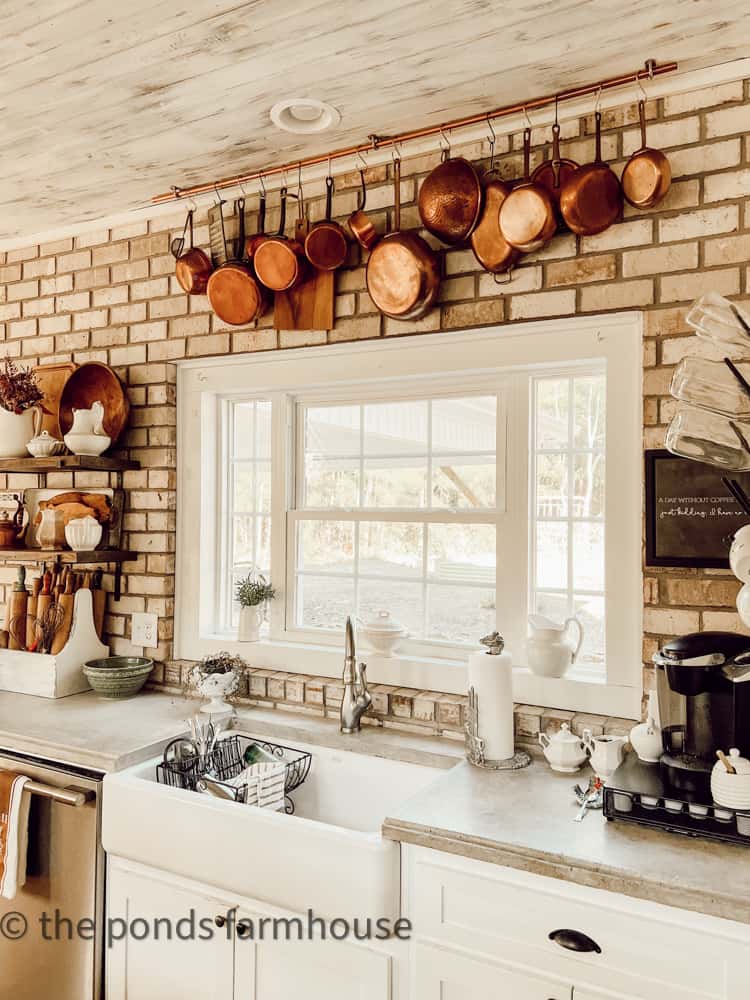
To be honest, we were a little nervous about building our own DIY Countertops. We were looking for a budget-friendly solution and decided to give it a try. The cost was a fraction of what granite or marble would have been. We have been in our farmhouse for almost 8 years, and our countertops still look great. We have no regrets. I’ll share more about the indoor countertops at the end of this article.
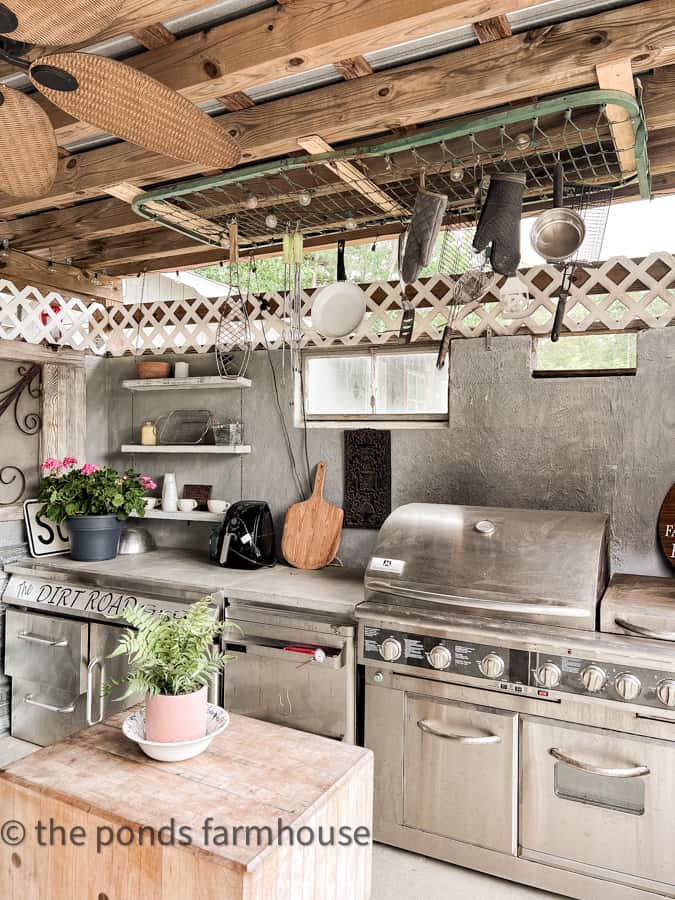
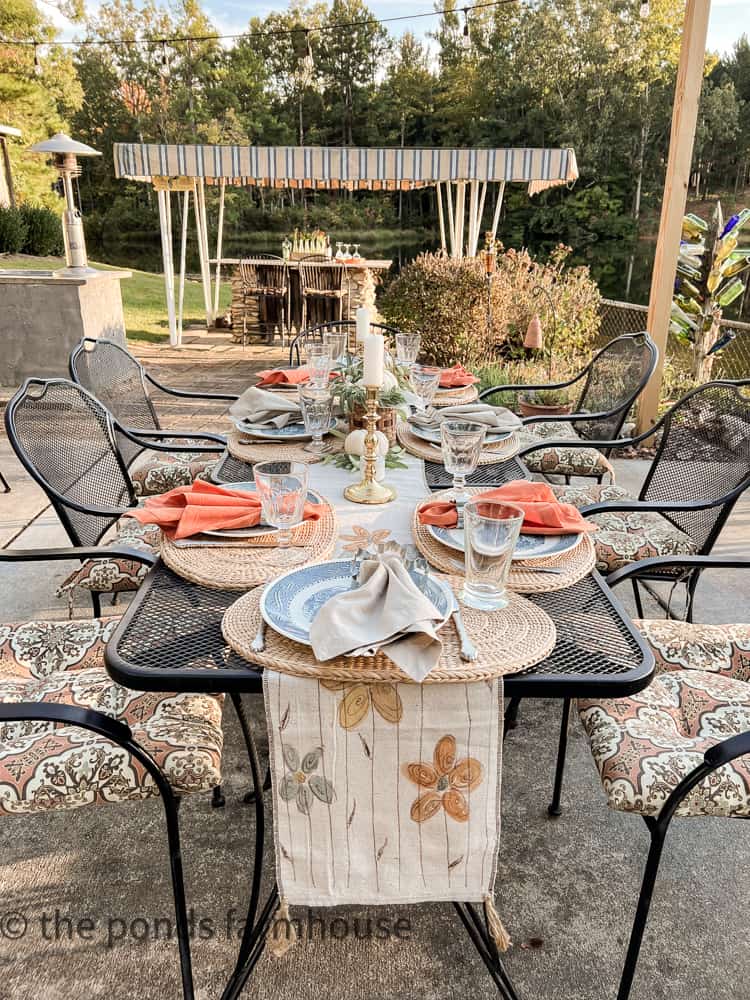
Concrete Countertops for Outdoors
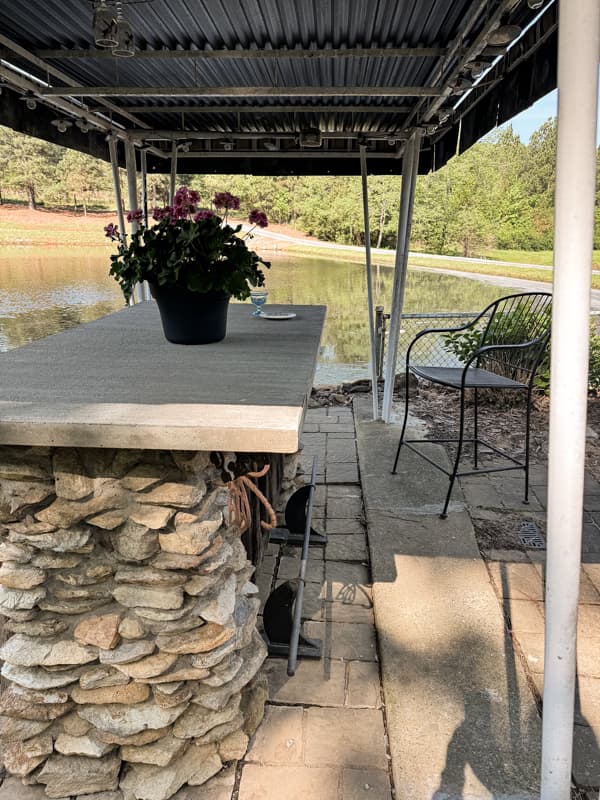
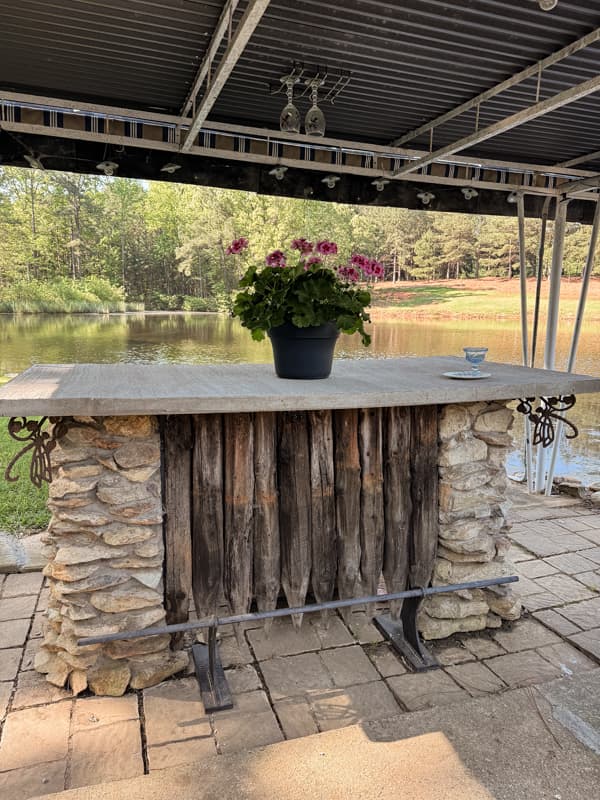
After the success of our indoor kitchen countertops, we began replacing the countertops in our outdoor kitchen. It was easy to make concrete countertops to fit around the grill and smoker.
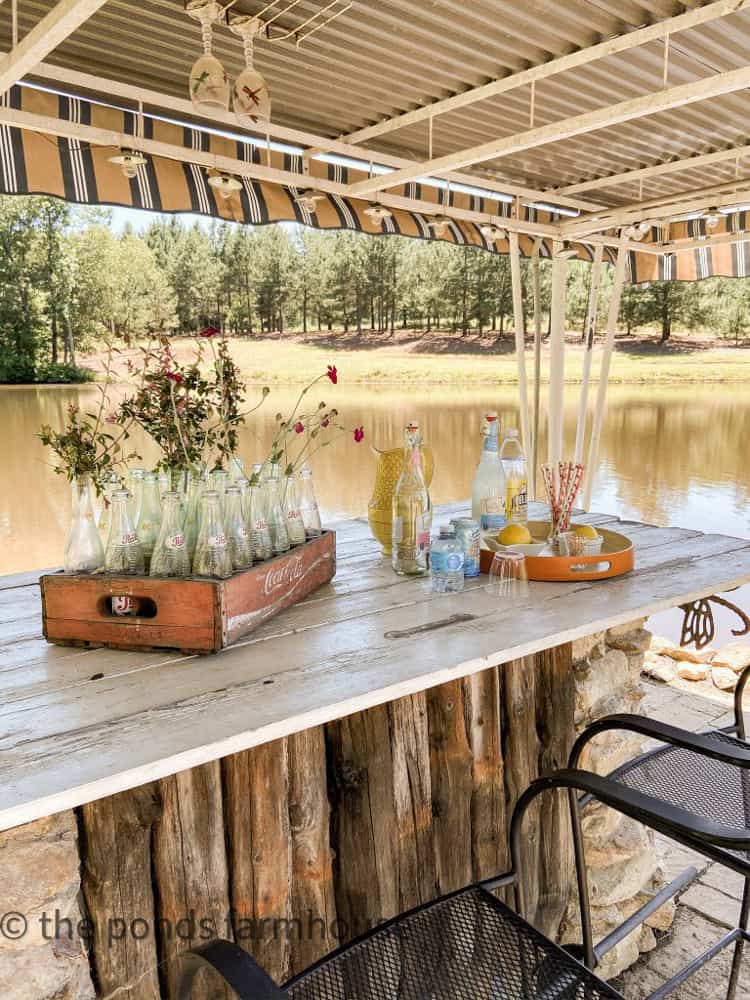
We recently began updating the outdoor bar, and I’ll take you along with a step-by-step guide.
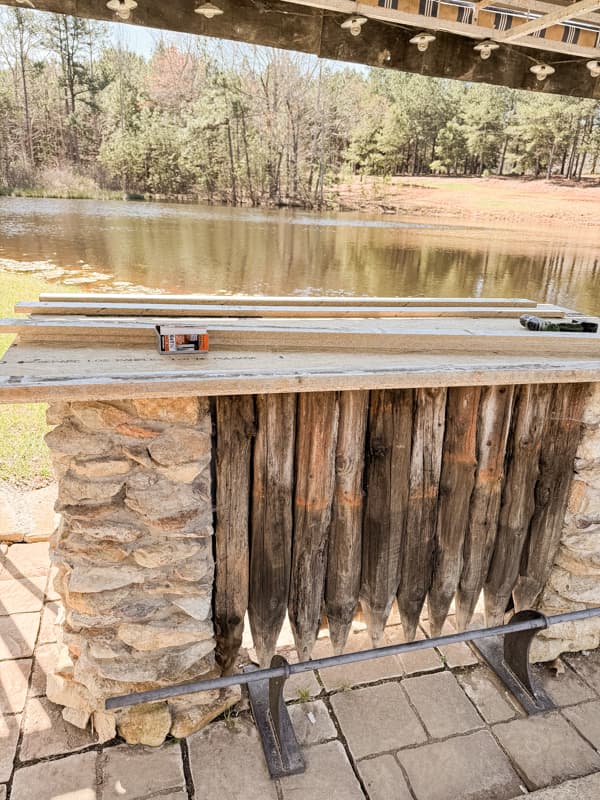
We have struggled to keep the outdoor bar looking nice. The awning is made from Sunbrella fabric, and the color holds up great, but the wind’s wear and tear requires replacing it often. The countertop is wood and hard to keep clean. Here is what the outdoor bar looked like before.
Materials Needed
These are the materials used for the outdoor bar countertop
- Melamine Boards (4×8 boards – the number will depend on countertop size)
- Quikrete
- Outdoor Grade Heavy Duty Plywood (cut to the size of the countertop)
- Caulk
- Screws
- Vegetable Oil
- Rubber Malet
- Level
- 2 x 4 boards ( only if your cabinets need more support to accommodate the extra weight of the countertops)
How To Build DIY Concrete Countertop Edge Forms
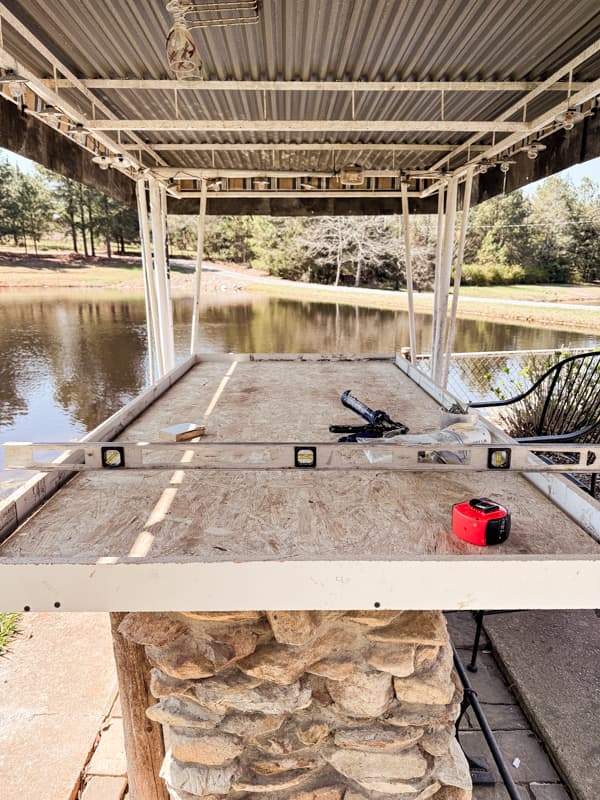
First, you need to cut the outdoor-grade plywood to the size you want for the countertop. Be sure that the plywood is well-supported underneath and level. You can use 2×4 boards to help stabilize the base.
Next, cut your melamine boards to create edge forms. You will need enough to surround the exposed countertop and enough to create a trough around the edge of the top. All these boards are cut 3-inches wide.
You may be asking about the trough around the edge of the top. If you don’t allow for the trough, the edge of the plywood will be visible around the exposed edges of your countertop. The trough will allow concrete to fill in around the edges for a smooth concrete surface on the exposed edges.
Begin by attaching a 3-inch melamine board underneath the plywood to extend out and form a 1-inch wide trough for the concrete to fill. Use screws to attach from underneath the plywood and allow 1-inch to extend out beyond the plywood. Then using screws, attach the form edge boards to the trough board. See the images below.
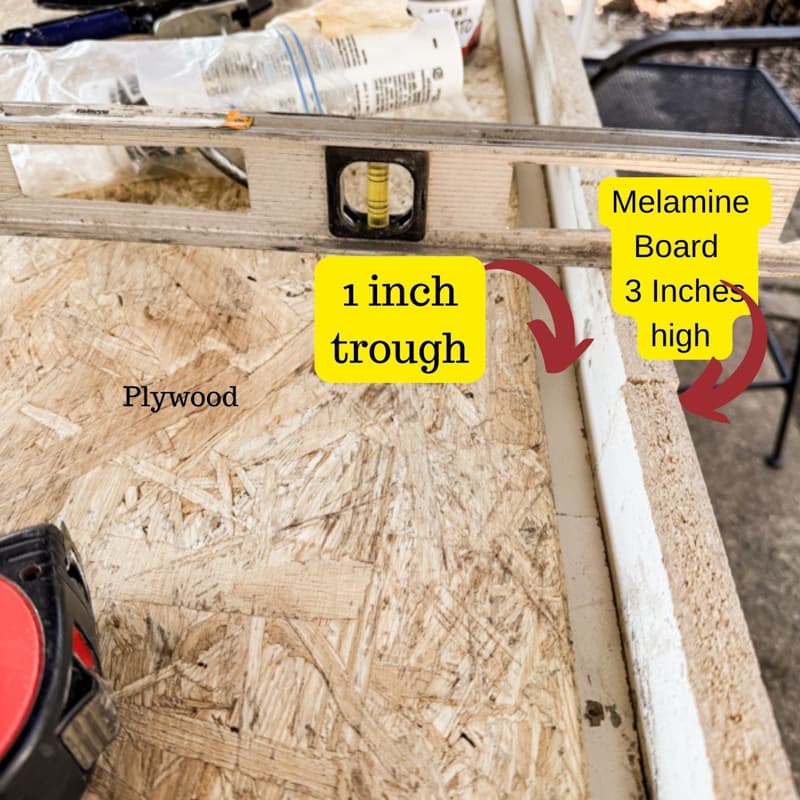
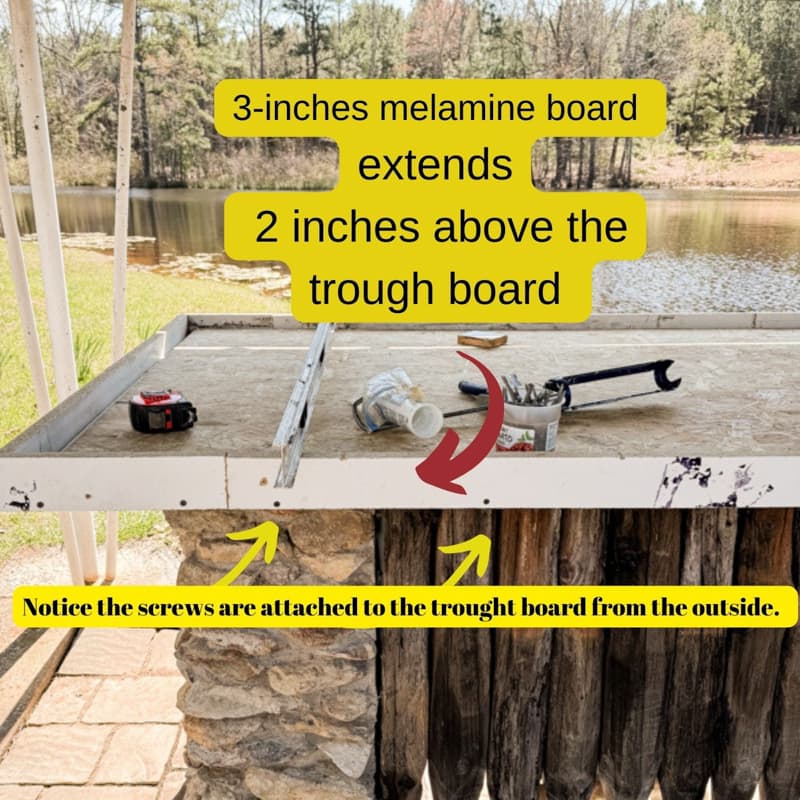
Be sure that all boards are level and use screws to attach, as these boards will be removed once concrete is set.
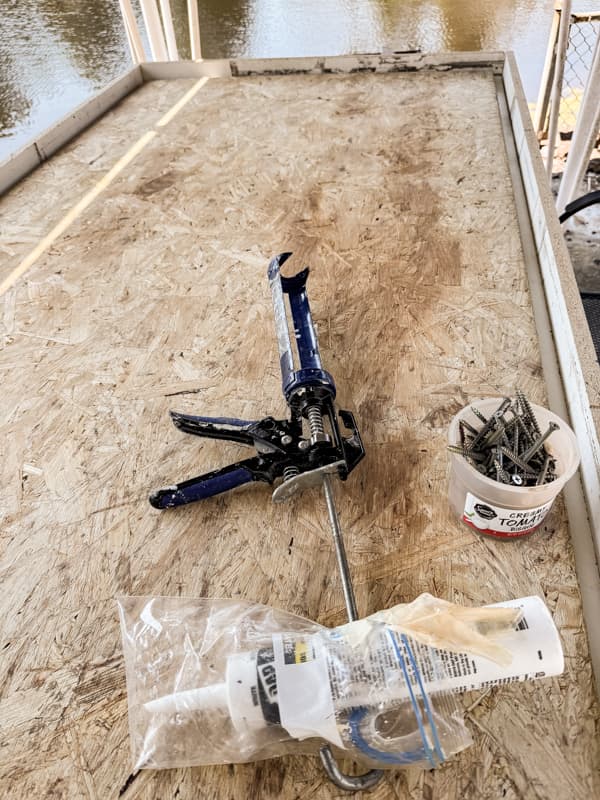
Seal All Seams
Next, you will want to use caulk to seal the inside seams around the melamine boards. Remove as much excess caulk as possible. Allow the caulk to dry for approximately 30 minutes.
Then, use cooking oil to rub over the inside edges of the melamine boards. Wipe away any excess oil with a paper towel.
How To Pour the DIY Concrete Countertops
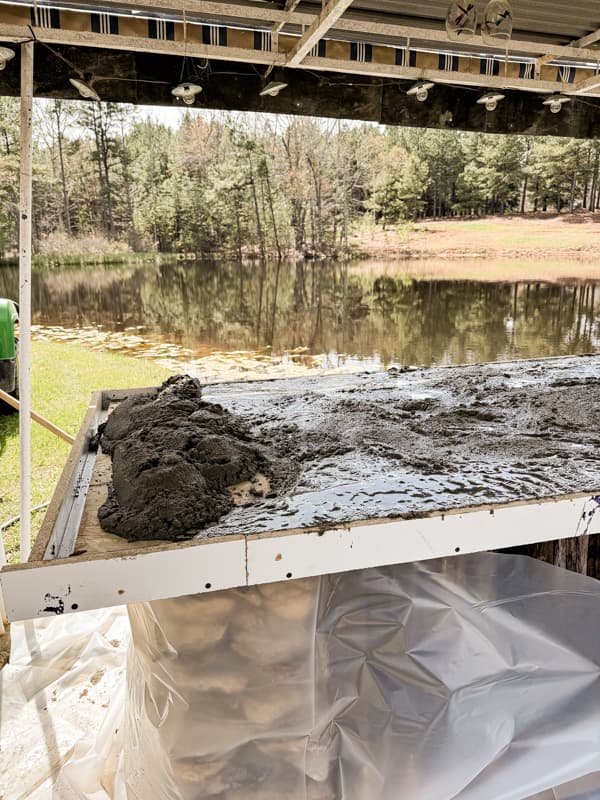
Now, you are ready to pour the DIY concrete countertops. First, cover the floor or cabinet beneath the countertop with plastic to protect it from the concrete.
Mix your quikrete according to directions. You can use a concrete mixer or, for small jobs, mix a bag at a time in a concrete mixing trough. Use a shovel or hoe to mix thoroughly.
Pour the concrete into the prepared form and begin smoothing the top. As the concrete settles, you will want to overfill the form slightly. Use a 2×4 board or something similar to glide across the top and smooth. Water will begin to rise to the top.
Note: This is where the protective plastic will be important, as this step is messy.
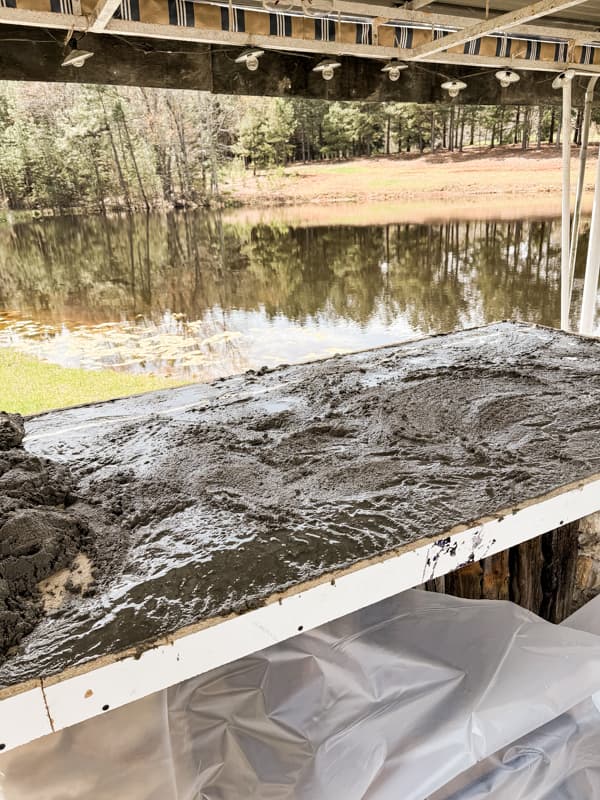
Continue to smooth and remove excess concrete and water as you go. You can use a trowel to fine-tune your top. Once the top is smooth and level, use the rubber mallet to tap the underside of the form gently. You will see air bubbles as you tap against the form. This process requires a little patience, as you want to continue until you no longer see air bubbles.
Note: Do not tap the DIY concrete countertop edge forms, as they could break loose.
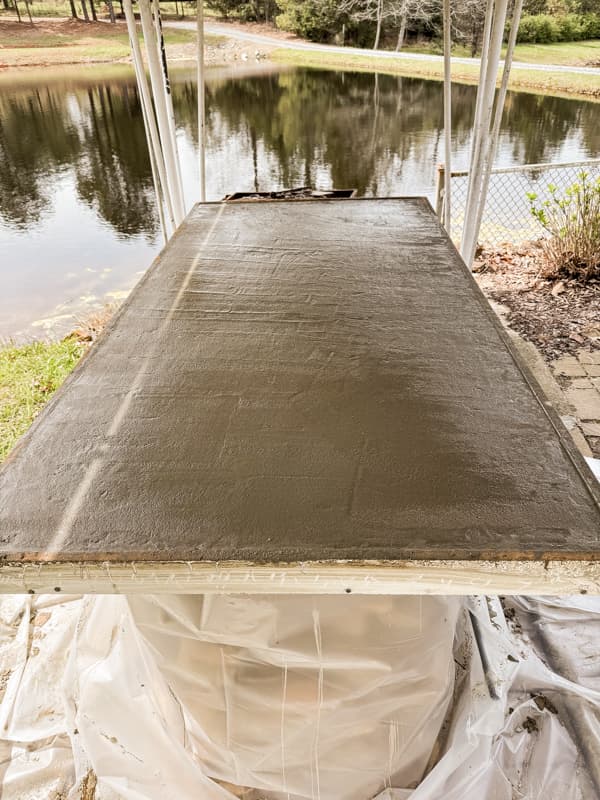
Allow the DIY concrete countertop to set for a minimum of three days before removing the edge forms.
Remove the screws and forms to reveal your new countertop.
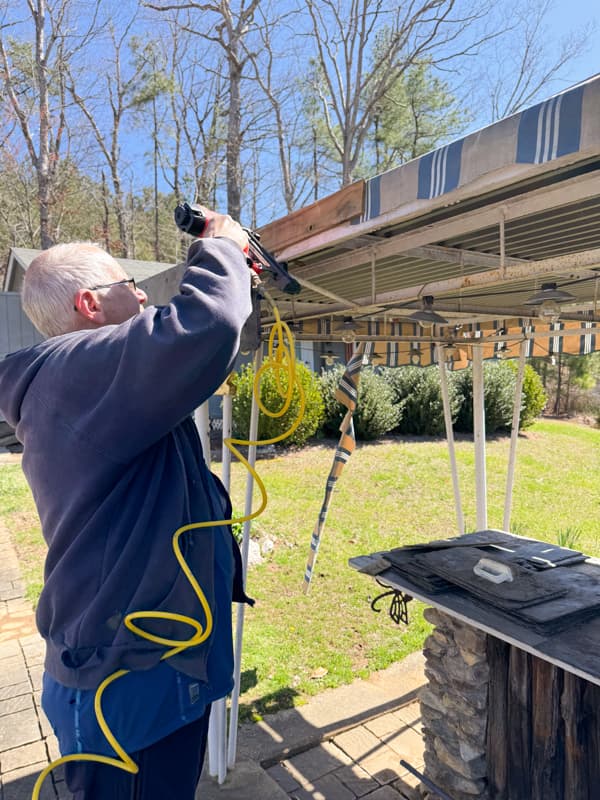
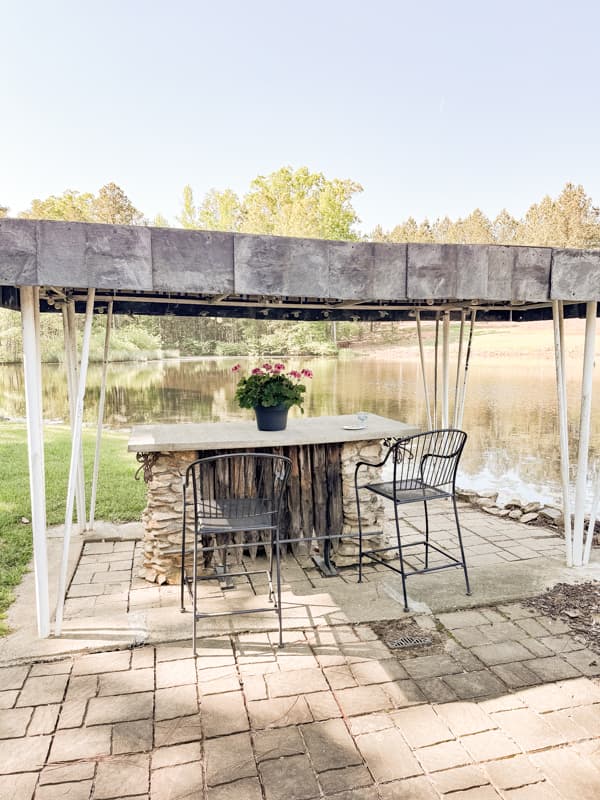
Replace The Outdoor Bar Awning
Another low-maintenance idea was to replace the bar awning with reclaimed slate roofing shingles. Since we were replacing the fabric awning approximately every two years, a more permanent solution was needed.
Brad was able to use the original frame and attach the slate shingles with wood screws. The slate works well with the new concrete bar top.
How To Pour Indoor Kitchen Concrete Countertops
Although I don’t have in-process photos of our indoor kitchen countertops, I wanted to share how easy they were to build.
First, these were poured upside down and flipped to install.
Insider Tip
When building concrete countertops that need to be flipped, consider the size of your project. The bar countertop is very large and would require several strong people to flip it.
This is our preferred method for building countertops if you are working with smaller pieces, as the top will be much smoother.
Supplies for Indoor Kitchen DIY Countertops
- Melamine Boards (4×8 boards – the number will depend on countertop size)
- Quikrete
- Caulk
- Screws
- Vegetable Oil
- Rubber Malet
- Level
- 1/4 round molding (optional)
The biggest difference is that you will use a sheet of melamine board for the bottom and sides of the edge forms. The top of your countertop will be against the smooth melamine board.
Build your frame to the exact size you want your countertop. If you’d like a decorative edge, you can attach the 1/4 round molding to the inside of the frame.
Follow the previous instructions for sealing the inside of the frame with caulk and oil. Remove any excess oil.
Place the frames on a level surface and fill them with concrete. Smooth and tap with mallet.
After drying for several days, remove the frames and flip the concrete over to install.
The area you see in the image below is three separate pieces. The seams are filled with concrete caulk sealer. Brad included the hole for the faucet with a piece of pipe while pouring the concrete.
Insider Tip
For indoor kitchen use, I recommend sealing with a food-grade clear sealer. Apply thin coats of sealer over a few weeks. I applied with a foam roller and allowed at least one week of cure time before applying a second coat. As a precaution, I apply another fresh coat of sealer about once a year.
The sealer has not peeled, and the DIY concrete countertops look as good as they did on installation day.
I hope today’s DIY Concrete Countertop Tutorial encouraged you to build your own maintenance-free outdoor spaces. If you have any questions, please don’t hesitate to ask.
Related Articles
- DIY Outdoor Kitchen Incredible Before and After
- Free Outdoor Bird Deterrent Device
- How To Build A Shabby Chic Cabinet With Reclaimed Windows
- Amazing Recycled Metal Utensil Holder for Outdoor Kitchen
Thanks for stopping by, and I look forward to sharing my next adventure with you.

Pin It To Remember It
Did you find some great ideas you’d like to save for future reference? To save, hover over the images and pin to your favorite Pinterest Boards when you see the PIN button in the upper left-hand corner.


We have a concrete countertop in our master bathroom. I LOVE it, but I will say I have struggled trying to find the right sealer. Could you share that information?
Lynda,
I ordered mine online from Faux Effects. I’ve been very happy with it. It’s called C-500 in a satin finish. It’s pricey but works so well. Here’s a link if you’d like to check it out. https://www.fauxstore.com/ProductInfo/GL-C500-1-SATIN.aspx
Love how this guide makes DIY concrete countertops approachable—perfect for adding a modern touch to any space!
Thank you for your kind comments.