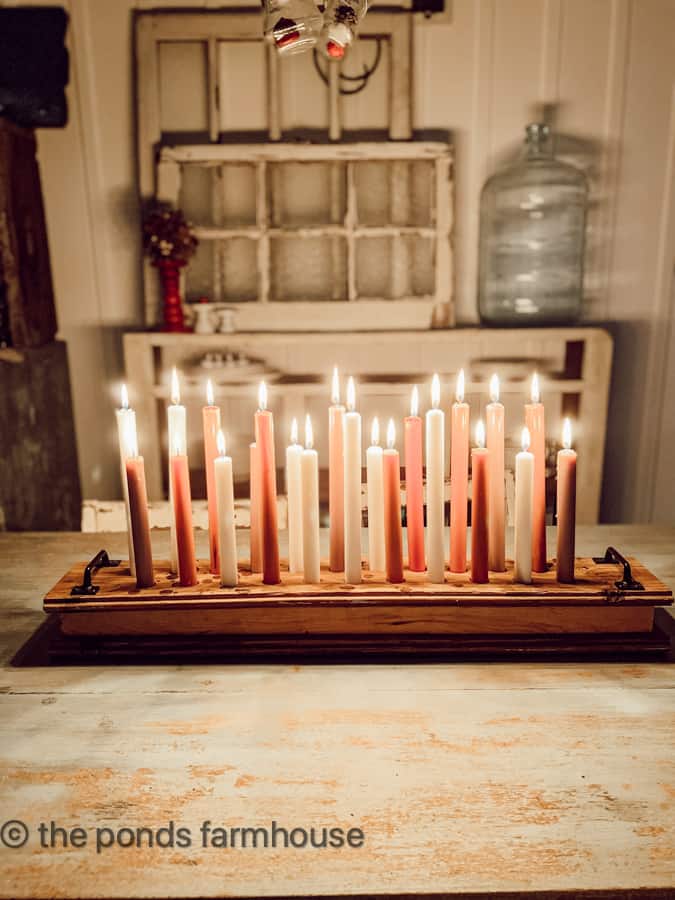
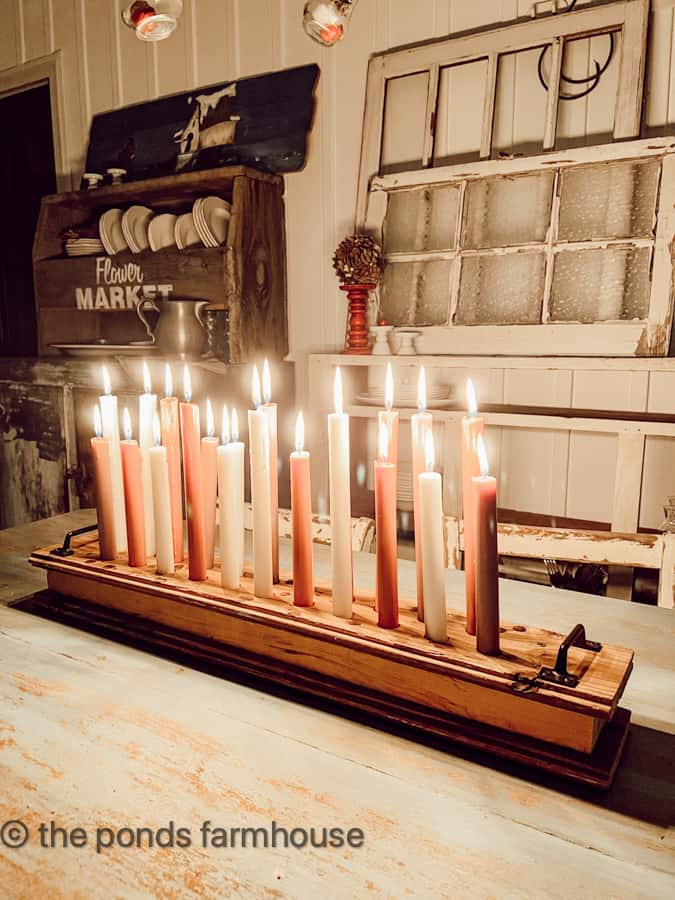
Easy DIY Reclaimed Wood Centerpiece: 22 Taper Candle Holder.
If you want to add a rustic, cozy atmosphere to your dining table, this budget-friendly DIY taper candle holder is the perfect solution. This dramatic 22-candle centerpiece is made from reclaimed wood, making it both eco-friendly and beautiful. After spotting stunning multi-candle displays on Pinterest, I knew I had to create a version that was both affordable and easy to build. The best part? This project takes only minutes to assemble. Below, I’ll share the exact steps and spacing tips to help you create this statement piece for your home.

(Posts on The Ponds Farmhouse may contain affiliate links. As an Amazon Associate, I earn from qualifying purchases. See the full disclosure details here.)
Multi-Candle Centerpiece Materials: Why Use Reclaimed Wood
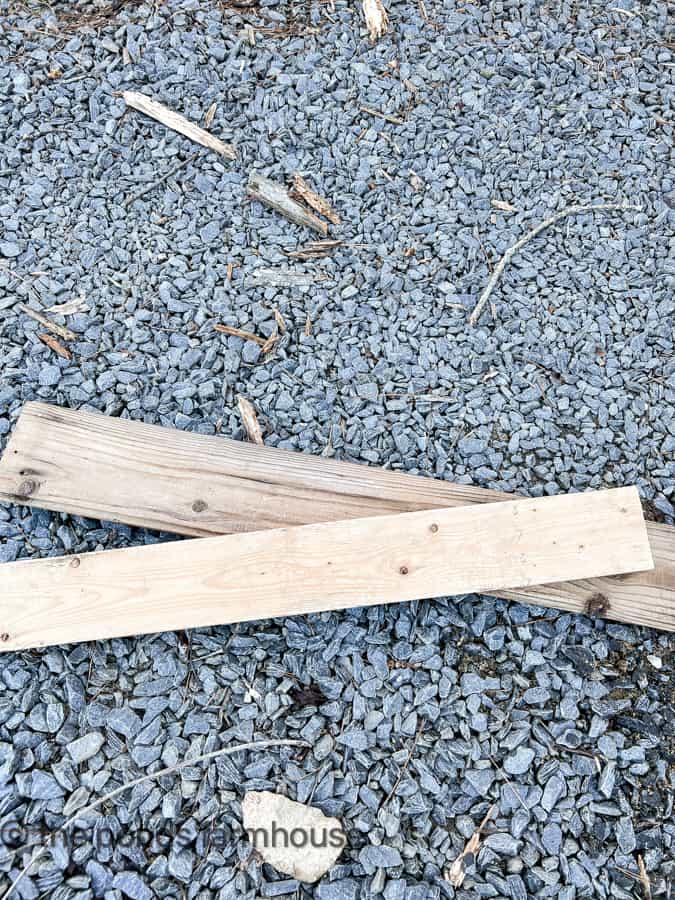
I’m always looking for ways to upcycle scrap wood that we have left over from other projects. I found these reclaimed pieces of wood in my stash and knew the old wood would help to add character to the piece. In addition, using reclaimed materials is cost-effective and eco-friendly. This sustainable DIY decor project is one you will use for years to come.
New Wood Option
If you don’t have access to old wood, you can make this project with new wood. New wood will not have the character of old wood, but never fear: there are techniques to help you give it the appearance of aged wood. You can read “How to Make New Wood Look Like Old Barn Wood” for all the tips. If you use this technique, allow for drying time before beginning the project.
Supply List
- 1 – 2×4 Board 28″ Long
- 2 – Tongue in Groove Boards 29 ” long
- 2 – Metal Drawer Pull Handles
- 6 – Wood Screws 2″ long
- 7/8 inch drill bit (check the size of your taper candles but this is standard)
- Cordless Drill
- Rotary Tool
- Miter Saw (Optional)
- Optional Candles
- Copper Candles – 10 inch
- White Candles -12 inch
- Gray Candles – 10 inch
- Battery-operated Flameless Candles
How To Prepare Wood
First, trim your boards to the size you want your candle holder to be. I used two boards for my candle centerpiece. One reclaimed 2×4 board was exactly the length I needed at 28 inches. The second tongue-and-groove board was long enough to cut into two pieces with a miter saw. The finished two boards are 29 inches long.

How To Attach Boards for a Candle Holder
First, please align the boards by ensuring they are evenly spaced around the edges. The 2 x 4 is smaller than the tongue-and-groove boards, so I positioned it in the center of the upper and lower boards.
We began by attaching the bottom board to the 2×4 board with 2 wood screws. Counter sink the screws to keep the bottom level. Then we added four screws to attach the top board. I recommend drilling small pilot holes for the screws to avoid splitting the wood.
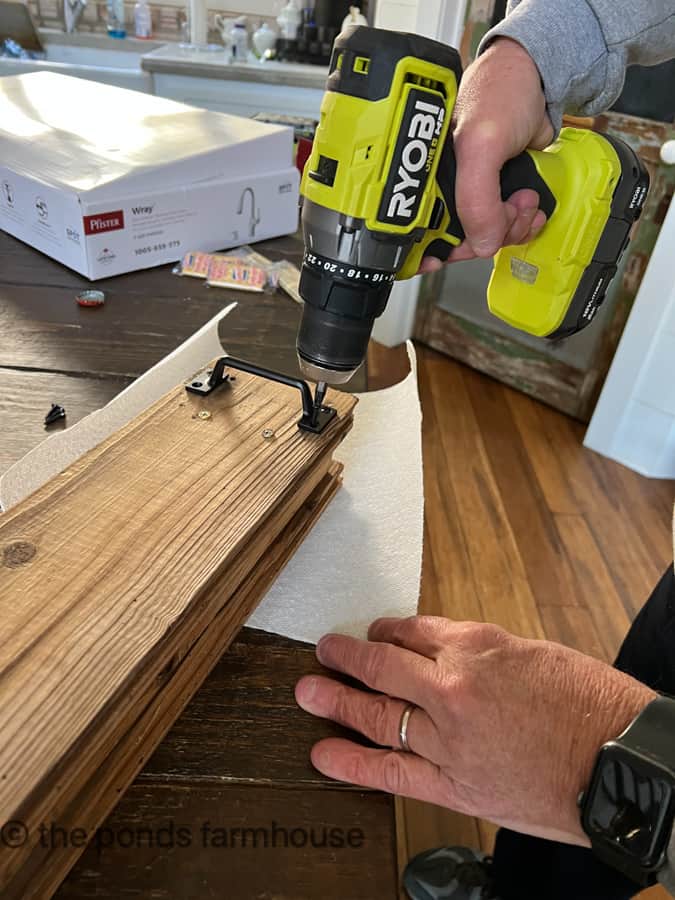
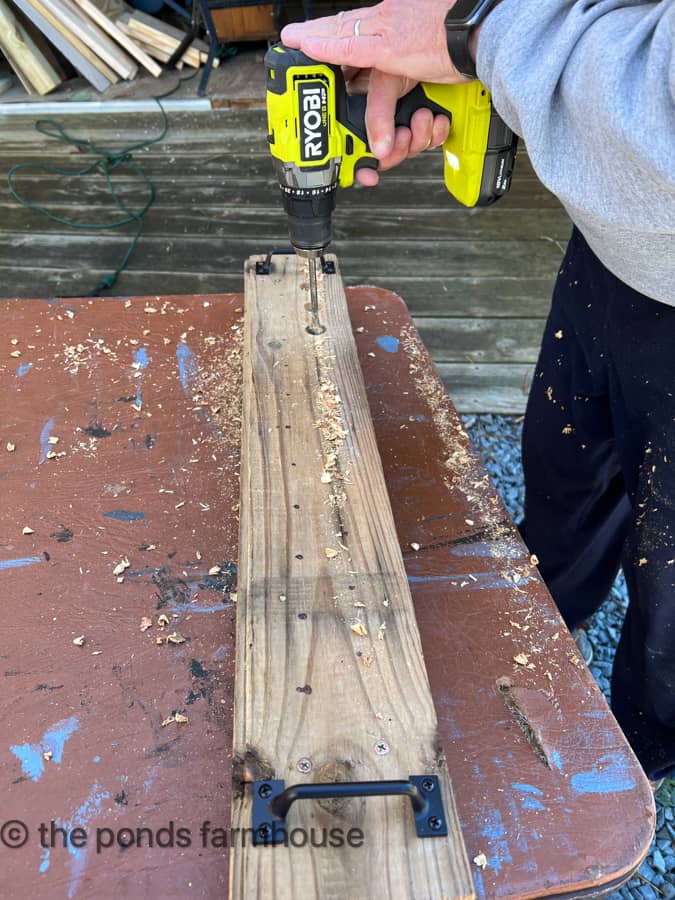
Optional – Attach Handles
I decided to add a couple of drawer pulls to each end of the boards for easier carrying. The handles are optional, but if you plan to add them, begin with pilot holes and then use the screws provided with the handles to attach.
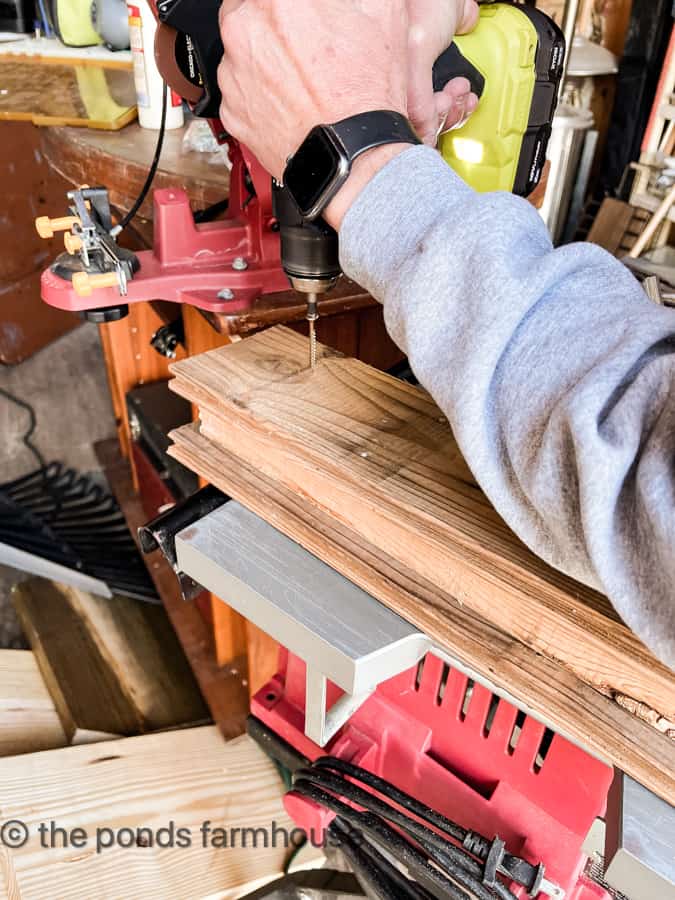
Measuring and Drilling Candle Holes
First, determine how many candles you want in your centerpiece, then draw your pattern on the top of your centerpiece board using a ruler or tape measure. My pattern included 22 holes. If you want a perfectly spaced pattern, I recommend drawing a template on paper to use as a guide.
I placed each candle hole approximately 1 inch apart, forming two rows. I staggered the front row from the back so that the candles would all be visible from the front.
We used a 7/8-inch drill bit; however, double-check the candles you plan to use for size. Mark each hole with a pencil so you can see it clearly on the board. Drill each hole approximately 1 inch deep.
Insider Tip
If you are using a handheld drill, you want to ensure that each hole is the same depth. The best way to ensure the depth to mark your drill bit at the exact depth. You can add a pieces of tape to mark the spot. You can also use a drill press for this step and set the depth before beginning.
You will need to smooth the edges of each drilled hole. You can use sandpaper. I used my Ryobi Cordless Rotary Tool to quickly smooth each candle hole.

Candles for the Centerpiece
Although all my wood supplies were free, adding candles was a different story. The DIY multi-candle holder has 22 candles. I used three different colors of candles and two lengths to make the centerpiece more interesting.
I used a combination of 8- and 10 inch candles in white, grey, and copper candles.
Candle Options
I have also used the candle holder with battery-operated taper candles. This is a safe alternative for creating a stunning centerpiece.
They look beautiful on the table at night and add a warm, cozy glow to the screened porch. I’m glad I added the handles because they allow the candle centerpiece to be moved easily off the table.
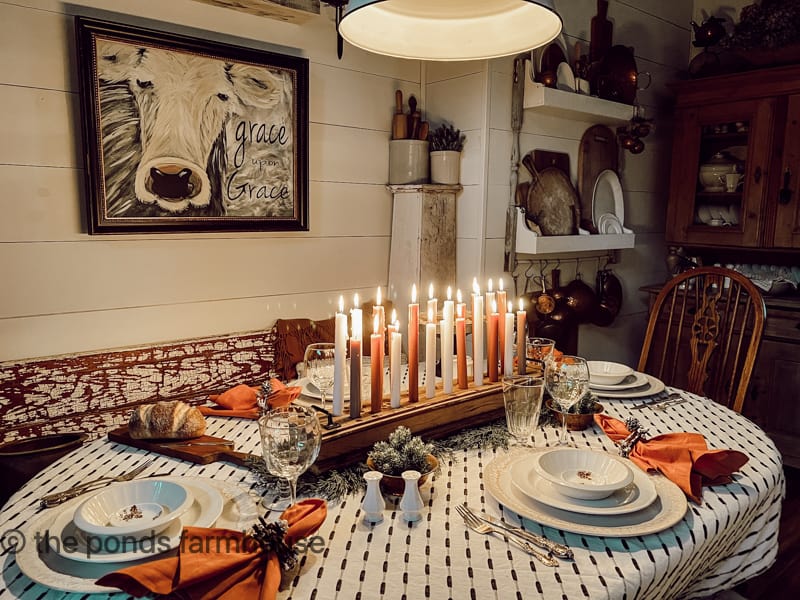
Styling Ideas for 22 Candle Holder Centerpiece
In addition to our screen porch table, the multi-candleholder centerpiece is perfect for our dining table.
Combined with these DIY Twig Napkin Rings, neutral dishes, and a tablecloth, it was easy to create a Cozy Winter Tablescape.
I’ve moved the centerpiece to several areas of the farmhouse to add a warm, cozy feel to each room.
Other Styling Ideas for Candle Centerpiece
The candle centerpiece is perfect for all seasons. Here are some seasonal ideas for using the candle holder.
- Red and white candles for Valentine’s Day
- Pastel Candles with Greenery wrapped around the holder for Easter
- Add red and green, with a mix of greenery or berries, for Christmas.
In addition, this centerpiece would be stunning for Weddings, Bridal Showers, and anniversary celebrations.
FAQ
Thanks so much for stopping by today. I look forward to sharing my next adventure with you.

Pin It To Remember It
Did you find some great ideas you’d like to save for future reference? Hover over the images you’d like to save and pin to your favorite Pinterest Boards when you see the PIN button.


L O V E your version of the multi-candle holder! Thanks so much, Rachel.
Oh I’m so glad Dori. Thanks so much for stopping by.
Love it! It really does look pry at night thanks for sharing
Margie,
Thanks for you kind words.
I love the centerpiece!!! It’s super cozy!
Stacy,
I really appreciate this.
Everything you do is charming.
Diana,
You are so kind and your encouragement means a lot to me.
Rachel, what a great tutorial. I like this because you can customize the length and the candle height and color for a seasonal touch. Thanks for sharing!
Mary,
I’m so glad you like this. I’ve been wanting one for some time.
What a beautiful project! I love that you added handles and can use different colored candles for different seasons and occasions. Using old wood is so much fun!
Lora,
Thanks so much for including my centerpiece.
This is lovely. Just changing candle colors makes it so versatile. Great job!
Regina,
Thanks so much sweetie.
Thanks so much for sharing Stacy.
This is such a great DIY idea Rachel. Love it!
Kim
Thanks so much.
Hi Rachel, I love your version and love that it has handles!
Corine,
Thanks for your kind words of encouragement.
Popping back in to say I love this so much I’m featuring it on Farmhouse Friday! Thank you for sharing it with us and hope you link up again. I always love what you add.
I appreciate this so much.
Cindy,
Thanks so much for sharing my Candle Centerpiece.
This project is gorgeous. I love it and Pinned!
Cindy,
I’m so glad you like it.
I absolutely adore everything about your candle centerpiece! You always come up with the best ideas, Rachel. pinned
Marie,
I appreciate this so much. I’m so glad you like it.
What a great project! I’ve got to do this!
You will love it. So easy and beautiful.
I love this project!!! Great step by steps too.
Jennifer,
Thanks so much.
That is awesome, so pretty! And the candles make it even better! I showed this to my husband and he said he would make me one!! Thank you for sharing.
Laurie,
I’m so glad you like this. It’s such a unique look. Can’t wait to see what you husband makes.
What a great idea! So versatile. Hugs to you
Renae,
I really appreciate all you sweet comments.
Rachel, I love this project. I need to get the rotary sander……candle colors are perfect.
Mary,
I appreciate this. You’d love this project.
Rachel, I love your candle centrepiece! It’s so unique! I love that you put handles on it. Such a great idea! Thanks for sharing your wonderful DIY with us!
Mary-Ann,
Thank you so much. I appreciate you for stopping by. Hope you had a great holiday. Looking forward to a fabulous New Year!
Thanks you so much for this. I love the idea and it looks great! I am looking forward to making one for my dining room table.
Stephanie,
I’m so glad you liked this idea. It’s still one of my favorite all time DIY projects. I use it a lot. Have a blessed week.