How To Make A Distressed Napkin Decoupage Lamp
Easy way to transform a cheap thrifted lamp into a trending decor accessory.
Yield: 1 Lamp
Cost: 8
Equipment
- Razor Edge Scissors
- Paint Brush
- Painters Tape
Materials
- Blue & White Napkins
- Gloss Mod Podge
- Textured Spray Paint
- White Chalk Paint
- Antique Gold Craft Paint
- Black Craft Paint
- Brown Craft Paint
- Thrifted Lamp
Instructions
- Use painters tape to cover any areas you don't wish to paint.
- Spray the lamp base with textured spray paint to add a ruff surface.
- Paint over the textured paint with white chalk paint
- Then paint the metal areas with Antique Gold Paint
- Separate layers of the napkins
- Cut top layer of napkin into smaller pieces with razor edge scissors
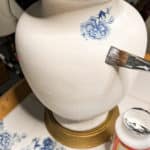
- Apply gloss mod podge to small sections of the lamp base.
- Press the napkin sections onto the mod podge.
- Then apply another layer of mod podge over the napkin to adhere.
- After the entire lamp base is sufficiently covered, use the brown and black paint to add distress areas. Paint some cracked spots and add some smudged areas randomly on the napkins.
- Finally, mix 1 part white chalk paint with 3 parts gloss mod podge and brush over the entire lamp base. Allow a heavier coverage in some areas to enhance the distressed look.
- Note: Test a small are before covering completely to assure that the mixture isn't to heavy. You are wanting a milky coverage not completely white.
- Add new lamp shade and ta da!
Video
Notes
You can apply this same technique for vases or bowls
Choice of napkins and paint colors are optional