How to Build a Rustic Shiplap Christmas Tree: Easy Guide 2024
Looking for a unique Christmas Tree alternative? You will love this step-by-step guide on how to build a shiplap Christmas tree using reclaimed wood boards. This is an easy project to create a unique, rustic farmhouse-style tree. No need to worry if you don’t have reclaimed shiplap because I’ll teach you how to age new wood to get the same rustic look.
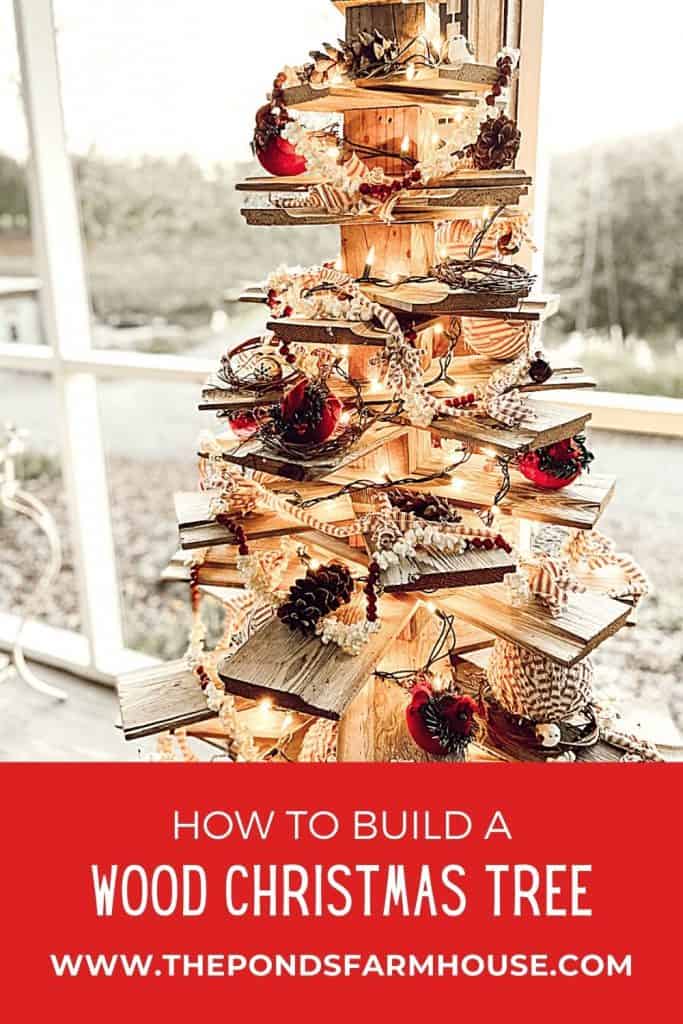
For our first Christmas here at The Ponds, my husband built a wooden Christmas Tree using reclaimed shiplap. We placed it on our screened porch, and it has been a perfect addition to our Farmhouse style. It’s not just for Christmas anymore because I now decorate it for Spring and Fall. I have received so many questions about the tree that I decided to share all the details with you.
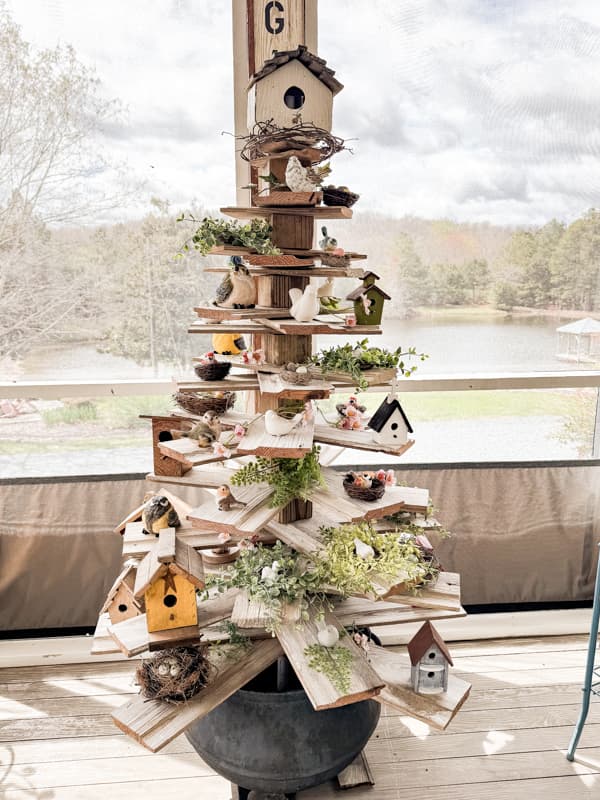
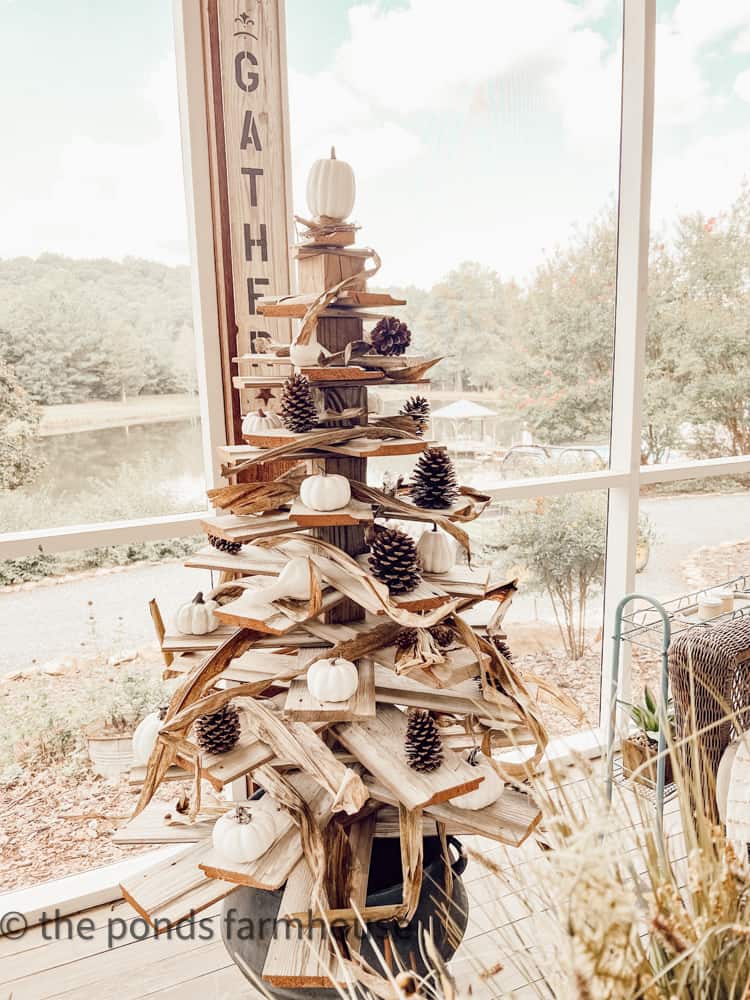
Table of contents
Inspiration for A Shiplap Tree
The inspiration for the DIY shiplap tree came from seeing a small tree made of driftwood at the coast. My dad had a stack of old reclaimed shiplap in his shop, and Brad said he could make a tree using the old wood.
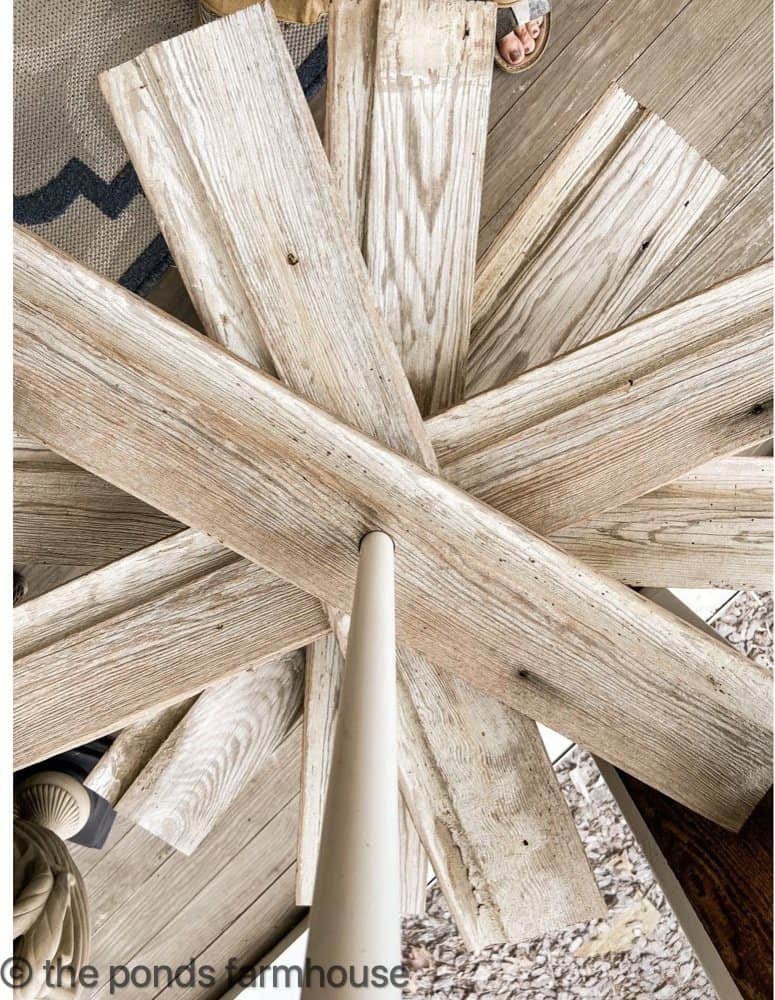
He constructed the tree with individual boards that connected in the middle of the plank so they could move freely. He accomplished this by drilling a hole in the center of each board and using a pipe to hold them in place. The boards can be individually shifted to balance the tree. Didn’t he do good?
(Posts on The Ponds Farmhouse may contain affiliate links. As an Amazon Associate, I earn from qualifying purchases. See the full disclosure details here.)
Materials Needed to Build a Shiplap Tree
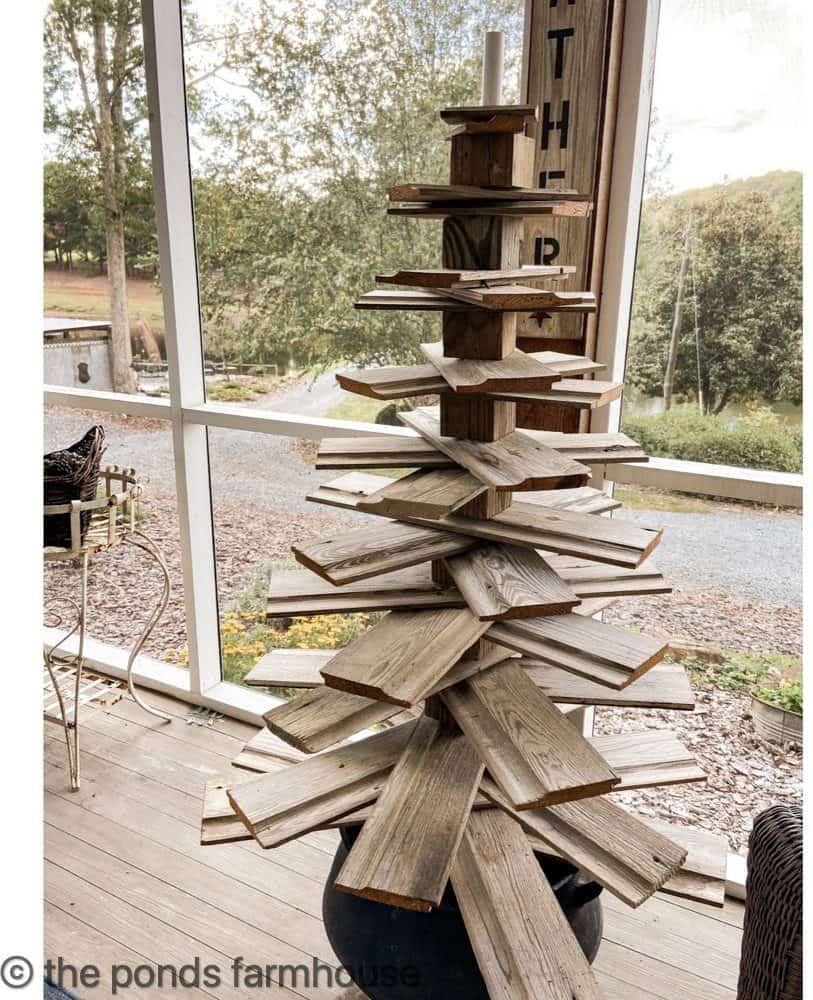
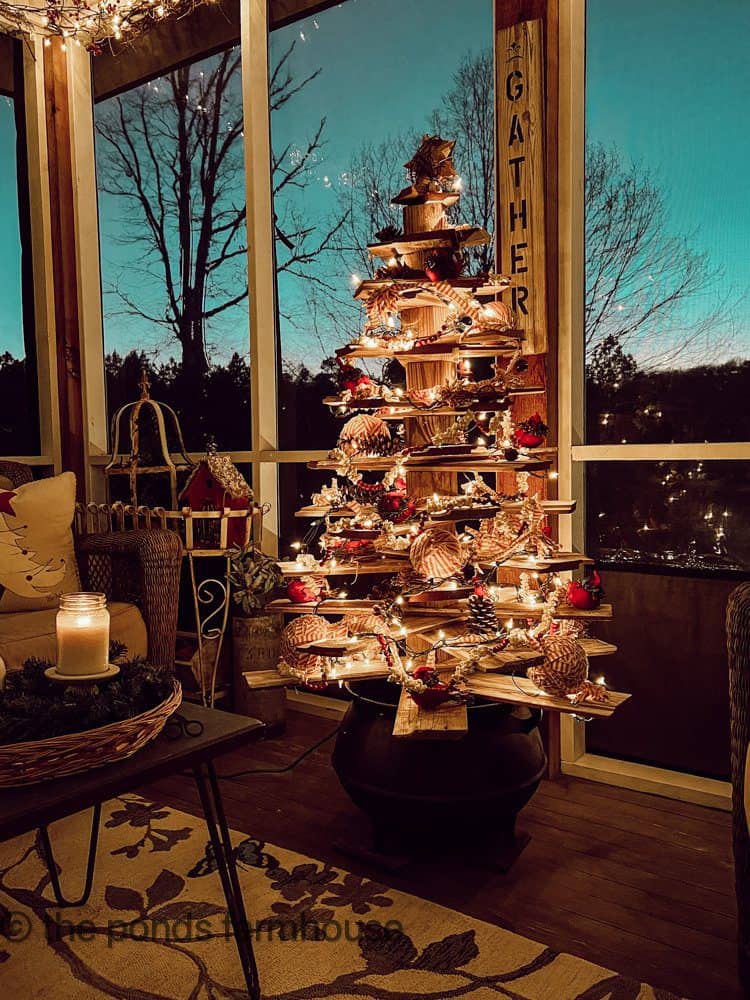
This tree measures 62 inches tall from the bottom block to the top of the center pole. We placed our tree inside a vintage iron pot with legs, so it is slightly taller when assembled.
Before beginning this project, you will want to determine the container you plan to use. The container size will determine the exact amount of materials and lengths needed for your wood tree.
Caution: Choose a container heavy enough to hold the tree steady. This is crucial because heavy wood can easily tip over a container that is not substantial enough. If you have a lightweight container, you can add rock or brick to weigh it down.
Shiplap Wood
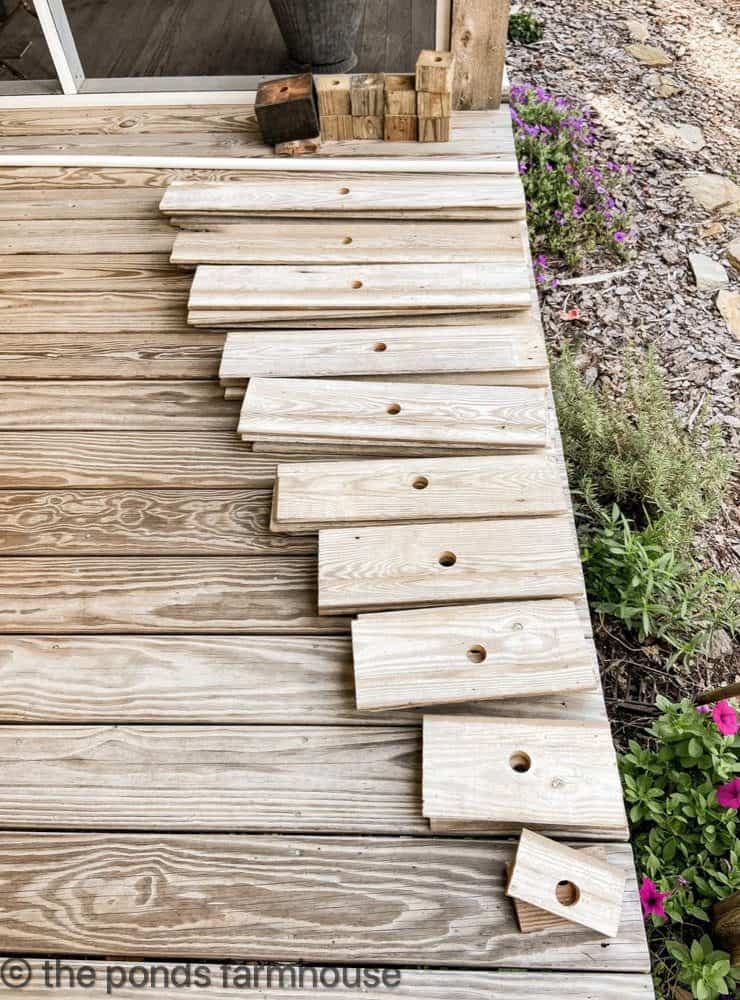
The shiplap boards used on this tree are 5 1/2 inches-wide reclaimed boards.
Cut boards
- 3 of each size – 34″ long, 31″ long, 25″ long, 22″ long, 16″ long, and 13″ long
- 2 of each size – 10″ long and 5 1/4″ long
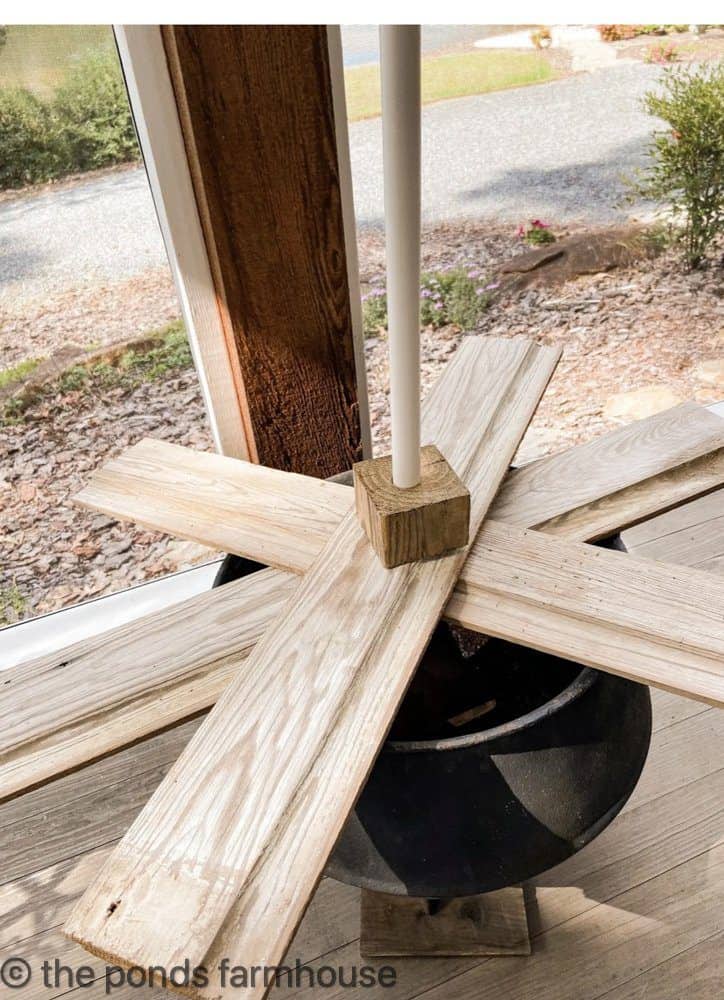
You will need a 4×4 post to cut – 9 – 2 1/2″ blocks
Use a 6×6 Post and cut one – 4″ high block
One 3/4″ PVC Pipe is approx. 55 1/2 inches tall (note: a narrow piece of wood was inserted into the PVC Pipe to prevent bending. If you have a hardwood 3/4″ round dowel rod, you can substitute for the PVC pipe.
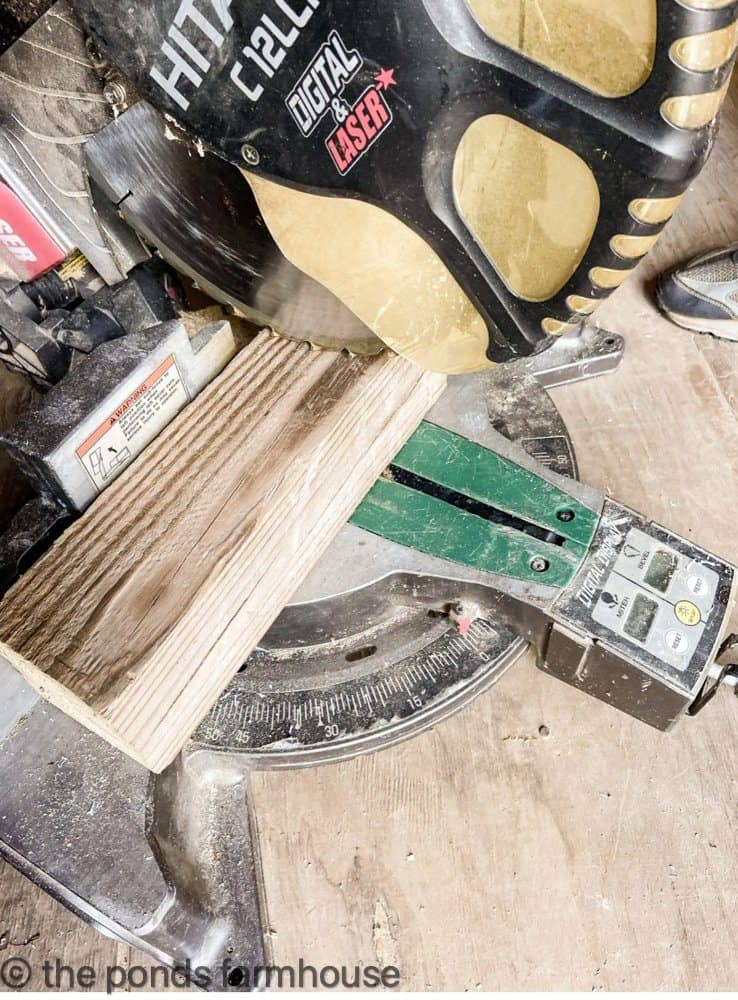
How To Cut Wood Pieces?
First, cut all the wooden pieces to the correct size, using a miter saw to create clean edges. If needed, you can lightly sand the edges with fine-grit sandpaper. Cut all boards based on the above dimensions or measurements determined by your container size.
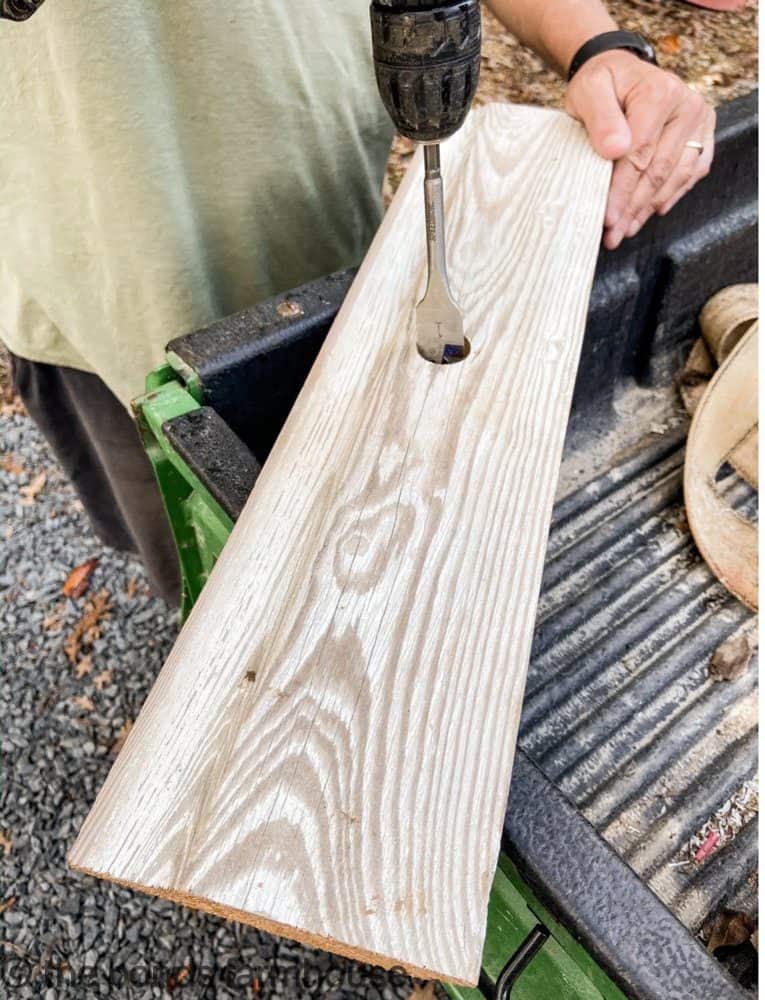
How To Add Center Support?
Next, drill a 1 1/4 ” hole in the center of each cut board and 4×4 post using a cordless drill or drill press. In addition, drill a shallow hole into the center of the 6×6 post. This hole is just deep enough for the PVC pipe to rest inside. You can drill approx—1/2″ deep.
As a reminder, the hole should be larger than the PVC pipe. This will allow for any wood swelling and facilitate assembly.
How To Assemble The Tree
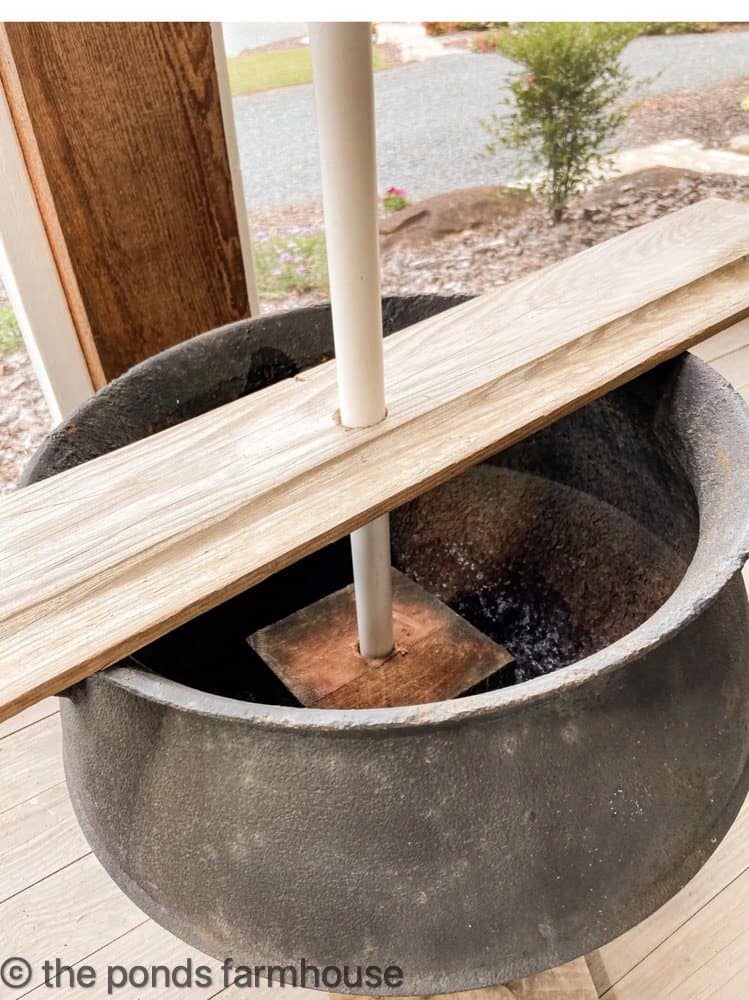
Now, place the 6×6 post inside the container and level it so that the tree is balanced.
Next, place the PVC pipe into the post’s shallow hole and add the shiplap boards to the pipe. Start with the longest boards as you add them to the pipe.
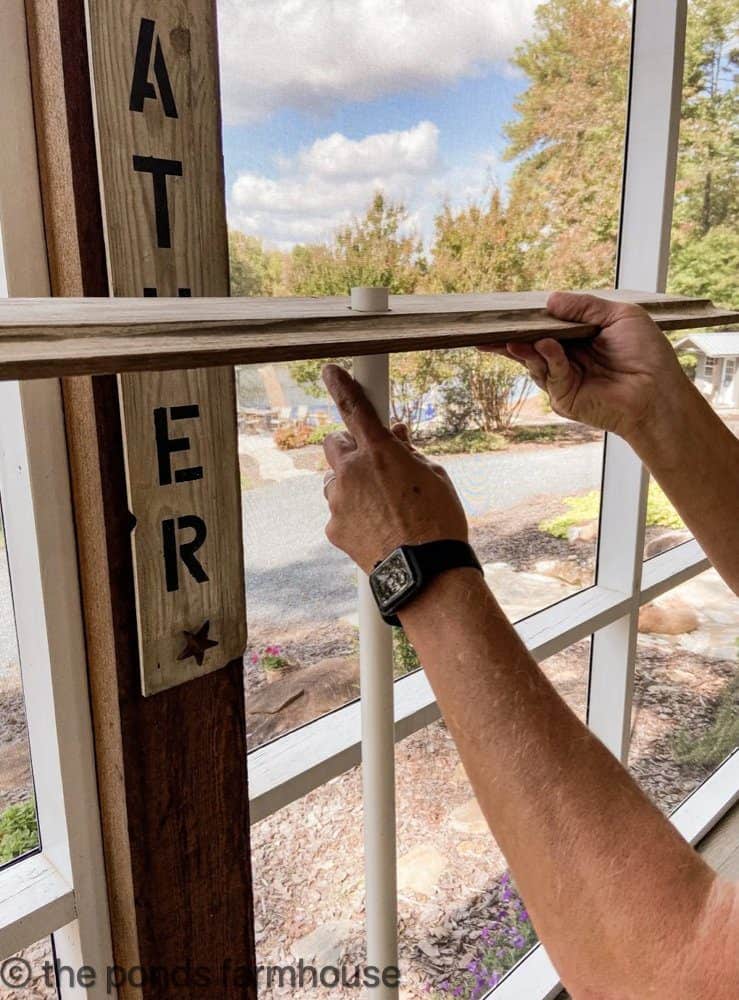
With most containers, the first board rests on top of the container rim and helps to steady the pole.
Alternate the Shiplap Board Placement
To balance the tree, alternate the placement of each board, as shown in the photo.

Add Dividing Blocks
When the size of the boards changes, add one of the 4x4x2 1/2 divider blocks between each one to create space between them. You will lay three boards and then a block. Repeat with three more boards and a block until the tree is filled.
You will continue until all the boards are placed on the pole.
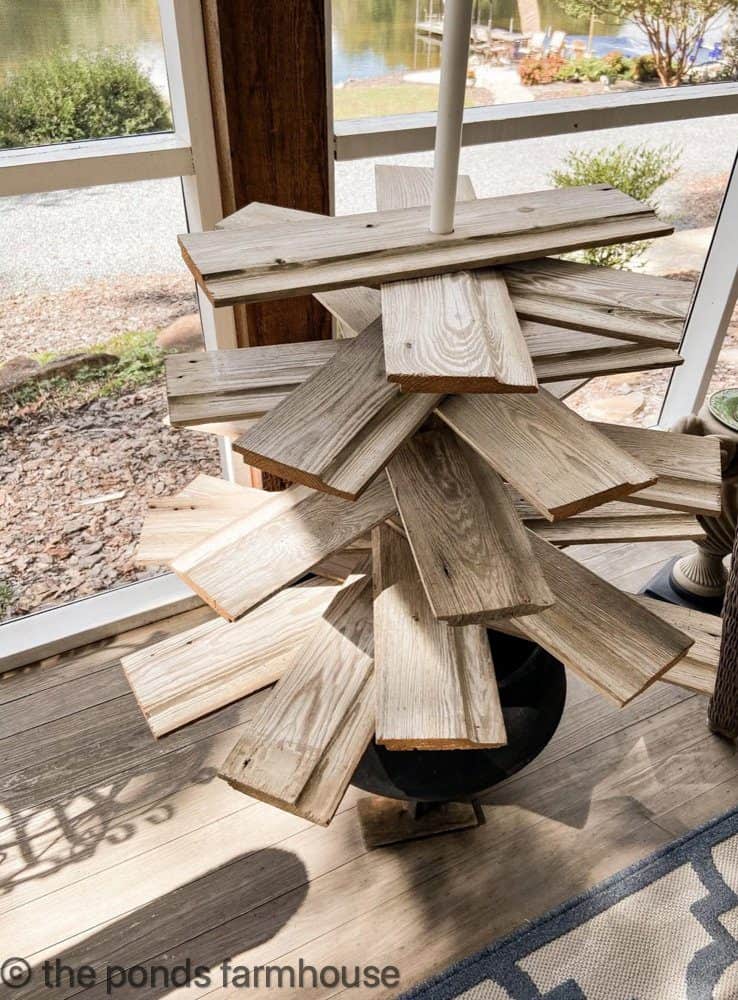
Continue to alternate the board placement so that the tree is balanced and shaped like a Christmas Tree.
Once all the boards are in place, you will have a small section of pipe above the blocks and shiplap. I added a metal star that slips over the exposed pipe as a tree topper; however, you can shorten the pipe before assembly if you prefer less exposure.
How To Age New Shiplap? (optional)
The shiplap boards we used were reclaimed and were already distressed with age. However, you can accomplish the same look with these techniques.
How to Make New Wood Look Aged
First, I recommend staining the wood with a grey oil-based stain such as Minwax Penetrating Classic Gray to age your new shiplap. Allow the gray color to penetrate and dry.
Next, add a white-washed appearance using a dry brush of white chalk paint.
Dry Brush Technique
To achieve a dry brush technique, dip your brush into the paint and wipe off most of the paint with a paper towel or cloth. Then, lightly brush the color over the board’s surface until you have the desired coverage.
In addition, you can distress the wood for a more authentic appearance. This is how we distressed the wood on our DIY kitchen island.
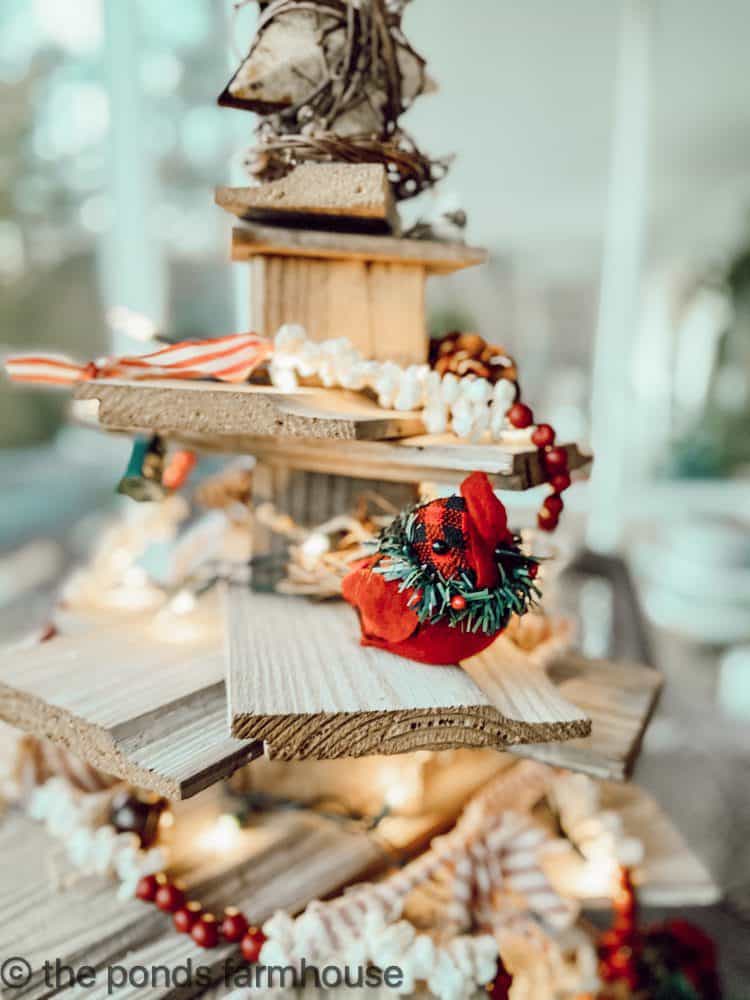
Decorate Shiplap Christmas Tree
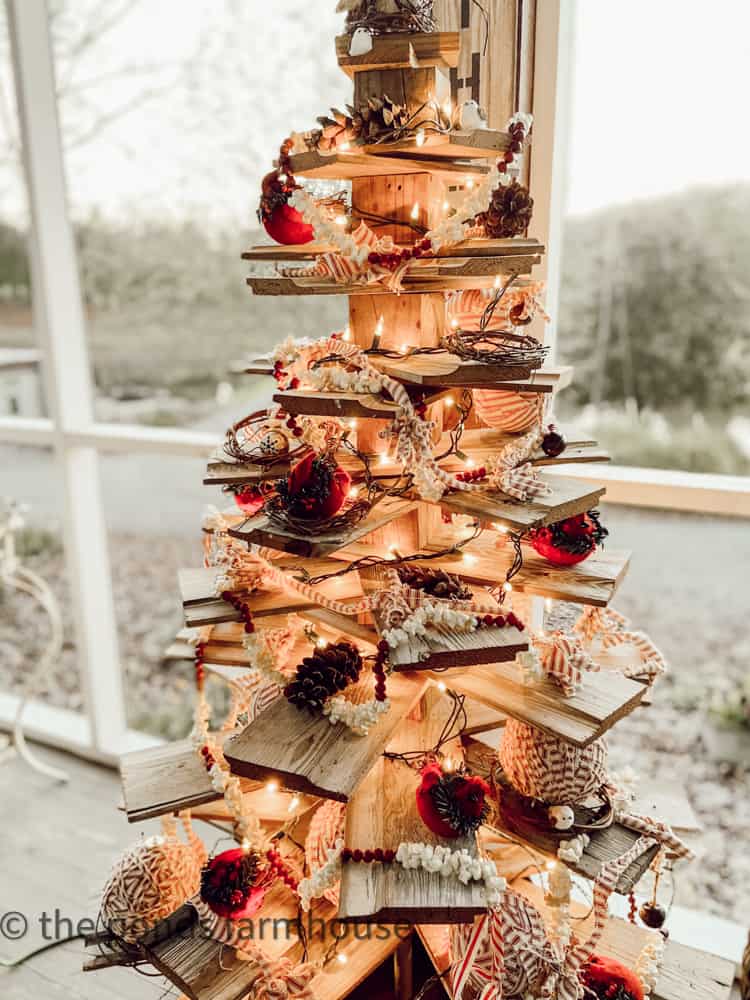
You can use many items to decorate your new wood Christmas tree. This is a close-up view of the wood tree last Christmas. If you’d like to see more from last Christmas, check out this post, where I shared several photos from Christmas Past.
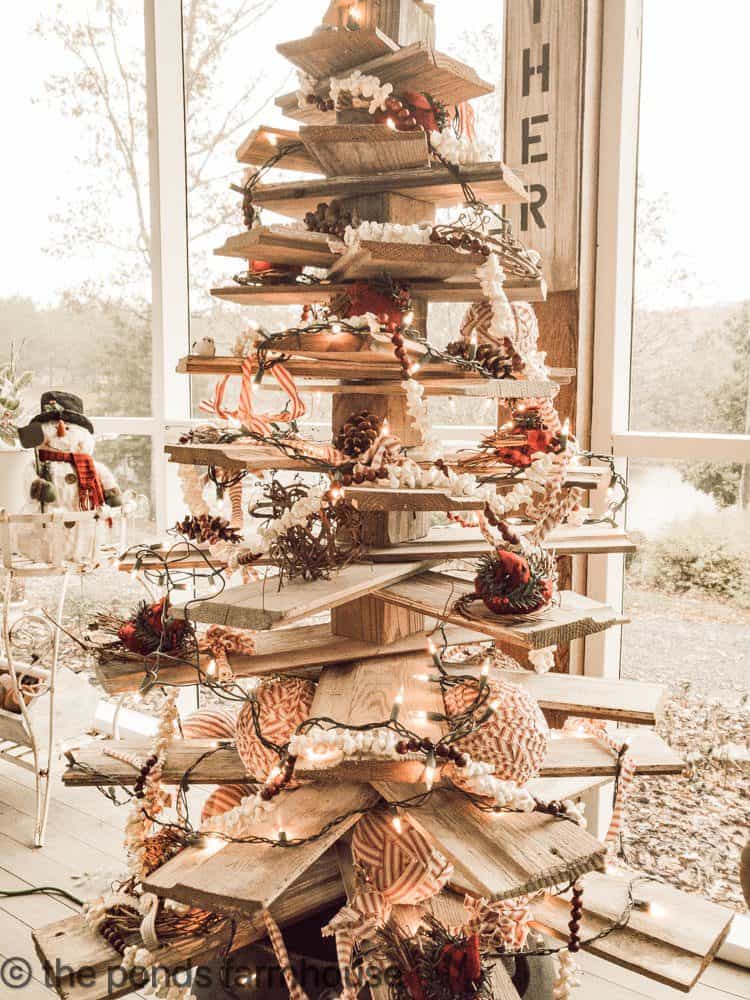
Foraged grapevine and pinecones are nestled on the wooden boards along with red birds and popcorn garland, helping to create a fun outdoor vintage vibe.
Each year, the Shiplap Wood Christmas Tree is placed on the screened porch, where it is a perfect addition once the sun goes down.
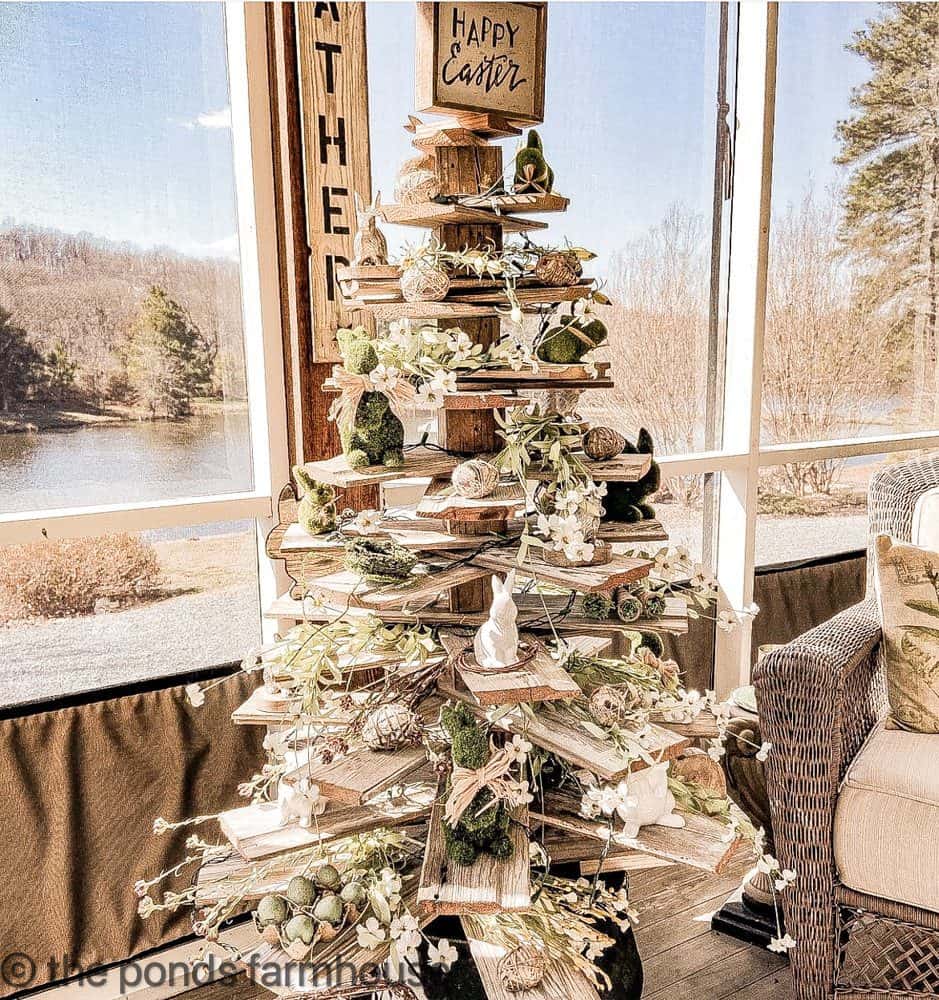
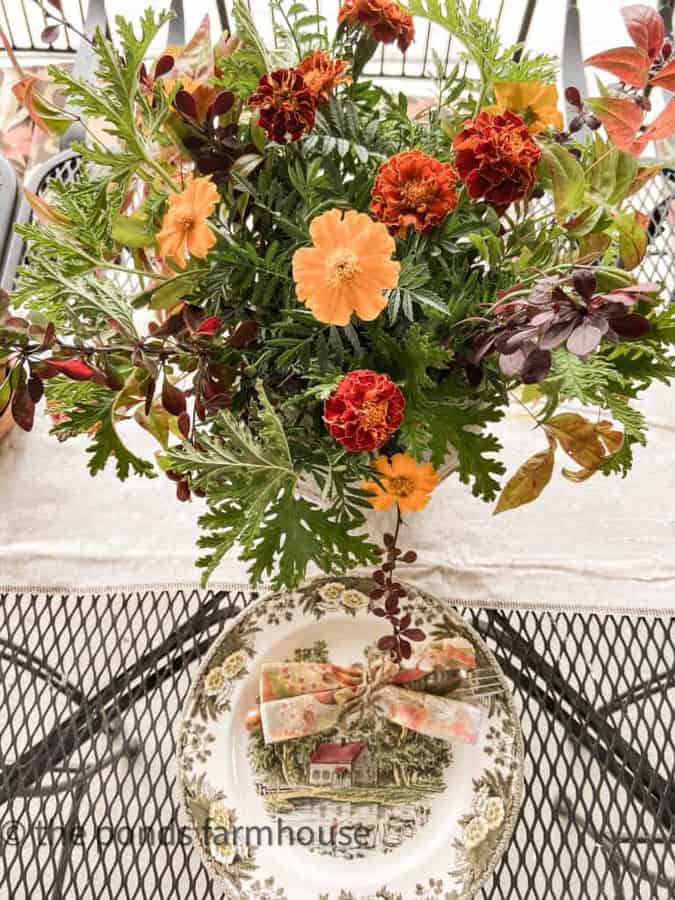
Although I initially used the wood tree for Christmas, I have discovered it’s excellent year-round and filled with seasonal decor. I now decorate it almost year-round.
Here is the shiplap tree dressed for Easter. To see the tour, click here.
How To Store Wood Tree
Another question I am asked is, “How do you store the tree?” When I’m not decorating with the shiplap tree, it is easily disassembled. The wood stacks only take up a small space in our holiday storage area. The iron cauldron stays on the porch year-round, and when the tree is stored, I add flowers or ferns.
Please let me know if you have any questions about making a shiplap tree.
Thanks so much for stopping by today. I look forward to sharing my next adventure with you.

Pin It To Remember It
Did you find some great ideas you’d like to save for future reference? Hover over the images you’d like to save and pin to your favorite Pinterest Boards when you see the PIN button.


Brilliant and Pinned! Thank you.
Miche,
So glad you liked it.
Rachel
This is so amazing that I cannot wait to show the Mister so he can make one for me! He won’t let me touch his power tools. I even love the glow at night and how you’ve decorated it. Just magnificent! Pinned and will totally give you credit when (fingers crossed) I get to make one!
Cindy,
I can’t wait to see what you do.
Rachel
This project is amazing! Love this idea so much, Rachel!
Anne,
Thank you so much. I appreciate this.
Rachel
What a cute idea! I want to do this – I’m sending it to my husband – we have leftover shiplap!!!!
Stacy,
It’s super easy and the good news is it’s so easy to store.
Rachel
I absolutely love this Rachel! Pinned!
Thanks so much Kim!
Hey there! Just wanted to let you know that we loved this so much that we are featuring it over on Farmhouse Friday – Woo hoo! Hope you link up again sometime. Big hugs.
Cindy,
I really appreciate you for sharing this.
Rachel
I love this Christmas tree, I can not wait too make it myself. I am soooo glad I did not buy one yesterday when I was at HL..
Terry,
I’m so glad you like it. Thanks for stopping by.
Rachel
this is such a fun idea, and I love how you’ve decorated it. It’s perfect for a screened porch!
Debra,
Thanks so much for stopping by.
Rachel
Great idea .I am building one for my grandaughter whose moving into new house in two weeks. All the best to you and the family. Tom
Tom.
I’m so glad. Thanks for sharing with me.
Rachel
I’m crazy about this shiplap tree!! We have a stack of fence pickets that would be perfect for this project! If I build it, I’ll be sure to tag you and link back! This idea is such a good one!! Thanks for sharing! Pinned!
Cindy,
I can’t wait to see what you do. Thanks so much.
I loved this so much when I saw it earlier this fall that hubby and I built one. It is on my screen porch decorated for Halloween with little witches and pumpkins. I put orange lights on it. I plan to change the decorations for the different seasons. Thanks so much for the idea. It’s my favorite decoration. Peace
Cindi,
I’m so glad you liked this project. I bet your halloween version is amazing.
This is SO much fun and it lends itself to a lot of different decoration ideas and uses.
Perhaps use the “branches” onto which to place hors d oeuvres and small bowls with nuts, etc?
Thanks for the inspiration.
Benesse,
I’ve never thought of that. Thanks for the input.
It came out so good, love this idea! Pinned.
AnnMarie,
Thanks for your sweet compliment.
Rachel this is such a cute idea. Pinned!
Stacy,
I’m so glad you like it.
Rachel,
I am dying to make this darling shiplap Christmas tree.
Thank you for sharing the tutorial…pinned!
xoxo,
Brendt
Brendt,
I’m so glad you like it. Thanks so much.
Another super creative idea my friend!!
Jennifer,
Thanks so much.
You two knocked it out of the park! Can’t wait to share with my Handyman to build this year! The tree would be really great for 4th of July too!
Jan,
I’ve been using is almost year-round lately so many options. I hope you get yours soon.
I love this. It’s such a clever idea.
Renae,
I really appreciate this.
Thank you so much! for sharing! Absolutely love, love, love this creative project I can do with my daughter Aleigha and love that we can use it all year round with our favorite seasonal decor!!! 💕
Kryston,
Oh, Thank you! I have enjoyed mine every year and I do keep it up through the Spring & recently started using it for fall. Very fun piece. Have a blessed week and Happy Thanksgiving.